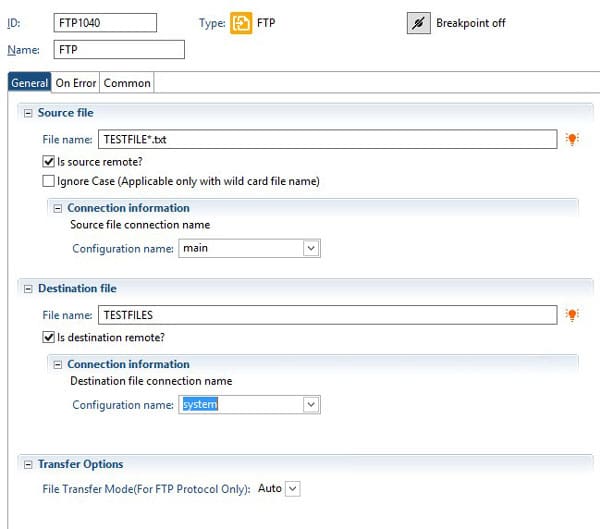
The FTP node can be used to move records from one server to another over FTP. It is important to note that there can be only one FTP configuration per configuration set. So you should create a new configuration set for each FTP server you are using for file transfers.

  • Source File
    • Provide the file name
    • The source is remote if it is not the Landmark server
      • If you are accessing the file via UNC share, you should leave “Is source remote” unchecked
    • Connection information – select the configuration set for the remote server where the file resides (not required if it is a local file)
  • Destination File
    • Provide the file name
    • The source is remote if it is not the Landmark server
      • If you are accessing the file via UNC share, you should leave “Is source remote” unchecked
    • Connection information – select the configuration set for the remote server where the file is being transferred (not required if it is a local file)
  • File Transfer Mode
    • Select Ascii or Bin

The For Each node can be used to loop through records.

  • Iteration
    • Supply a number of iterations, or a variable
  • Expression
    • Typical “for-each” loop
    • Can use variables for each of the expressions
  • Array
    • Provide an array of values
  • XML
    • Loop over elements in an XML document


The FileAccess node can be used for file manipulation on local and remote servers. If you are manipulating files on a remote server, you can access them via UNC share, or you can create a new configuration set that connects to the file server.

  • Configuration name
    • default is system (Landmark)
  • Execution mode
    • Read from file
      • This can be used with a data iterator
      • Pass the output data (line) of the file to the iterator
    • Write to file
      • Creates the file and then writes to it
    • Append to file
      • Appends to an existing file
    • Check file exists
      • Returns an error that can be trapped if it doesn’t exist
    • Delete file
    • List files

After completing federation and restarting LSF and Landmark, landmark authentication fails.  The security authen log returns the following error:  sun.security.validator.ValidatorException: PKIX path building failed.

This can happen if secured ldap bind is being used.  With the secured ldap bind (using ldaps protocol and port 636), the certificates from the AD server are missing from the java keystore on the landmark server.  This can happen even if you are using SSOP on LSF for authentication.  To resolve the issue, export the certificates from the AD server and import them into the java keystore.  If LSF was bound to AD, the certificates should already be on the LSF box.  They can be copied over from LSF and imported to the keystore on the landmark server using the following example.


D:\JDK\bin\keytool.exe  -keystore D:\JDK\jre\lib\security\cacerts -importcert -alias ADca –file D:\cacert.cer

D:\JDK\bin\keytool.exe  -keystore D:\JDK\jre\lib\security\cacerts -importcert -alias ADroot –file D:\root.cer


Error:


Wed May 31 09:49:13.112 MDT 2017 – default-724934462: Error encountered while getting users DN. Please see logs for details[egn1ldmam2ike26udaqvs9rs2g]Could Not Bind With privileged identity. User [lawson]simple bind failed:ldap.domain.com:636

Stack Trace :

javax.naming.CommunicationException: simple bind failed: ldap.domain.com:636 [Root exception is javax.net.ssl.SSLHandshakeException: sun.security.validator.ValidatorException: PKIX path building failed: sun.security.provider.certpath.SunCertPathBuilderException: unable to find valid certification path to requested target]

at com.sun.jndi.ldap.LdapClient.authenticate(LdapClient.java:219)

at com.sun.jndi.ldap.LdapCtx.connect(LdapCtx.java:2788)

at com.sun.jndi.ldap.LdapCtx.<init>(LdapCtx.java:319)

at com.sun.jndi.ldap.LdapCtxFactory.getUsingURL(LdapCtxFactory.java:192)

at com.sun.jndi.ldap.LdapCtxFactory.getUsingURLs(LdapCtxFactory.java:210)

at com.sun.jndi.ldap.LdapCtxFactory.getLdapCtxInstance(LdapCtxFactory.java:153)

at com.sun.jndi.ldap.LdapCtxFactory.getInitialContext(LdapCtxFactory.java:83)

at javax.naming.spi.NamingManager.getInitialContext(NamingManager.java:684)

at javax.naming.InitialContext.getDefaultInitCtx(InitialContext.java:313)

at javax.naming.InitialContext.init(InitialContext.java:244)

at javax.naming.InitialContext.<init>(InitialContext.java:216)

at javax.naming.directory.InitialDirContext.<init>(InitialDirContext.java:101)

at com.lawson.security.authen.LawsonLDAPBindLoginProcedure.getDNForUser(LawsonLDAPBindLoginProcedure.java:446)

at com.lawson.security.authen.LawsonLDAPBindLoginProcedure._authenticate(LawsonLDAPBindLoginProcedure.java:233)

at com.lawson.security.authen.LawsonLDAPBindLoginProcedure.authenticate(LawsonLDAPBindLoginProcedure.java:681)

at com.lawson.security.authen.LawsonLoginSchemeImpl.authenticate(LawsonLoginSchemeImpl.java:1701)

at com.lawson.security.authen.LawsonProgrammaticAuthenticatorImpl.authenticate(LawsonProgrammaticAuthenticatorImpl.java:198)

at com.lawson.security.authen.LawsonProgrammaticAuthenticatorImpl.authenticate(LawsonProgrammaticAuthenticatorImpl.java:100)

at com.lawson.rdtech.gridadapter.provider.LmrkSessionProvider.createGridPrincipal(LmrkSessionProvider.java:287)

at com.lawson.rdtech.gridadapter.provider.LmrkSessionProvider.validatePassword(LmrkSessionProvider.java:254)

at com.lawson.rdtech.gridadapter.provider.AbstractSessionProviderBase.logon(AbstractSessionProviderBase.java:134)

at com.lawson.rdtech.gridadapter.provider.LmrkSessionProvider.logon(LmrkSessionProvider.java:159)

at sun.reflect.NativeMethodAccessorImpl.invoke0(Native Method)

at sun.reflect.NativeMethodAccessorImpl.invoke(NativeMethodAccessorImpl.java:62)

at sun.reflect.DelegatingMethodAccessorImpl.invoke(DelegatingMethodAccessorImpl.java:43)

at java.lang.reflect.Method.invoke(Method.java:498)

at com.lawson.grid.proxy.ProxyServerImpl$ProxyRequestThread.invoke(ProxyServerImpl.java:2715)

at com.lawson.grid.proxy.ProxyServerImpl$ProxyRequestThread.processRequest(ProxyServerImpl.java:2502)

at com.lawson.grid.proxy.ProxyServerImpl$ProxyRequestThread.runThread(ProxyServerImpl.java:2425)

at com.lawson.grid.util.thread.PooledThread.run(PooledThread.java:137)

at java.lang.Thread.run(Thread.java:745)

Caused by: javax.net.ssl.SSLHandshakeException: sun.security.validator.ValidatorException: PKIX path building failed: sun.security.provider.certpath.SunCertPathBuilderException: unable to find valid certification path to requested target

at sun.security.ssl.Alerts.getSSLException(Alerts.java:192)

at sun.security.ssl.SSLSocketImpl.fatal(SSLSocketImpl.java:1949)

at sun.security.ssl.Handshaker.fatalSE(Handshaker.java:302)

at sun.security.ssl.Handshaker.fatalSE(Handshaker.java:296)

at sun.security.ssl.ClientHandshaker.serverCertificate(ClientHandshaker.java:1514)

at sun.security.ssl.ClientHandshaker.processMessage(ClientHandshaker.java:216)

at sun.security.ssl.Handshaker.processLoop(Handshaker.java:1026)

at sun.security.ssl.Handshaker.process_record(Handshaker.java:961)

at sun.security.ssl.SSLSocketImpl.readRecord(SSLSocketImpl.java:1062)

at sun.security.ssl.SSLSocketImpl.performInitialHandshake(SSLSocketImpl.java:1375)

at sun.security.ssl.SSLSocketImpl.writeRecord(SSLSocketImpl.java:747)

at sun.security.ssl.AppOutputStream.write(AppOutputStream.java:123)

at java.io.BufferedOutputStream.flushBuffer(BufferedOutputStream.java:82)

at java.io.BufferedOutputStream.flush(BufferedOutputStream.java:140)

at com.sun.jndi.ldap.Connection.writeRequest(Connection.java:426)

at com.sun.jndi.ldap.Connection.writeRequest(Connection.java:399)

at com.sun.jndi.ldap.LdapClient.ldapBind(LdapClient.java:359)

at com.sun.jndi.ldap.LdapClient.authenticate(LdapClient.java:214)

… 30 more

Caused by: sun.security.validator.ValidatorException: PKIX path building failed: sun.security.provider.certpath.SunCertPathBuilderException: unable to find valid certification path to requested target

at sun.security.validator.PKIXValidator.doBuild(PKIXValidator.java:387)

at sun.security.validator.PKIXValidator.engineValidate(PKIXValidator.java:292)

at sun.security.validator.Validator.validate(Validator.java:260)

at sun.security.ssl.X509TrustManagerImpl.validate(X509TrustManagerImpl.java:324)

at sun.security.ssl.X509TrustManagerImpl.checkTrusted(X509TrustManagerImpl.java:229)

at sun.security.ssl.X509TrustManagerImpl.checkServerTrusted(X509TrustManagerImpl.java:124)

at sun.security.ssl.ClientHandshaker.serverCertificate(ClientHandshaker.java:1496)

… 43 more

Caused by: sun.security.provider.certpath.SunCertPathBuilderException: unable to find valid certification path to requested target

at sun.security.provider.certpath.SunCertPathBuilder.build(SunCertPathBuilder.java:141)

at sun.security.provider.certpath.SunCertPathBuilder.engineBuild(SunCertPathBuilder.java:126)

at java.security.cert.CertPathBuilder.build(CertPathBuilder.java:280)

at sun.security.validator.PKIXValidator.doBuild(PKIXValidator.java:382)

… 49 more


Wed May 31 09:49:13.113 MDT 2017 – default-724934462: Error encountered while getting users DN. Please see logs for details[egn1ldmam2ike26udaqvs9rs2g]Could Not Bind With privileged identity.

Wed May 31 09:49:13.113 MDT 2017 – default-724934462: Failed to get DN for user: lawson

Microsoft Windows Server provides a tool called ADSI Edit, which can be used to get a closer look at your LDAP configuration.

Please be careful when you are moving around in LDAP, as mistakes here can destroy your Lawson Security configuration.

Your first step should always be to back up LDAP. Nogalis provides another article with instructions on how to do that. (How to Backup LDAP in Lawson v10)

Next, verify that the necessary features are installed on your Windows Server.

  1. Open your Windows Features & Roles
  2. Navigate to Features
  3. Check for AD LDS Snap-Ins and Command-Line Tools
    1. If not installed, install it

Once the AD LDS Snap-Ins are installed, go to Start > Run > mmc.exe

Go to File > Add/Remove Snap-Ins

Add the ADSI Edit Snap-In

Right-click on ADSI Edit, and select “Connect to…”

Type in your LDAP server name under “Select or type a domain or server”

  • The LDAP URL can be found in your Lawson install.cfg file, under the setting LDAPHOST

Type in your Connection Point

  • This can be found in Install.cfg under the LDAPBINDDN setting (everything except the ldap admin username)

If you need to provide credentials to connect to your LDAP instance, click “Advanced…”

Select “Specify Credentials”

Type in the LDAP admin username

  • This can be found under the LDAPBINDDN setting in Install.cfg

Type in the port number

  • LDAPPORT in Install.cfg

Select “Simple bind authentication” if applicable

Click OK and OK

You are now ready to expand the tree on the left side of the application, where you can view resources and other security settings

Sometimes users would like to go directly to Lawson through Ming.le, rather than clicking on the Lawson Icon (globe).  To help users with this requirement, you can generate a URL that opens Lawson when Ming.le is loaded.

  1. Open your Ming.le site, and click on the Globe 
  2. Make note of the URL
    1. Add the following text to the URL: ?LogicalId=lid://infor.lawson-s3.1
    2. For example https://lawson.server.com/Lawson%20S3/SitePages/Default.aspx?LogicalId=lid://infor.lawson-s3.1
  3. Users can either bookmark this new URL, or you can add it to your Intranet site

When applying updates to Lawson System Foundation, you may see an error returned  in the log saying, “Error: Fatal Not all files were delivered.”  While the red highlighted message does not indicate exactly what the problem is, the actual error can be seen earlier in the log.  It reads: “Failed to load inst-gendir-coreadmin/bin/launtdll.dll to D:\lsfdev\gen\bin\launtdll.dll – Delete failed.”  You may then try to delete the launtdll.dll manually.  If so, you will see another error message that the file is in use.  The file becomes locked by the Lawson Unix Utilities when the environment starts.  To resolve the issue, you can set the Lawson environment service to start manually.  Then restart the server.  After the restart, you should be able to manually delete the dll and run the update again.  Selecting the Reload option will redeliver all of the files and the update should continue past the original error.

These nodes can be used to encrypt/decrypt data or files for secure transmission.  Before you begin, you must have a PGP key pair generated by a network security administrator.

Both nodes have the same properties:

  • Configuration name – Select the configuration you wish to use for this encryption. If the configuration name is blank, the default will be used.
  • Encryption (or Decryption) Type – PGP is the only encryption type available
  • Service Name – This is the name of the service that was assigned for the generated key pair.
  • Data Source – Encrypt raw data, or provide a file name to encrypt the contents of the file.
  • Data – Provide the data or the full path of the file that will be encrypted.

Sometimes when you are troubleshooting issues with Ming.le, your support technician will ask which version of Ming.le you are using, Enterprise or Foundation.  There are a couple of ways to determine this.

First, you can open your Ming.le website and direct your attention to the header.  If you see the “social” apps section in the header (highlighted below), you are running Ming.le Enterprise.  Otherwise, you are running Foundation.

Enterprise:

Foundation:

Another way to determine your Ming.le version is to click the “i” icon at the top of the page .


Enterprise:

Foundation:

Users may find that the browser returns blank.htm when accessing the Lawson portal screen.  With Internet Explorer, this can be caused by Compatibility View Settings.  To verify the setting, click on the cog in the upper right of the browser.  From the menu under the cog, select Compatibility View Settings.  A window will return showing the Compatibility View Settings.  Uncheck the box labeled “Display intranet sites in Compatibility View” and refresh the page.  Also within the Compatibility View Settings, verify that the  site is not in the list under “Websites you’ve added to Compatibility View.”  If the site is in the list, click on the site and then click the Remove button.  After closing the Compatibility View Settings window, refreshing the page should then allow the portal to be displayed properly by returning the login screen.  If the compatibility view is not available or changes to it are not allowed, other browsers such as Chrome or Firefox could also be used to access the page.