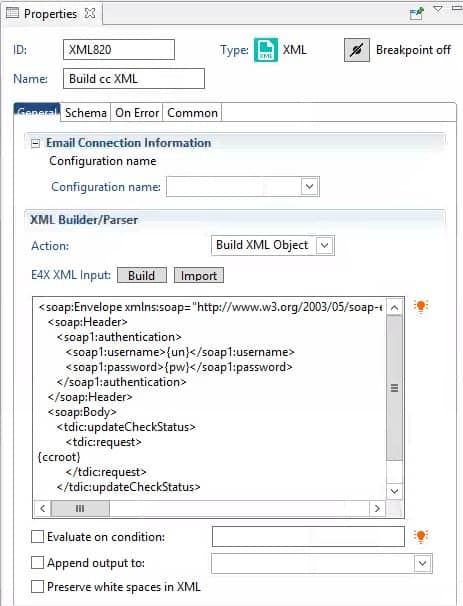
The Return Activity node in IP Designer is useful for stopping the flow when specified conditions are met, and returning information to the calling process, such as a trigger.

In this example, we have an error connection between the file access node and the Return Activity Node.  In this case, if there is an error in the File Access Node, information will be returned to the calling process by the Return Activity Node.

The Return Activity node can return four fields: Error Code (integer), Information Code (integer), Return Message (string), Output Data (string or binary).  These four fields can be populated with variables or with hard-coded information.  In the example, we chose to populate them with the codes and messages generated by the File Access node.

As you can see, the Return Activity Node is a very efficient method of stopping a process and returning the results to the calling application.

The Custom Activity node in IP Designer is useful for implementing functionality that is not available in the “canned” IPA nodes.

Infor delivers four Custom Activities with IPA. These are “Encoding”, “Assert”, “ComponentTest”, and “FlowRunner”. You can also create your own custom activities by creating Java Bean classes and adding them to the Grid.

Custom Activities are an advanced piece of IPA and should be configured by a developer.

To add a Custom Activity to the grid,

  1. Create a jar file for the supporting classes
  2. Place the jar file you created in the $LACFGDIR/LPS/jars folder
  3. In the Infor Grid, click the gear icon 
  4. Select Applications > Your Application
  5. Click Edit Properties 
  6. Under the LPA heading, find pfi.customActivity.beans and click the “value” link
  7. Add the full classname of your Java Bean class
    1. Class names are separated by semi-colons
  8. Restart the IPA node
  9. Launch IP Designer
  10. Add a Custom Activity node, and click to refresh the list. Your activity should be displayed now.

To use your Custom Activity, select the configuration name for email notification. Select the Activity from the list, then choose the action from within that activity. Then configure your input variables.

The Branch node in IP Designer is useful for an “if-then-else” type of logical statement.

After adding a branch node to your process, make sure the node is connected (using the connection tool) to previous nodes. That way, all your variables will be available. Then, click on the branch node and add conditions. You can add many conditions, and you can use variables and/or javascript code to create the comparisons.

In this example, we have very simple conditions:

When you create a connection from a branch to another node, you will be prompted to select the condition that should lead to that node:

NOTE: If you need to connect your branch node to a different node, DO NOT DELETE the connection. That will delete your entire condition!!! Simply grab the end of the arrow and move it to the correct node, or right click on the connection to unlink it and create another connection to the correct node.

In Lawson version 10.0.8, you may encounter performance issues followed by the dreaded “error occurred outside of IOS” notification.  If you run into these issues, check your event viewer.  If you see an error like the one below, you may need to reinstall the Micro Focus license manager.  Here are the steps to do install it.

  1. Go to ftp://asqcust:[email protected]/supportdownload/CES/lmsetupx64.msi and download the msi
  2. Place the file on your Lawson application server
  3. On the Lawson application server, stop the Sentinel RMS License Manager service
  4. Double-click the installation file and follow the steps
  5. The Sentinel RMS License Manager service should be restarted after the installation is complete

Sometimes Lawson errors can be very cryptic and difficult to troubleshoot.  Sometimes you will have a very specific error in the ios.log or other system logs, and a search on InforXtreme produces ZERO results.  It can be quite frustrating!  Don’t forget that you have another place to check for errors.  Always remember to check your Windows Event Viewer for another “perspective” on the error.  Sometimes a Google search or even InforXtreme search on the error text in Event Viewer will actually produce results where the log search didn’t.  Some examples I have found are an error in the importdb script, which provided more information for an Infor ticket I had open, and a MicroFocus license manager error that led me to a KB and a download that solved some performance issues for us.  So, the bottom line is, don’t forget to check server logs in addition to Lawson and WebSphere logs!

The Assignment node in IP Designer is pretty straightforward and simple to use, but it can also be very useful and flexible. The first step to using the assignment node is to create and initialize your variables in the start node properties.

The assignment node can be used to set simple variables. It can also be used for more complex assignments. Here is a simple assignment, created by clicking :

You can also use javascript and regular expressions in your assignment node to manipulate strings. This example uses a simple “if” statement to assign a variable (created by clicking ):

This example takes a line from a data iterator, splits it on the “,” , and removes unwanted characters using regular expressions. It assigns that string to the “impCompany” variable, which was created and initialized in the Start node.

This is a simple way to create a database alias.


Create your Alias:

  1. Log on with Options
    infor-bi-office-plus-create-a-database-alias-1
  2. Select the Repository
    infor-bi-office-plus-create-a-database-alias-2
  3. On the Database Structure Pane – Click New Database Alias button
    infor-bi-office-plus-create-a-database-alias-3
  4. Fill in information:
    infor-bi-office-plus-create-a-database-alias-4

Your Alias is now created:

infor-bi-office-plus-create-a-database-alias-5

Here are 2 simple ways to create ad-hoc reports:


Once you have your Alias create

infor-bi-office-plus-ad-hoc-report-2-simples-ways-to-create-ad-hoc-reports-1

  • Click New Ad-hoc Report on the Office Plus section of the Ribboninfor-bi-office-plus-ad-hoc-report-2-simples-ways-to-create-ad-hoc-reports-2

    or

  • Double click the cube in the left side paneinfor-bi-office-plus-ad-hoc-report-2-simples-ways-to-create-ad-hoc-reports-3

Note: Each new ad-hoc report will open in a new window.

How to Change Dimensions


Drag and drop your Dimension (column header) to the Dimension in the grid, the dimension will be switched.

infor-bi-office-plus-ad-hoc-report-how-to-change-dimensions


Right click on the data for more formatting options:

infor-bi-office-plus-ad-hoc-report-how-to-change-dimensions-2


Limit/filter reporting data by double clicking on column header.

infor-bi-office-plus-ad-hoc-report-how-to-change-dimensions-3_mini


Double click dimensions in the table , the List Designer will open in the right side of the report for selecting specifics

infor-bi-office-plus-ad-hoc-report-how-to-change-dimensions-4


List Designer will assist with Structure Selection, Filter, Sort, Attributes (and Advance options)

infor-bi-office-plus-ad-hoc-report-how-to-change-dimensions-5

An easy guide on how to add charts to Ad-hoc Reports


Click Presentation

infor-bi-office-plus-ad-hoc-report-adding-charts-to-ad-hoc-report-1


Chart and Table – puts a chart above the table

infor-bi-office-plus-ad-hoc-report-adding-charts-to-ad-hoc-report-2

Table and Chart – puts chart below table
infor-bi-office-plus-ad-hoc-report-adding-charts-to-ad-hoc-report-3


Change Chart Type. Done!