If install-lpa.pl fails with exit code 2, make sure your OS account is configured. To configure the OS account, type command secadm provision os-C -o -a in a Landmark command window. Then try restarting the Landmark update.
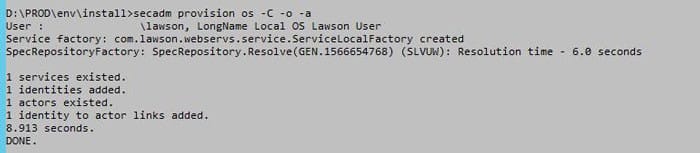
If install-lpa.pl fails with exit code 2, make sure your OS account is configured. To configure the OS account, type command secadm provision os-C -o -a in a Landmark command window. Then try restarting the Landmark update.

To customize the login instructions on your AD FS login screen, first you need to download the theme that will be updated. Then, you will update the onload.js script with your custom code, and then reset the theme to use the updated onload.js. Open PowerShell as administrator on the AD FS server, and follow these steps:
Download your theme:
export-adfswebtheme -name “<your theme name>” -DirectoryPath “<local directory>”
Modify the onload.js file located at <local directory>/script/onload.js:

Upload your modified onload.js file:
set-adfswebtheme -targetname <your theme name> -additionalfileresource @{Uri=’/adfs/portal/script/onload.js’;Path=”<local directory>/script/onload.js”}

The theme name that is delivered with the AD FS configuration is “default”, but you have the option of creating and customizing your own themes.

To update the left-hand illustration on your AD FS login screen, open PowerShell as administrator on the AD FS server, and type the command:
set-adfswebtheme -targetname <your theme name> -illustration @{path=”<path to the image>”}
The theme name that is delivered with the AD FS configuration is “default”, but you have the option of creating and customizing your own themes.


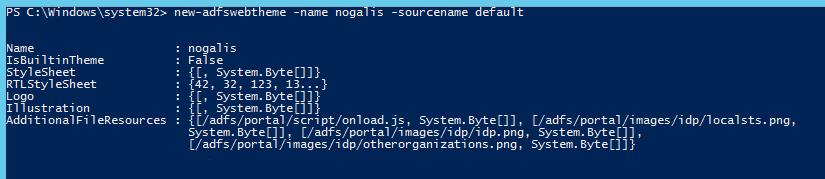
The theme name that is delivered with the AD FS configuration is “default”, but you have the option of creating and customizing your own themes. To create a custom theme, open PowerShell as administrator on the AD FS server, and type the command:
new-adfswebtheme -name <your theme name> -sourcename <the theme to copy>
For your first theme, you will probably want to use “default” as the source.
To activate your theme, type command:
set-adfswebconfig -activatethemename <your theme name>

To update the company logo on your AD FS login screen, open PowerShell as administrator on the AD FS server, and type the command:
set-adfswebtheme -targetname <your theme name> -logo @{path=”<path to the image”}
The theme name that is delivered with the AD FS configuration is “default”, but you have the option of creating and customizing your own themes.
![]()
![]()

Lawson allows you to use distribution codes that allow for percentages to be negative which would create a deduction. Book the invoice at normal 100% for the expense account and use the distribution code to book the discounts to the proper GL accounts. The amount of the invoice will need to be adjusted to reflect the deductions taken.
If there is a vendor who always gets the same deductions, you can add the distribution code to their AP10 Vendor Record and it will always default onto invoices for that vendor.

IP Designer is no longer downloaded from InforXtreme, starting with IPA version 11.
The link to download can now be found in the validation URLs that are generated during the install. These web pages can be found on your Landmark server at LADIR/validationurls-<productline>.htm.

Landmark version 11 still has the validation URLs in the LADIR folder, but the Rich Client download link has moved.
To access the Rich Client download, use the URL https://<LANDMARK-SERVER>/canvas/native/. You will find all the Rich Client links at this location.
NOTE: In v11, the validation URLs page contains the link to download IP Designer.

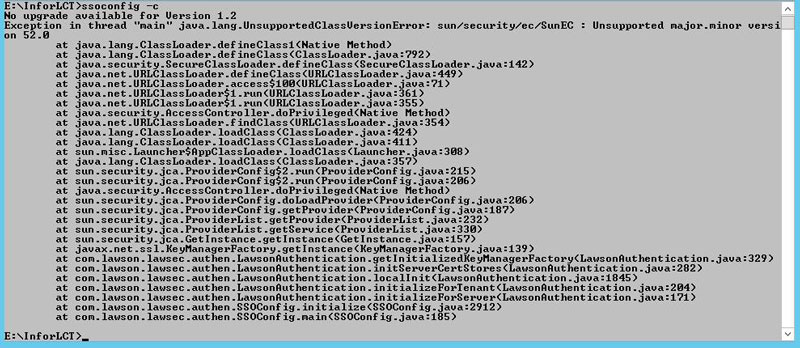
UnsupportedClassVersionError occurs when running Lawson command line utilities. This could mean that Lawson is using an incompatible version of Java. Make sure you have a compatible version of java installed and activated. If that is the case, then check your enter.cmd file and make sure it isn’t manually setting the JAVA_HOME variables to the incorrect version of java. If it is, update to point to the correct location.
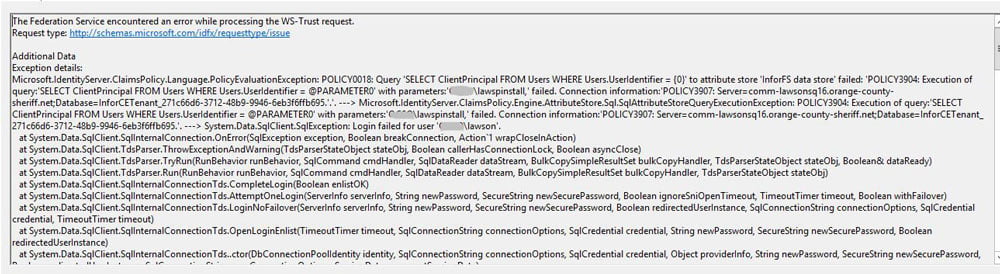
If you are unable to log into Infor Federation Services (IFS) with a very vague error message, check the event viewer on the AD FS server to see if there are any more descriptive messages there. A database login issue could indicate that the install user for IFS doesn’t have the proper permissions on the database. Make sure the Lawson and spinstall accounts both have full access on the two databases that are created by the IFS install.