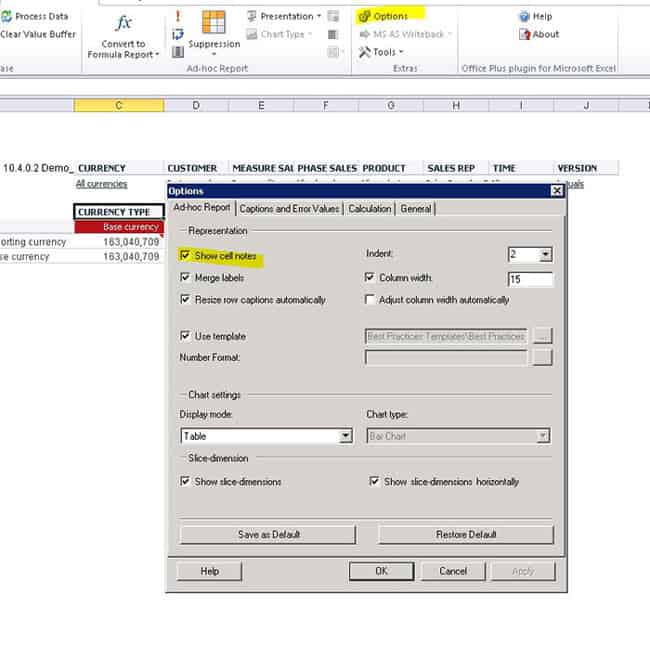
How to add notes to cells

Make sure “Show cell notes” is enabled

infor-bi-office-plus-ad-hoc-report-adding-notes-to-cells-1

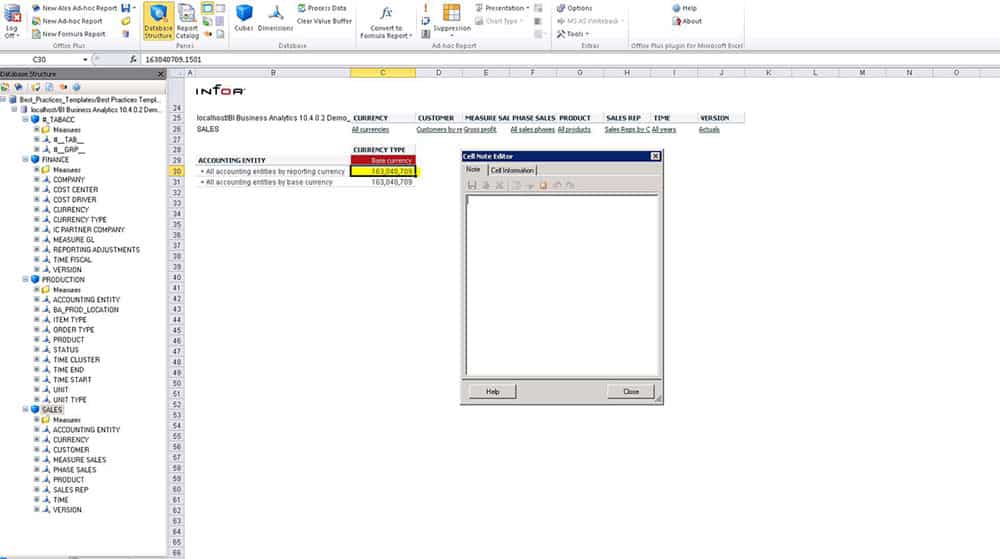
Double click the cell you want to add your note
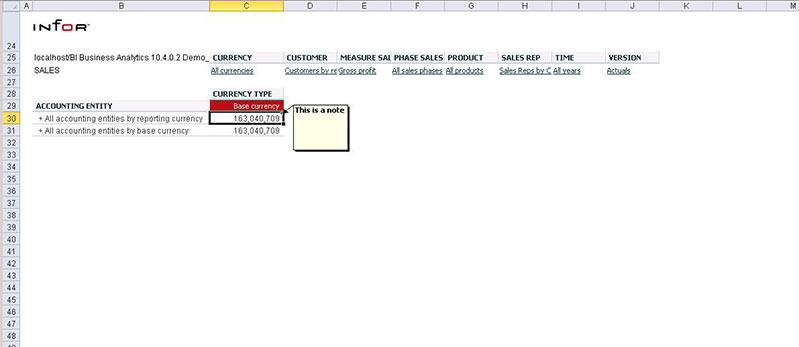
infor-bi-office-plus-ad-hoc-report-adding-notes-to-cells-2

infor-bi-office-plus-ad-hoc-report-adding-notes-to-cells-3


And you’re done!

Once you have done all your Infor work to create your files for submitting to IRS, the steps below will help you get your file submitted successfully. The final files are generated when you run the BN299.

Download the schema package from the IRS website: Schema Package – IRS

Follow instructions on validating the files generated from Infor. See attached KB from Infor View Attachment

Example of file names:

1094C_Request_XXXXX_YYYYMMDDXXXXXXXXXXZ.xml

1094C_Request_XXXXX_YYYYMMDDXXXXXXXXXXZ-Manifest.xml

An XML Reader Application is needed to validate the files. Altova XMLSpy application is a good program to use for this. Follow the steps in the above KB article to validate the files.

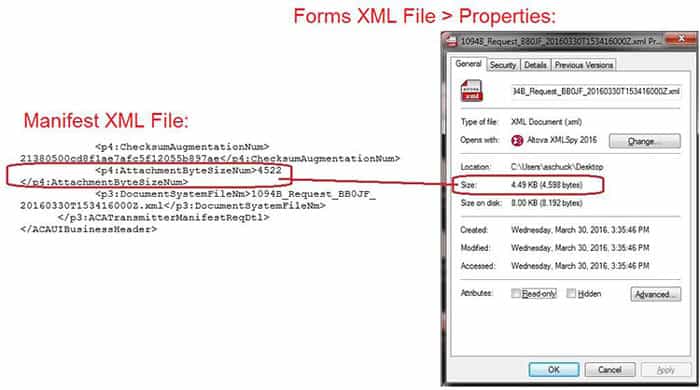
Once you make the changes that are noted in the XML Validator you will need to update the Checksum value in the Manifest.xml

submitting-aca-affordable-care-act-to-irs-1

Checksum verifies the integrity of the file. Download the utility FCIV. FCIV (File ChecksumIntegrity Verifier) is utility from Microsoft that computes (MD5 and SHA1) and verify Integrity of the File.

From the command prompt:

  1. Browse to the location where your files and fciv.exe is located
  2. Type program name + file name (ex. fciv.exe 1094C_Request_BB9LL_20160629T100009000Z.xml)
  3. Press enter
  4. The unique value should be placed in the ChecksumAugmentationNum tag in the Manifest.xmlsubmitting-aca-affordable-care-act-to-irs-2

You also will need to make sure the AttachmentByteSizeNum is correct. This can change when you make changes to the file.

submitting-aca-affordable-care-act-to-irs-3

See attached KB from Infor for details. View Attachment

  1. Locate the Forms XML File.
  2. Right click on the file, select Properties
  3. Locate the Manifest XML File.
  4. Right click and open using Wordpad
  5. Find <p4:AttachmentByteSizeNum> entry
  6. Replace the existing byte size entry with the byte size found in the Forms XML File properties.
  • In this example: Change Manifest Size: 4522 to match Forms XML File size: 4598
  1. Save update
    submitting-aca-affordable-care-act-to-irs-4


And we’re done!

You may be used to deleting users jobs through jobdef.

how-to-delete-a-lawson-users-jobs-more-efficiently-1

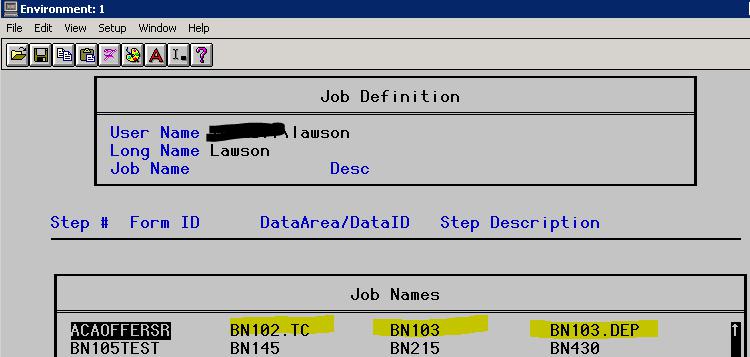
This works, though you must select each job individually and press delete. So it’s not very efficient.

A better way do to this is jobinq

In lid >> jobinq <DOMAIN\UserName>

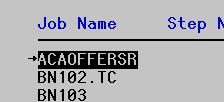
This will open up a window listing all the jobs of the user:

how-to-delete-a-lawson-users-jobs-more-efficiently-2

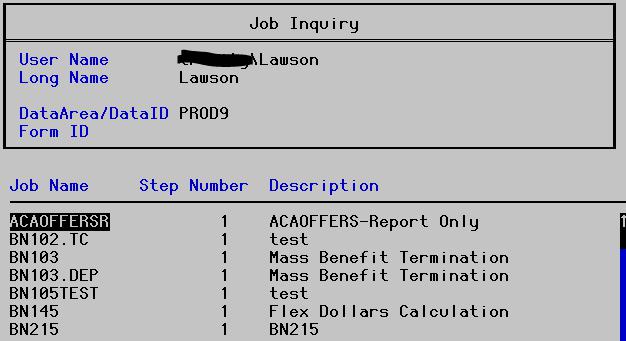
Now you can select multiple jobs with the HOME key:

how-to-delete-a-lawson-users-jobs-more-efficiently-3

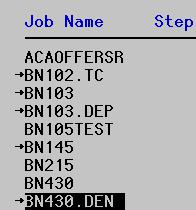
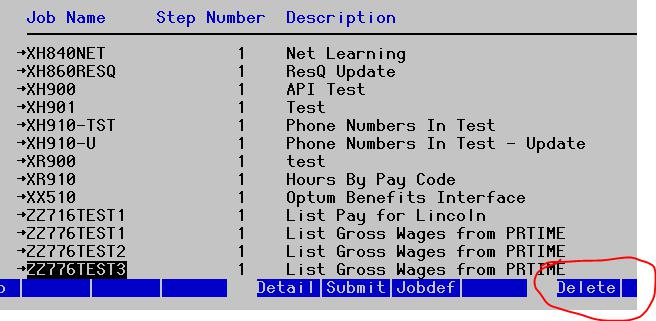
If you want to select ALL jobs and delete them, select first job with HOME key.

how-to-delete-a-lawson-users-jobs-more-efficiently-4

Scroll all the way to the bottom of the job list and press END key on the very last Job and press F9 to delete:

how-to-delete-a-lawson-users-jobs-more-efficiently-5

Done. Good luck!

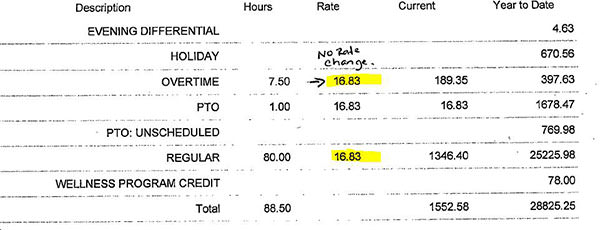
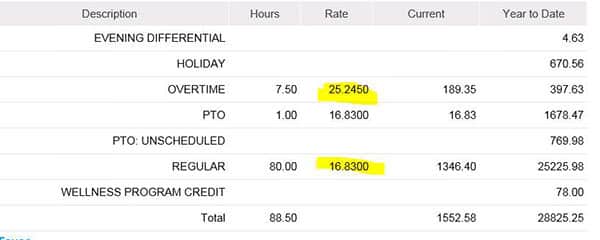
After upgrading to Infor 10 with Employee Self Service, when users view their Printable Pay Stub the Overtime Rate was displaying Regular Rate (see screen print #2).

Screen Print #2

ot-pay-rate-displaying-incorrectly-1

To resolve this issue:

  1. in emss_config.xml change “calc_hourly_rate” = “true” (location: lawdir\web\lawson\xhrnet\xml\config)
  2. The user requires access to their data. Through Lawson Security Administrator grant access to EMPLOYEE table fields: EXEMPT-EMP, SALARY-CLASS, TAX-STATE, WORK-STATE (see screen print #3 for “Printable Pay Stub” displaying correctly).

Screen Print #3

ot-pay-rate-displaying-incorrectly-2

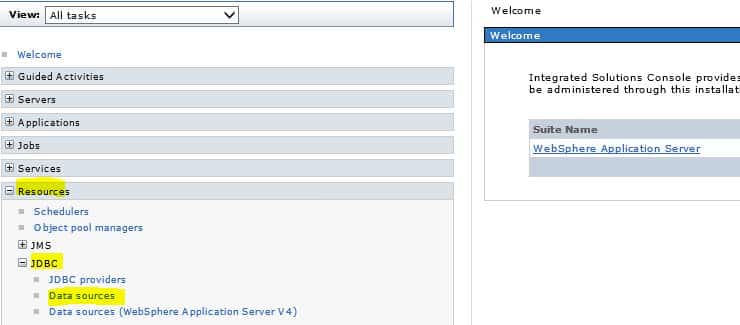
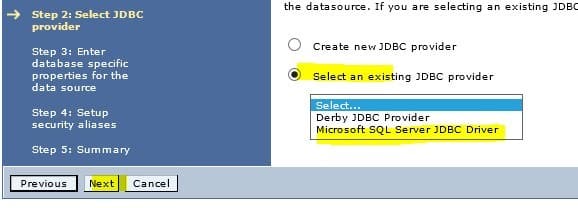
Login and get to the main menu of websphere

Then go to Resources >> JDBC >> Data sources:

how-to-create-new-datasource-for-lbi-in-websphere-1
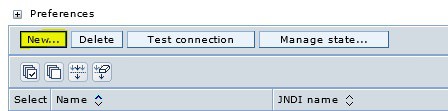
Select New to create a new DataSource:

how-to-create-new-datasource-for-lbi-in-websphere-2

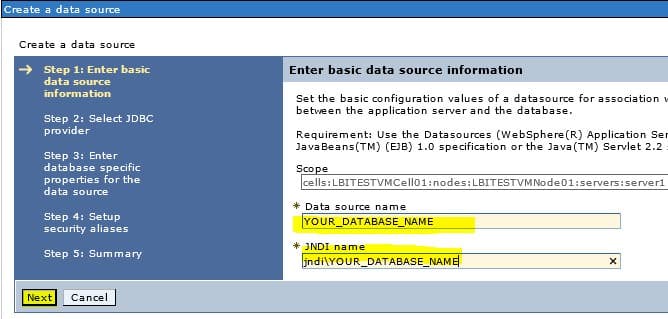
Type in the name of your DataSource and your database name as so (place the jndi\ in jndi name field):

how-to-create-new-datasource-for-lbi-in-websphere-3

Select existing JDBC provider >> Microsoft SQL Server JDBC Driver (Most common)

how-to-create-new-datasource-for-lbi-in-websphere-4

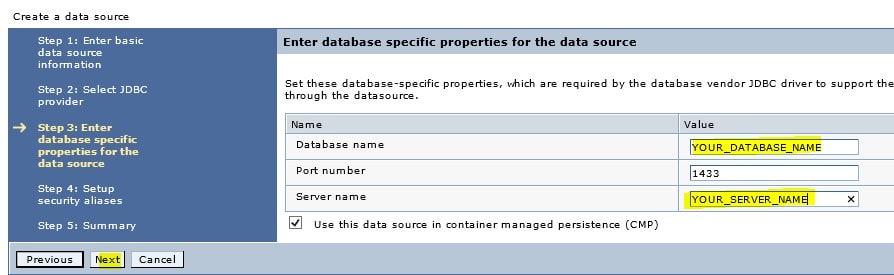
Enter in your database name and the server your database sits on:

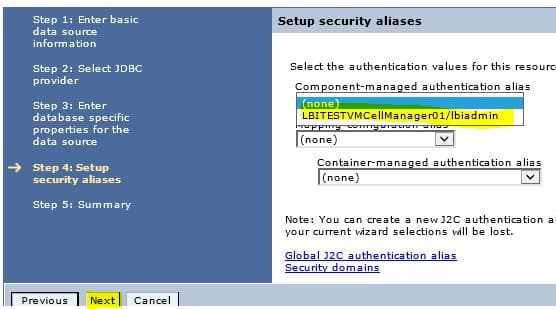
Select your Admin user for Component-managed authentication alias.

how-to-create-new-datasource-for-lbi-in-websphere-6

Review your setup and click Finish:

how-to-create-new-datasource-for-lbi-in-websphere-7


Go test your newly created DataSource in from a SmartNotification or LBI Report that uses that DataSource.


Enjoy!

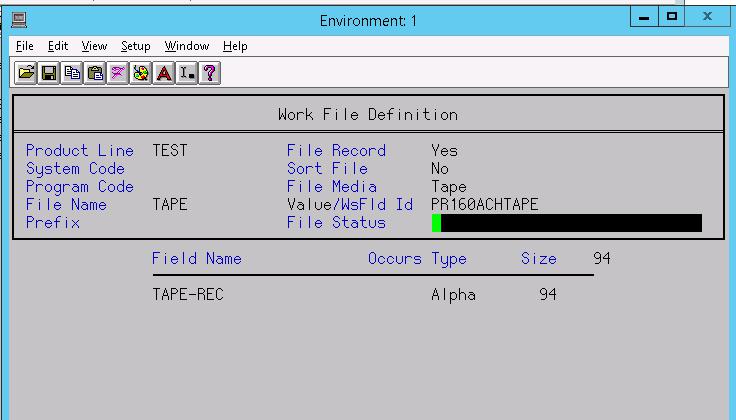
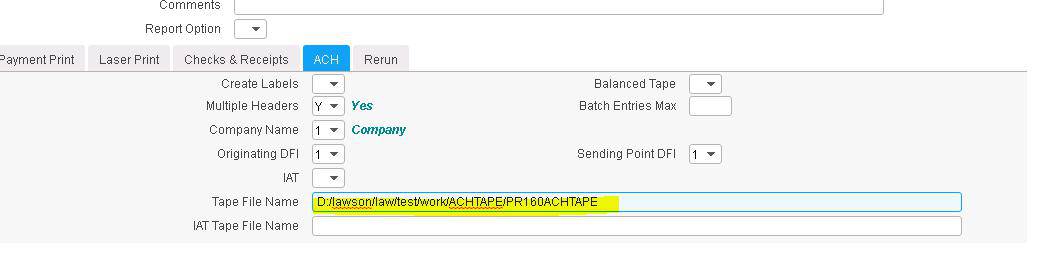
If you upload the ACH file generated by PR160 to your bank, chances are you will need to fix the formatting after your upgrade to version 10. Some banks require the 94-character fixed width format, rather than the sequential format that is the Lawson default. Here are the steps to update your ACH file format.

  1. In LID, type in the command workdef
  2. Search for your product line and the File name TAPEpr160-ach-output-format-1
  1. File Media should be “Tape”
  2. The default “Value” for file name is PR160-ACHTAPE. If you need to drop the file under a custom name, you will enter it in the “Value”. If you want to keep the default, leave that field blank.pr160-ach-output-format-2
  1. Click enter twice to save your changes
  2. The PR160-ACHTAPE file is defaulted to save in the user’s print directory. If you want it saved somewhere else, you can supply the filename on the PR160 job. If you supply a file path on PR160, make sure the file name matches the “Value” field in workdef.pr160-ach-output-format-3
  1. In Lawson Security, make sure that your Batch role has access to the cnvexp development token

Every time an employee makes a benefits change, a new record is stored in the benefits table.  Additionally, a new record is stored in the employee’s deduction master table for each deduction related to that benefit.  If these records are allowed to accumulate unchecked, this can slow down payroll processing and even cause errors.  The larger the benefits and deductions table become, the slower payroll batch jobs will run.  These batch jobs, such as PR140, loop through each record in these benefits and deductions tables so that the correct deductions are applied.  Some of these batch jobs have a limit of the number of records allowed, so if an employee has deductions that exceed that limit, the job will error out.  Also, traversing through these records can greatly slow down processing.

To help alleviate these issues, we recommend running the BN430 benefits purge program periodically.  When you are processing payroll, if you see an error similar to “26 20591 PRDED-DED-TABLE must be increased; Cur size 0500”, chances are you have an employee with too many benefits changes, and need to run the BN430.  But, before you receive this error, you should make the benefits purge part of a normal maintenance process.  Ideally, payroll users would make this part of the payroll process each pay period, and choose a “Purge Through Date” corresponding to your company’s record retention period.Purging-Benefits-Data

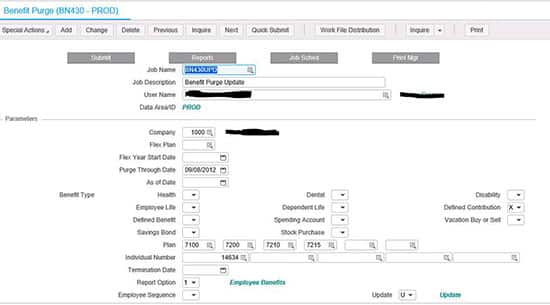
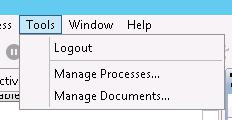
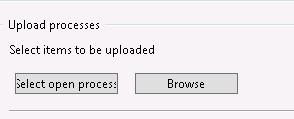
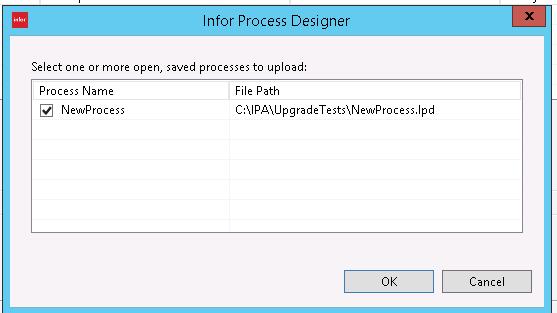
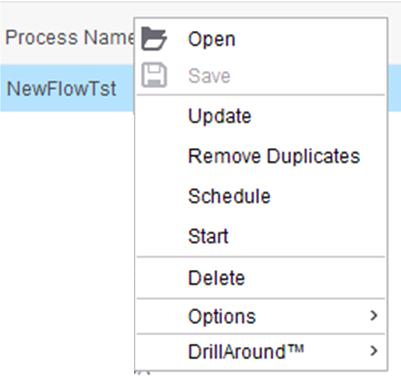
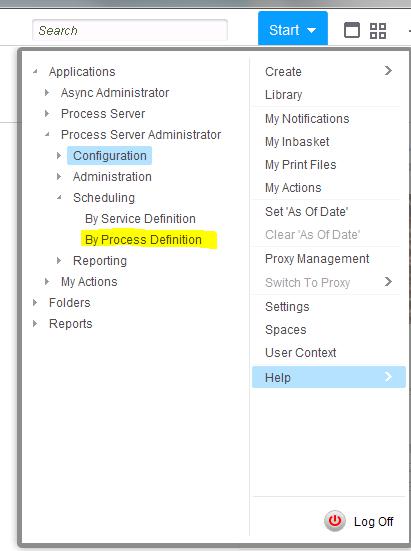
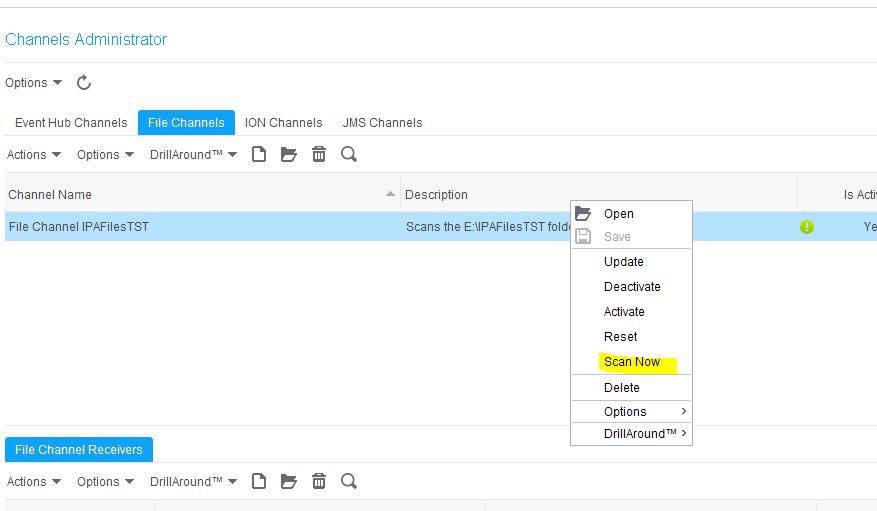
Upload Your Process from IP Designer

  1. Log into IP Designer
  2. Create a new process
  3. Upload the process to your server by clicking the up arrow icon Scheduling a Process in IPA-1, or by clicking:
    1. Tools > Manage Processes > Select Open ProcessScheduling a Process in IPA-2Scheduling a Process in IPA-3
    1. Choose the process you wish to upload, then click OKScheduling a Process in IPA-4
    1. The process now appears in the list. Click “Upload”.Scheduling a Process in IPA-5

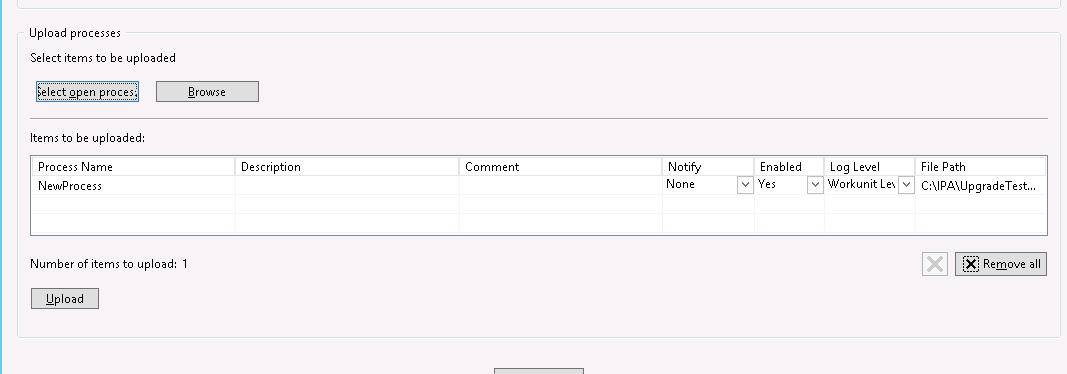
Create a Trigger in Rich Client

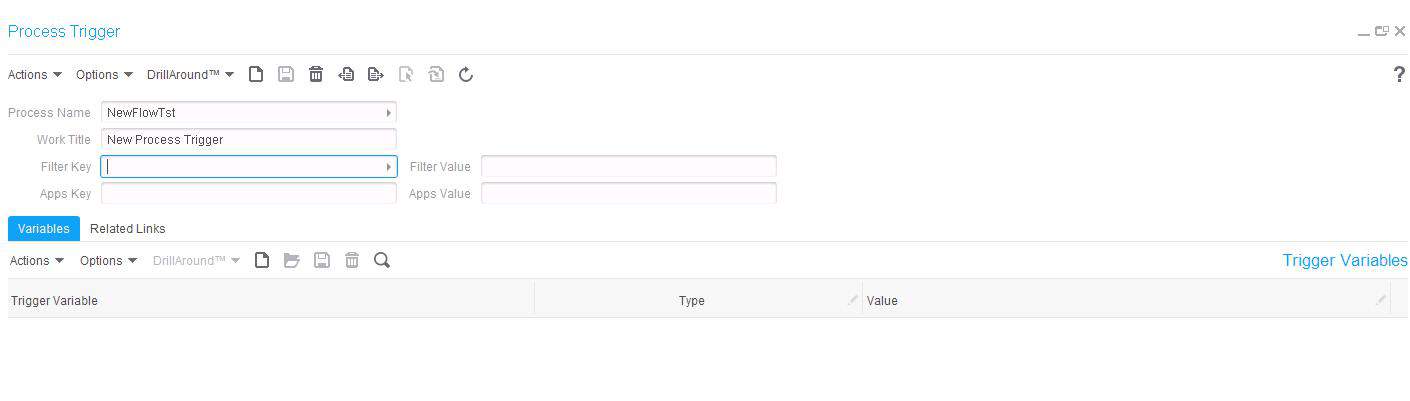
Now that your process is uploaded to the IPA system, it is time to create a trigger for the process. Once you have created your trigger, you will be able to:
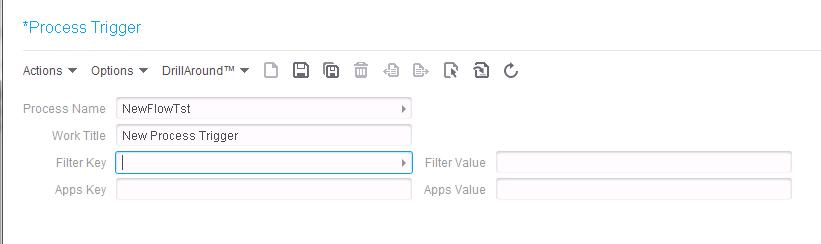
  • Run the process manually
  • Schedule the process
  • Configure the process as part of a File Channel
  • Trigger the process from a Lawson S3 screen
  1. Log into Rich Client
  2. From the Start menu, navigate to Applications > Process Server Administrator > Scheduling > By Process DefinitionScheduling a Process in IPA-6
  1. Click Actions > Create, or click the “blank sheet” icon Run A Process-6Scheduling a Process in IPA-7
  1. Fill in the Process Trigger informationScheduling a Process in IPA-8
    1. Process Name – Click the arrow to search for your newly-uploaded process
    2. Work Title – Important: this field does not appear to be required, but if you do not fill it out, you will receive an error in the scheduler, and the flow will not run

5. Click Save Create a File Channel in IPA-7

6. Once you click Save, you will have an opportunity to add variables that need to be passed into the flow

Scheduling a Process in IPA-9

Run the Process Manually

There may be occasions where you need to run a process ad-hoc. Once you have created your trigger, you will be able to do this.

  1. Log into Rich Client
  2. From the Start menu, navigate to Applications > Process Server Administrator > Scheduling > By Process DefinitionScheduling a Process in IPA-6
  1. Find your Process in the Process Triggers list
  2. Right-click and select Start, or highlight the flow, and select Actions > StartScheduling a Process in IPA-10Scheduling a Process in IPA-7
  1. The process will begin running, and a work unit will generate
  2. To check the status of your process, navigate to Start > Applications > Administration > Workunits > WorkunitsScheduling a Process in IPA-11
  1. Double-click on the workunit to see the resultScheduling a Process in IPA-12

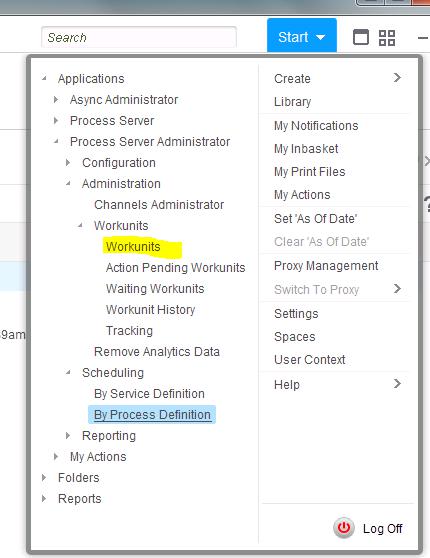
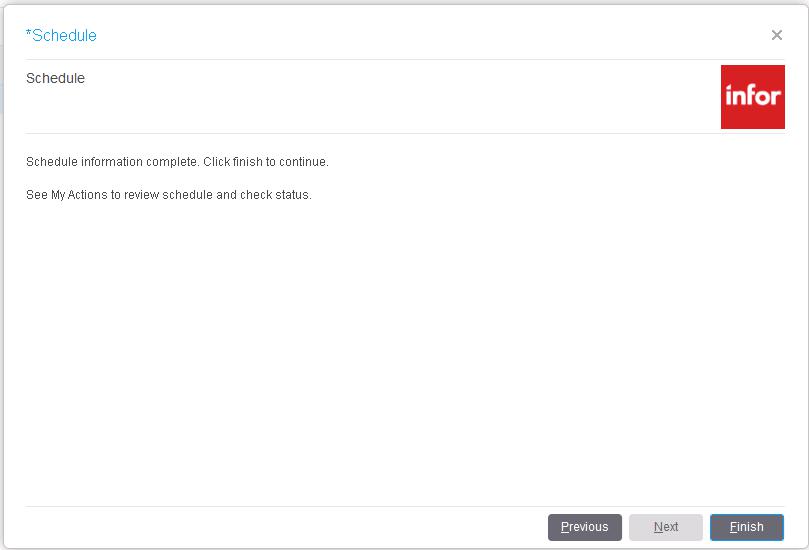
Schedule the Process

  1. Log into Rich Client
  2. From the Start menu, navigate to Applications > Process Server Administrator > Scheduling > By Process DefinitionScheduling a Process in IPA-14
  1. Find your Process in the Process Triggers list
  2. Right-click and select Schedule, or highlight the flow, and select Actions > ScheduleScheduling a Process in IPA-10Scheduling a Process in IPA-7
  1. Fill in the schedule propertiesScheduling a Process in IPA-13
  1. Click Next
  2. Enter the time and date informationScheduling a Process in IPA-15
  1. Click next
  2. Click FinishScheduling a Process in IPA-16
  1. To view or update your schedule, navigate to Start > Applications > Process Server Administrator > My Actions > My Scheduled ActionsScheduling a Process in IPA-17
  1. Open Infor Rich Client Run A Process-1
  2. At the login prompt, enter the Lawson username and passwordRun A Process-2
  3. The canvas is now open. Look in the upper left corner and make sure you are pointing to the prod or test data area (not gen) Run A Process-3
  4. In the upper right corner, click “Start > Applications > Process Server Administrator > Administration > Channels Administrator”Scan for Files in IPA-1
    1. At this point, you can click, HOLD, and drag the “Channels Administrator” link to the canvas. That way, it will create a shortcut on the canvas. Create a File Channel in IPA-4
  5. Once you are in Channels Administrator, click on the File Channels tab, and you should see a list of File Channels that have been set up
  6. Locate the channel for which you wish to scan
  7. Right click on the channel and select “Scan Now”Scan for Files in IPA-2
  1. This will scan the file configured in the Channels Administrator, and kick off any processes that use the files in that directory (the processes are configured in the File Channel Receivers section)


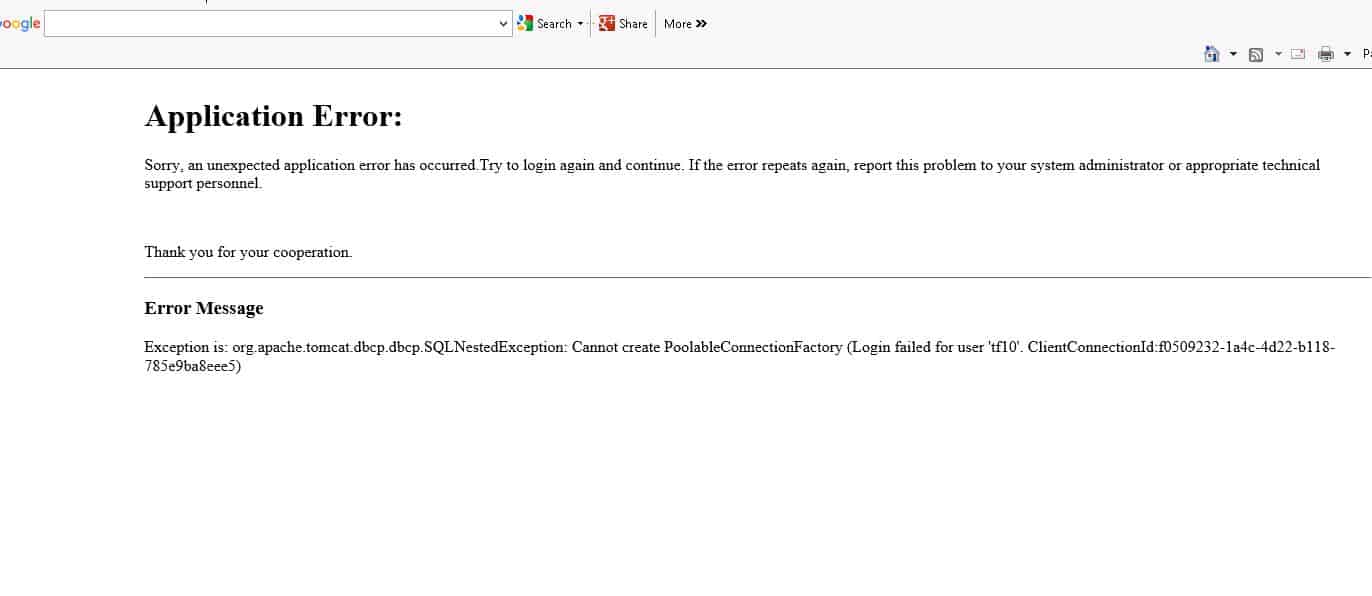
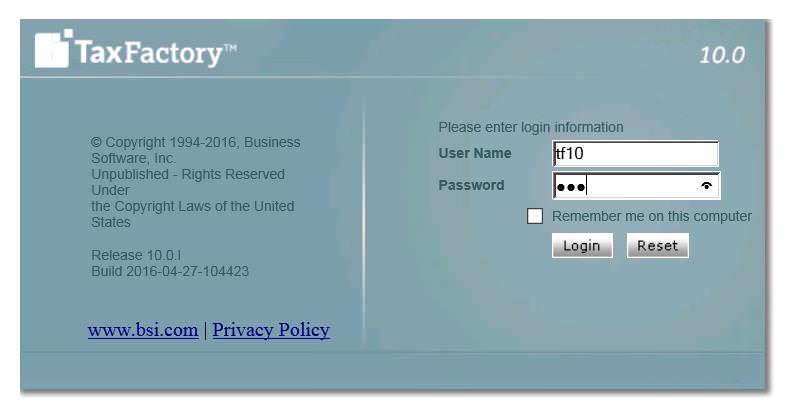
Your install is successful, but when you log on to the BSI Interface (Screen Print #1) you receive an error (Error Message. Exception is: org.apache.tomcat.dbcp.dbcp.SQLNestedException: Cannot create PoolableConnectionFactory (Login failed for user ‘tf10’. ClientConnectionId:f0509232-la4c-4d22-b118-785e9ba8eee5). See Screen Print #2

You will receive this error if your SQL database is configured with a Named Instance. The Named Instance should be configured with a static port. You should not use the default port (1433) when installing the BSI Client even though your ODBC will connect successfully with the default port. Please see article on assigning a static port for SQL Server named instance: (https://blogs.msdn.microsoft.com/arvindsh/2012/09/08/how-to-assign-a-static-port-to-a-sql-server-named-instance-and-avoid-a-common-pitfall/)

Screen Print #1

Troubleshooting BSI Database Connection during Install-1


Screen Print #2

Troubleshooting BSI Database Connection during Install-2