Activities Management and Projects

One way to simplify having to add the account category to the account string when using the activity management module is to default in the account category based on the GL account that is used.

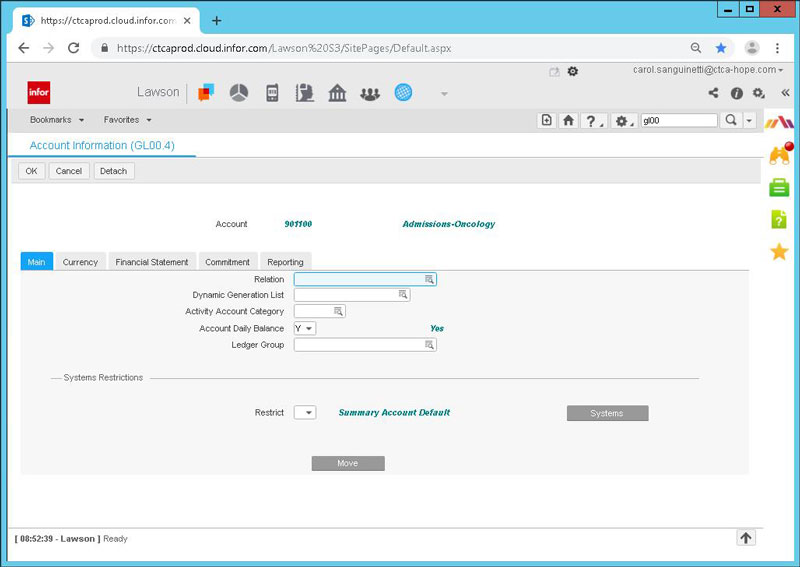
This can be done on the Chart setup screen:

Click on the More button next to the account and on the MAIN tab, there is field for Activity Account Category. Enter the Account Category for this account here if you will always use the same Account Category for all instances of this account.

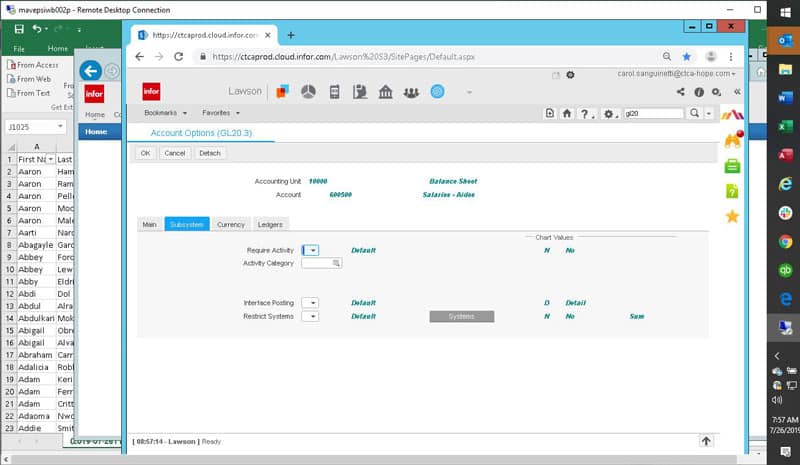
If the Account Category depends on the accounting unit used with it, then set the default up on the GL20 forms.

Click on the more button on GL20.2 and go to the Subsystem tab.  You will find an Activity Category field here. Enter the desired Account Category here and it will default whenever the combination of the accounting unit and account are used.

Need to deduct a percentage or a flat amount from a vendor’s invoice?  Here’s how:

  1. Setup a distribution code on AP05.3 as a percentage and indicate the account that the amount should go to. You can actually setup two or more different percentages to distribute to two different accounts. Make the percentage a negative percentage when deducting an amount from the invoice.
  2. On the vendor’s AP10 record on the Default Tab add the distribution code. It will default onto the invoices and automatically deduct the percent or percentages specified on the AP05.3 form for the distribution code.

  1. You may have to adjust the invoice total amount to reflect the deduction(s) to be in balance.

The short answer is no.

However, there are some creative ways to accomplish having a single BL & AR company and still booking information to various GL Companies.

Option 1: Using allocations and getting creative with your Process Levels and possibly accounting units, you can move the amounts to various companies using the allocation module.

The AR process Level setup has a default accounting unit that allows you to book all transactions for this process level to the various accounting units and then setting up an allocation to transfer those amounts at the end of each period would allow you to see the AR amounts on your various GL companies in the financial statements.  I would make these allocations auto reversing so that you can show what you need to for financial reporting only.

Option 2: Setup the various AR and BL companies and use the National Account relationship for your processing.  This option will allow everything to book in the correct company, and still allow you to process payments and adjustments, produce various reports, create consolidated aging reports and all other AR reports.

So as often is the case, you can get what you want, you just need to think it through and see if it will work for your needs.

Every now and then the system hiccups. Just like we all do.  When this happens, sometimes there are ways of addressing the issue and sometimes there are not through the standard forms.

When there isn’t a way to address the issue with the standard processes, Paint Screens can be used to go behind the scenes and address the issue that is needing to be fixed. So of course, they should be used sparingly and only when there is no other choice to address the issue.

Some examples of this are:

  • PO lines where the quantities indicate that the line should be closed, however the line is still open.  This keeps the PO header open as well.
  • AP Credit memos that were canceled yet still show up on the MA126 report.

There are several things that you need to take into consideration:

  1. What are the accounting needs?
  2. When do the commitments need to be booked in the GL?
  3. Budgets:
    • Do you want a budget to be tracked in your external Project tracking system?
    • Do you want a total not to exceed budget in your ERP to make sure someone is notified when the budget is exceeded?
    • Do you want a detailed budget in both places?
  4. If there is retention from supplier invoices to be paid at the end of the project, when does the retention need to be booked?
  5. Where is the project initially setup? In the external project tracking system or the ERP?
  6. What are the touch points that need to be considered when determining what the interface points are?
  7. How will your ERP know when the project is complete so it can be marked as closed?

When first using Lawson portal, it can be a bit overwhelming with all the buttons and unfamiliar UI. The first change I always make is changing the buttons to display text instead of icons.


First go to Preferences >> User Options


Under “Toolbar Button Display” select Text >> Apply and OK

Once you’ve applied the changes, your icons will change from this:

To this:

This is especially helpful for users with higher tier access as you don’t want to accidentally click delete or change a form when you didn’t mean to!


Hope this simple tip was helpful!

Over the years I’ve assisted users debug issues in Lawson portal.  Through this time, I’ve noticed a pattern of users not utilizing fundamental functions of portal.  I’ll share to you a few of them today.


New Tab Button:

Instead of using up more of your PC’s memory, Lawson has its own tab system that users often miss. This will let you switch between multiple forms faster and easier as shown below:


Search box keywords:

 You might be used to typing in form numbers as shown below, but did you know you can type in keywords as well?

Don’t know a form name to General Ledger? Type in the word General Ledger and click search:

This is great for newer and veteran users taking on newer tasks.


Form Help:

Finally, if you want to get more information about the form you’re currently using. Go to the form and click Help >> Form Help.


Hope these tips helped you in your journey in mastering Lawson Portal.

Step 1: Login to Infor Security Services (ISS)

Step 2: Goto SSO >> Manage Domains and click edit button as shown:

We are simply verifying the names of the displayed XML files:

Step 3: On the LSF server, go to the %LAWDIR%\security\domainauth\EXTERNAL directory to edit that XML


Step 4: Add an entry to an existing tree or create a new one:


That’s all that’s to it.

Step 1: Login to your LBI server and go to the Tools dashboard


Step 2: Select the Smart Notification link

Step 3: In Smart Notification interface, click the Admin button at the top right:

Step 4: Under Content section, select the Delivered Alert History link:

Final Step:

Select the between dates and click the “Get Delivered Alert History” button to see sent notifications. Below you’ll see all sent notifications on June 26th 2019. You can also filter down on the notifications by Alert ID and or Recipient. You can also redeliver these messages if needed.