Follow this step-by-step guide to set up a Lawson deljobhst recurring job. This will keep your Lawson print/job directories clean.

  1. Login to LID (elevated admin rights required)
  2. Go to jobdef and create a new deljobhst job
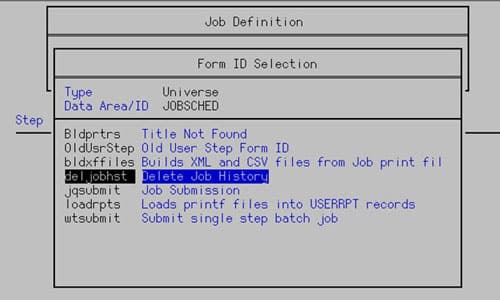
  3. Down arrow to Form ID >> F4
  4. Type >> F4 >> Universe >> Enter
  5. Data Area/ID >> F4 >> JOBSCHED >> Enter
  6. Down arrow to deljobhst >> Enter
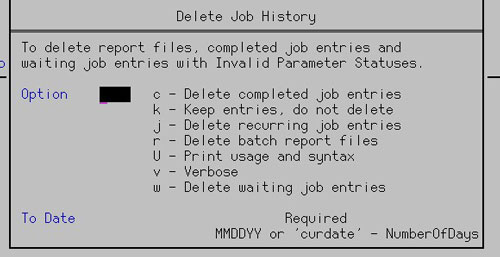
  7. F6 >> A. Step Parameter
  8. Type the parameter letters you want without a dash, for this example we are just deleting old %LAWDIR%\print directory files using the r parameter and for any files > 400 days old
  9. To Date must be in the above format of: ‘curdate’ – NumberOfDays
    1. When the job runs on schedule, files greater than and equal to the date 400 days ago from current date will be deleted.
    2. 400 day example: Todays date is 6/7/2021 so print files as created on 5/3/2021 and older will be deleted.
  10. Press Enter to save jobdef and go to recdef in LID
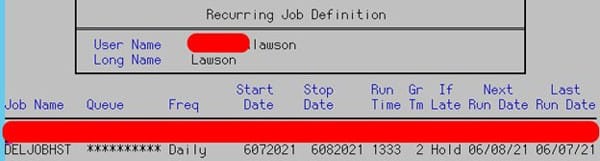
  11. Create a new recdef entry and select the job you just created under Job Name. Select all other parameters as you normally would.
  12. Example below: This job will run daily at 1:33pm starting 6/7/2021


That’s it and good luck.

It is pretty common for a Lawson recurring job to error out and continually run for hours and days. This can build up in the waiting screen of the job scheduler (jobschd). To clean it up can be repetitive when it doesn’t have to be.

  1. Login to LID
  2. Go to the job scheduler by typing the jobschd command
  3. F7 >> A. to show all user jobs
    • In our example we have 7 jobs, but this method works for hundreds of jobs.
  4. On the top most job that you want to delete press the HOME key to “mark” the job. Notice the black arrow on the very left
  5. Now scroll down or even page down to the bottom most record >> Press the END key. Notice all jobs from the top to bottom have the black arrow on the left, indicating these are selected.
  6. Now press F9 (Delete) to remove these jobs. Press enter to confirm.
    • NOTE: if there are dozens or hundreds of jobs, you may need to hold Enter to continuosly delete them.

Hope this was helpful!

LBI Smart Notifications are reports that are sent directly to users for reviewing vs a user logging into LBI to manually view a report. In this section we will first start off with an Intro to creating a Smart Notification. See Part 1 titled: “Creating an LBI Smart Notification Series – Creating an InfoSet (Part 1)


  1. Login into LBI (admin permission required) >> go to Tools >> Select Smart Notification
  2. In Smart Notification, select Notifications at the top
    • If you have none, it’ll say No Selections (see screenshot), else you’ll notice a list of existing Notifications
  3. To create a new Smart Note, click Add

  4. Smart Notification Wizard will pop-up and starts at step 1 (Select Facts)

    • The Facts section is where you would connect the dataset (or InfoSet) to the notification (this can also be a document among varios other types of data).
    • An InfoSet is most commonly an SQL query or stored Proc that gathers data from a database.
  5. For this example, we will assume you have an InfoSet already created. View your InfoSets by clicking Search

  6. For our example we will be selecting the MonlthyVariance InfoSet and then select Range
  7. At the bottom of the next page choose Select >> Add >> Ok at the very bottom

  8. At the bottom under My Selections you should now see your InfoSet for step 1
  9. Now click Next or select step 2 Conditions
    • Conditions can be added with the Add button. This lets you tailor the data to your liking. This can also be done on the InfoSet side when writing a query or stored proc.
  10. Click Next again or select step 3 Delivery
    • Delivery typically is done through the Device tab which are setup email addresses in Smart Notes (See article titled “How to setup a LBI smart note delivery device”)
    • The Bursting tab is the alternate method. In the Bursting tab select the InfoSet, and the column to burst on which is typically a list of email addresses.
    • Schedule tab is similar to Device, except on a schedule which can be set elsewhere for the Notification.
  11. Click Next again or select Step 4 Related Info
    • Related Info lets you link other LBI reports, shared documents, deploy in a pre-made formatted template among other customizations. This may be covered in more depth in a future article.
  12. Click Next again or select Step 5 Save
    • This is where you Name, describe, set Home Page Group for your Notification.
    • You can also Preview, set Status, and add additional Permissions if needed.
  13. Click Save New Item to create your new notification and view it in the Notifications Tab.


Hope this was helpful! Good luck!

LBI Smart Notifications are reports that are sent directly to users for reviewing vs a user logging into LBI to manually view a report. In this section we will first start off with an Intro to creating an Info Set.


  1. Login into LBI (admin permission required) >> go to Tools >> Select Smart Notification
  2. In Smart Notification, select Admin at the top >> Work with InfoSets
  3. Click Add to start creating an InfoSet
  4. InfoSet Wizard should start >> Select the type of Info Set you want
    • Our example will be a Relational Database (JDBC) stored procedure with a predefined Data Source
  5. Click Next or go to Step 2 Define Info Set
    • In this section you will be defining your data depending on what type you select.
    • This data can include defining column data, number/string format etc.
  6. Click Next or go to Step 3 Specify Links
    • This section allows you to add file or class links which is dependent on your organization’s needs and what the notification will be used for.
  7. Click Next or go to Step 4 Save InfoSet
    • In this section you can add a Name, Description, set a group name.
    • Also allows you to add additional access, filter certain content, even categorize or limit the InfoSet.
  8. Once done with Step 4, click Save As New at the bottom to finish your InfoSet


That’s it! Smart Notifications and InfoSets have a lot of customizability, most of which aren’t necessary to get it going.

See Part 2 of this series titled “Creating an LBI Smart Notification Series – Creating a Smart Notification (Part 2)” to find out how to add this InfoSet to a new Notification report. Good luck!

The default behavior of the shopping screen in RQC is to now allow users to select their Requesting Company.  To allow users to select the company, the rqc_config.xml file must be updated.  Navigate to LAWDIR/system and open the rqc_config.xml file in a text editor.  In the “client” section, update the setting “allow_company_select” to “true”.  Bounce the WebSphere application server for the change to take effect.


This process is going to assume you already know how to build a Lawson CSV report of users to compare against. LSA Report Maintenance has these report options available for this.


  1. Login into your windows machine and open Powershell as an Administrator.
  2. Type in this command: Get-ADUser -Filter * -SearchBase “dc=domain,dc=local” | select Name,SID | Export-CSV
    1. dc=domain,dc=local will need to be updated to match your organizations.
    2. select Name,SID will extract the users Name in AD (typically First and Last Name) and their Security ID.
    3. Since we are doing this to compare against Lawson users (assuming you’re using SSOP), you want to also include the sAMAccountName, this is login name the users use to login into their windows machine.
    4. Export-CSV Requires a path after it including filename,
      • example: Export-CSV C:\ExportDirectory\ADUserList.csv
  3. For example, if you only wanted the Name and sAMAccountName use the command below:
    1. Get-ADUser -Filter * -SearchBase “dc=Yourdomain,dc=Yourlocal” | select Name,sAMAccountName | Export-CSV C:\ExportDirectory\ADUserList.csv
      • NOTE: If you type dc=domain,dc=local incorrectly, Powershell will list the allowed partition(s), see screenshot below.
  4. If you only want Name and SID use the command below:
    1. Get-ADUser -Filter * -SearchBase “dc=Yourdomain,dc=Yourlocal” | select Name,SID | Export-CSV C:\ExportDirectory\ADUserList.csv

You should now be able to acquire the CSV file in your C:\ExportDirectory\ that you outputted to.

Good luck!

There are two common ways to get a list of program forms and their description from Lawson. One is through LID and another is through a database application like SQL Management Studio.


Method 1: The database application method requires your user to have at least database read access to the PROD or TEST Lawson database.

  1. Login to the PROD or TEST database through your database app (using SQL Management Studio for this example).
  2. Expand the PROD or TEST GEN database and expand the Tables folder:
  3. Scroll to the dbo.SCREEN table >> Right-click >> Select Top 1000 Rows
  4. For those not familiar with SQL, simply remove the TOP 1000 portion from the code to return all records in this table.

Change from this:

To this:

  1. Now click the Execute button:
  2. Select all returned records at the bottom by clicking the top left box:
  3. Right-click same box >> Copy with Headers
  4. Paste into Excel and filter as needed:


Method 2: The LID method is simpler if you have access to Lawson Interface Desktop

  1. Login into LID, your user will need access to rngdbdump
  2. Change directory to a safe directory to dump a file into.
  3. Type this command: rngdbdump -ct gen SCREEN > SCREEN.csv
    1. This command will dump out the SCREEN database table into a csv file in your current directory
  4. Go to that directory and open the csv file in Excel, filter down on the forms you want to view.

Good luck!