
Follow these simple steps on how to resolve the Lawson Fax Integrator error(s):
“There was an error connecting to the server” or “The remote server returned an error: (530) Not logged in” (see screenshot below)
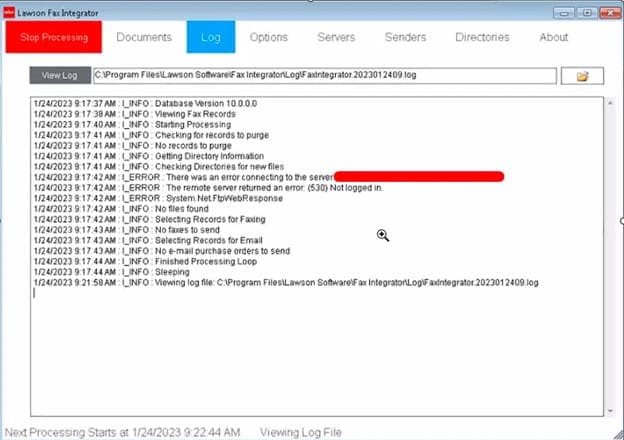
To resolve either of these, first navigate to the Servers >> Lawson tab, then make sure you use valid credentials for the FTP user.
Next, Under the Servers >> Portal tab, make sure that you have valid Lawson user credentials. If not, then enter the correct information.
Finally, click Update after entering your credentials. This will resolve the 530 FTP invalid credentials error. That’s all there is to it!

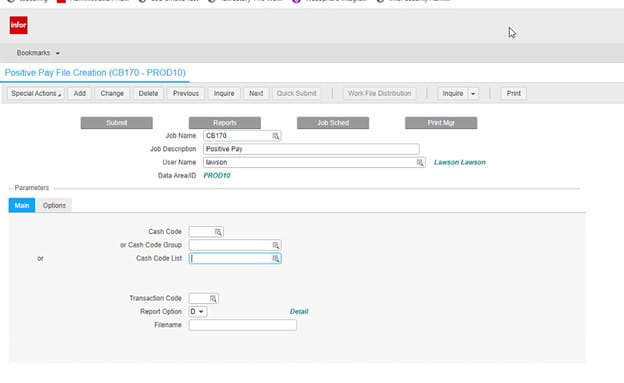
Positive Pay File Creation (CB170) produces a flat file containing bank required payment information for issued, voided and stop paid payment transactions that have been processed since the last run of the CB170 for the cash code and transaction code.
NOTE: The first time the CB170 is run for a cash code, it will only report on open transactions.
The positive pay file is then sent to the bank to be used to confirm checks presented for payment have not been altered.
Since there are no standard file layouts, you will need to use an external mapping tool to reformat the file into the specific bank format. Use this procedure to define a positive pay file.

Introduction:
In today’s hybrid IT environments, where organizations operate both on-premises data centers and cloud infrastructure, synchronizing data between these environments is critical. AWS Data Migration Service (DMS) offers a powerful solution for bridging the gap between on-premises data centers and the cloud. In this article, we will explore how you can leverage AWS DMS to synchronize changes between your on-premises data center and the cloud, ensuring data consistency and enabling real-time decision-making.
Setting Up the Replication:
To synchronize changes between your on-premises data center and the cloud, you need to set up replication using AWS DMS. Begin by deploying an AWS DMS replication instance in your AWS account, which serves as the migration engine. Configure the source endpoint for your on-premises database and the target endpoint for your cloud-based database service. AWS DMS supports various source databases, such as Oracle, Microsoft SQL Server, MySQL, and PostgreSQL. Ensure that your on-premises database is accessible from the AWS DMS replication instance.
Change Data Capture (CDC):
Change Data Capture (CDC) is a crucial feature provided by AWS DMS for real-time data synchronization. By enabling CDC, DMS captures and replicates only the changes made to the source database, ensuring that the target database remains up-to-date with the latest data. CDC can be configured at the table or database level, depending on your requirements. This capability minimizes data transfer and reduces the impact on network bandwidth, allowing near real-time synchronization between the on-premises data center and the cloud.
Network Connectivity and Security:
To synchronize changes between the on-premises data center and the cloud, a secure and reliable network connectivity is essential. AWS provides Virtual Private Cloud (VPC) and Direct Connect services to establish secure connections between your on-premises network and AWS cloud infrastructure. It is crucial to configure network security groups, firewalls, and routing rules to allow traffic between the on-premises data center and AWS resources. Follow AWS security best practices and ensure encryption of data in transit to maintain data integrity and confidentiality.
Monitoring and Managing Replication:
AWS DMS provides monitoring capabilities that allow you to track the progress of replication and detect any issues or delays. Utilize the AWS DMS console or leverage AWS CloudWatch to set up alarms and notifications for critical events. Monitoring replication latency, throughput, and error rates helps you identify potential bottlenecks and take proactive measures to optimize the synchronization process. Regularly review replication logs and metrics to ensure the health and performance of the replication tasks.
Handling Data Conflicts:
During the synchronization process, it’s possible to encounter data conflicts between the on-premises data center and the cloud. Conflicts can occur when the same data is modified in both locations simultaneously. AWS DMS provides conflict detection and resolution mechanisms, allowing you to define conflict resolution rules based on your business logic. By establishing clear conflict resolution strategies, you can ensure that data integrity is maintained and conflicts are resolved according to your defined priorities.
Disaster Recovery and High Availability:
Synchronizing data between on-premises and the cloud also enhances disaster recovery and high availability capabilities. By replicating data in near real-time, you can maintain a replica of your on-premises database in the cloud, enabling quick failover in case of a disaster. This replication approach ensures business continuity and minimizes data loss. Additionally, the cloud provides scalable and highly available infrastructure, which enhances the overall reliability and resilience of your data architecture.
Scalability and Cost-Effectiveness:
AWS DMS offers scalability and cost-effectiveness for synchronizing changes between on-premises data centers and the cloud. The service allows you to scale the replication instances based on your workload requirements, ensuring optimal performance during peak periods. Moreover, AWS offers a pay-as-you-go model, allowing you to pay only for the resources you use. This cost-effective approach eliminates the need for significant upfront investments in infrastructure and provides flexibility as your data synchronization needs evolve.
Conclusion:
AWS Data Migration Service (DMS) provides a robust solution for synchronizing changes between on-premises data centers and the cloud. By leveraging the power of DMS, organizations can achieve real-time data synchronization, enabling faster decision-making, enhancing disaster recovery capabilities, and embracing the scalability and cost-effectiveness of the cloud. With proper planning, network connectivity, and monitoring, AWS DMS empowers organizations to bridge the gap between on-premises and the cloud, unlocking the full potential of a hybrid IT environment.

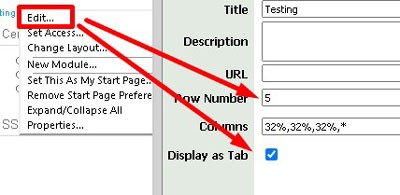
You may have read my “Creating an LBI Dashboard Series” articles and have many dashboards created at this point and are wondering how to rearrange their order.

That’s all there is to it!
Many organizations opt to engage Lawson consultant teams for managing their Lawson Business Intelligence (LBI) system. These consultant teams offer managed services at a fixed monthly rate and possess extensive knowledge and expertise in managing LBI. This service is particularly suitable for larger organizations, but smaller organizations that do not require a full-time Lawson employee on-site may also find it beneficial. Nogalis provides this service, and you can contact us via our contact page for further information.


You may come across this error at some point – “MHC An error occurred while viewing – Printer Issue” (see screenshot)

This means that the printer below for this account is no longer valid.
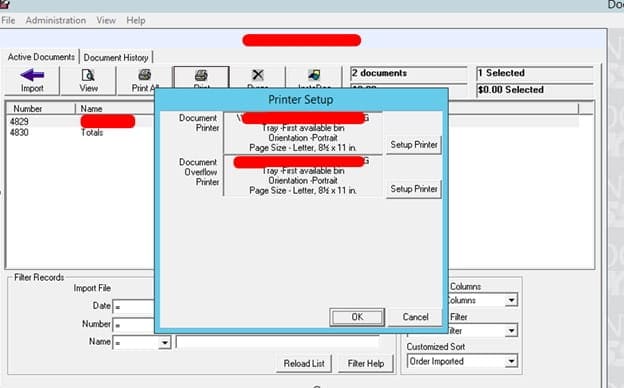
See Print routine data here:
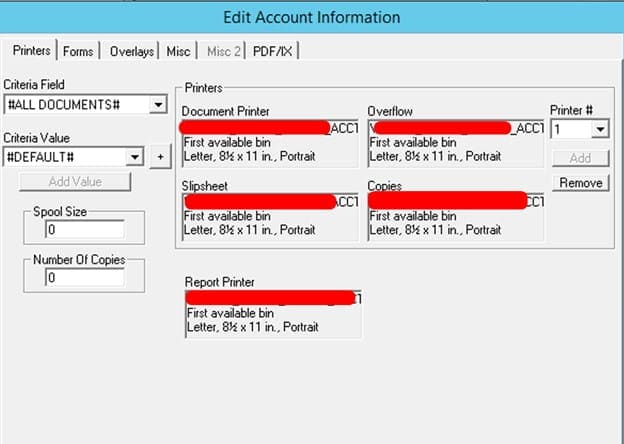
To update this, first add the network printer to server where Document Express is installed via windows Add New Device.
Once located, then double click within the box where the existing printer is and select the new one:
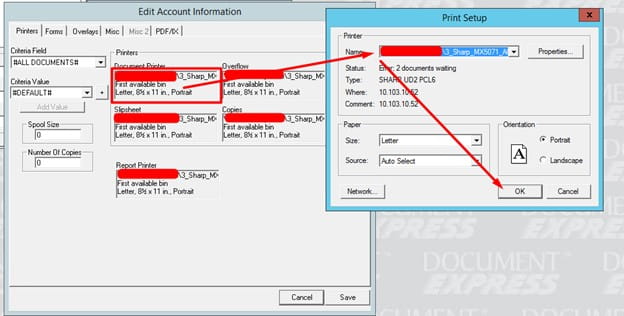
Save the changes and click view to see if the document shows up. You should now be able to print in Document Express and the error will disappear.
Problem:
WebSphere Admin Console only shows WAS_HOME directory when browsing WAR/EAR files using “Remote File system”
Resolution:
This change is due to following Security Bulletin from IBM:
https://www.ibm.com/support/pages/security-bulletin-information-disclosure-websphere-application-server-cve-2017-1743
To get access to all directories, please add custom properties “com.ibm.ws.management.fileservice.allAccess” and “com.ibm.ws.console.webserver.anypath” property to “true” on Deployment Manager and the Node Agents.
In the WAS admin console,
Go to System administration –> Deployment manager –> Java and Process Management –> Process definition –> Java Virtual Machine –> Custom properties
Click the New button and enter the following:
Name: com.ibm.ws.management.fileservice.allAccess
Value : true
Click the New button and enter the following:
Name: com.ibm.ws.console.webserver.anypath
Value : true
Click Apply, then Save your changes to the master configuration.
Go to System administration –> Node Agents –> node_name –> Java and Process Management –> Process definition –> Java Virtual Machine –> Custom properties
Click the New button and enter the following:
Name: com.ibm.ws.management.fileservice.allAccess
Value : true
Click the New button and enter the following:
Name: com.ibm.ws.console.webserver.anypath
Value : true
Click Apply, then Save your changes to the master configuration.
Restart all the WebSphere services after setting the properties.