Introduction:

Migrating on-premises databases to the cloud can be a complex task, but with the right tools and strategies, it can be streamlined and efficient. One such tool provided by Amazon Web Services (AWS) is the AWS Data Migration Service (DMS). DMS allows you to migrate your on-premises databases to AWS easily and securely, minimizing downtime and ensuring data integrity. In this article, we will explore some top tips to help you make the most of the AWS Data Migration Service and successfully migrate your databases to AWS.


Understand Your Database Requirements:

Before diving into the migration process, it’s crucial to have a clear understanding of your database requirements. Take time to evaluate your current on-premises database and identify any specific configurations, performance needs, or dependencies. This understanding will help you plan the migration process effectively and choose the appropriate AWS services for hosting your database in the cloud.


Choose the Right AWS Database Service:

AWS offers a range of database services to cater to different workload requirements. Depending on your specific needs, you can choose Amazon RDS for traditional relational databases, Amazon DynamoDB for NoSQL databases, or other specialized services like Amazon Redshift for data warehousing. Understanding the strengths and limitations of each service will help you select the right one for your migrated database.


Assess Data Migration Compatibility:

Before proceeding with the migration, it’s essential to assess the compatibility of your on-premises database with AWS services. DMS supports various source databases such as Oracle, Microsoft SQL Server, MySQL, and PostgreSQL. Ensure that your database version is compatible with the DMS service and that any required updates or configurations are in place.


Design an Appropriate Migration Strategy:

Developing a well-thought-out migration strategy is crucial for a successful migration. AWS DMS provides different migration types, including full load, ongoing replication, and change data capture (CDC). Evaluate your database size, downtime constraints, and the frequency of data changes to determine the most suitable migration strategy. Consider factors like cost, data volume, and the impact on your production environment when making your decision.


Plan for Data Consistency and Validation:

Data consistency and integrity are paramount during the migration process. AWS DMS provides options to enable validation checks and data transformation capabilities. Leverage these features to validate data completeness, correctness, and accuracy before, during, and after the migration. Establish data validation processes and monitor the migration progress closely to ensure a seamless transition.


Optimize Network and Resource Utilization:

Migrating large databases can put a strain on your network bandwidth and system resources. To optimize the migration process, consider scheduling the migration during off-peak hours to minimize network congestion. Additionally, allocate appropriate resources to the DMS service to ensure smooth and efficient data transfer. AWS provides guidelines and best practices for resource allocation, which you should follow to avoid any performance bottlenecks.


Monitor and Troubleshoot:

During the migration process, it’s crucial to monitor the migration progress and promptly address any issues that may arise. AWS DMS provides detailed logs and metrics that allow you to monitor the migration and identify any potential bottlenecks or errors. Leverage these monitoring capabilities and take advantage of AWS CloudWatch to set up alarms and notifications for critical events. Additionally, refer to the AWS DMS troubleshooting guide and forums for common issues and resolutions.


Plan for Post-Migration Tasks:

Once the migration is complete, there are several post-migration tasks to consider. These include redirecting your applications to the new database in AWS, ensuring DNS changes are made if necessary, updating security group configurations, and validating the data in the migrated database. Be sure to have a detailed checklist to guide you through these tasks and ensure a smooth transition for your applications and users.


Conclusion:

Migrating on-premises databases to AWS using the AWS Data Migration Service offers numerous benefits, including scalability, reliability, and cost-efficiency. By following the tips outlined in this article, you can ensure a successful migration that minimizes downtime, preserves data integrity, and sets the stage for leveraging the full potential of AWS services. Remember to plan meticulously, validate your data, monitor the migration closely, and take advantage of the extensive documentation and support provided by AWS throughout the process. With the right approach and the power of AWS, you can seamlessly migrate your on-premises databases to the cloud and unlock a world of possibilities for your organization.

When transferring between screens in EMSS, you may encounter the error message “Lawson System Foundation error message “verifyCertificate: CN value: *.<domain> is not in allowed CN list.”


The simplest way to resolve this issue, without requiring a restart, is to update the iosconfig.xml.  Add or edit the properties inside LAWDIR/system/iosconfig.xml.


1) Add the following property inside LAWDIR/system/iosconfig.xml:

<parameter name=”com.lawson.ios.transform.validatecert” value=”false” />

2) Save the file, wait 15-30 minutes for changes to take effect.

3) To validate the change, run this URL as a Portal Administrator: https://<LSFServer>:port/servlet/SysEnv


Another option, that will require a restart of services, is to add the certificates to the transform-hosts tag in the iosconfig.xml file:


<transform-hosts>

<cn host=”lawweb1.infor.com” value=”lawweb1.infor.com” />

<cn host=”lawweb2.infor.com” value=”lawweb2.infor.com” />

<cn host=”loadbalancer.infor.com” value=”InforCA” />

</transform-hosts>


Add a common name for every host.


That’s all there is to it!

If you find that you need to change the driver location in the Amazon Web Services Schema Conversion Tool, or AWS SCT for short, then follow these simple steps below.


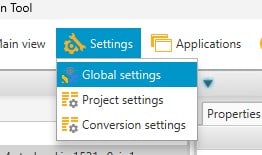
The first thing you need to do is open the tool and under the settings select “Settings” > “Global settings”Note that the drivers are global settings, not project-specific.


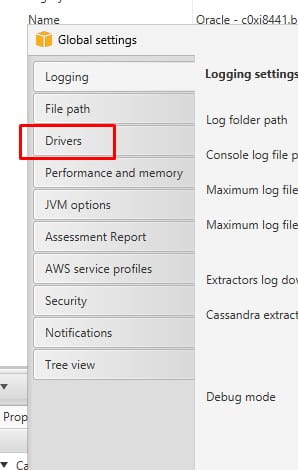
Next, select “Drivers” on the left side bar menu. You will need to edit the file path for the database driver you are updating. Once you save it then your drivers are now updated! See the screenshots below for a quick reference for these steps.


Changes will be saved and you’re done. You’ve successfully updated the drivers in AWS SCT 😊

Follow the steps below to enable security_authen.log tracing on the Lawson System Foundation (LSF) server.


  1. Back up the original SecurityLoggerConfiguration.xml file in LAWDIR/system.


  1. Edit the file and change the loglevel and tracelevel values to 7 for the SecurityAuthenFilter, as shown below:


<filter name=”SecurityAuthenFilter” enabled=”true” classname=”com.lawson.common.util.logging.SimpleMessageFilter”>

<parameters>

<Parameter value=”loglevel=7″/>

<Parameter value=”tracelevel=7″/>

</parameters>

</filter>


  1. Check the LAWDIR/system/configuration.properties file. If it does not have the following lines in the file, add them to the end of it:


ReloadFiles=TRUE

RefreshTimeOut=5


  1. If you did not have the lines in the configuration.properties file, you will need to restart WebSphere for LSF to enable that change and enable the L7 logging. After restarting, proceed to step


  1. If you already had the lines in the configuration.properties file, from a LID or other command line for LSF, type ssoconfig -c. Type the password when prompted. Select option 16 “Refresh Logging Configuration”.


  1. Wait 5 minutes, then view the security_authen.log and verify you see “L7” lines in it. If you do not see them, wait another 5 minutes, log into Infor Lawson Portal, and check the log again.


So, you have a list of users with several LBI bursting rights. Manually doing this is common but prone to mistakes while also timely.  This is where loading a file into LBI is more efficient.


  1. First let’s build a template file in excel (this can be used over and over again in the future).
    1. You’ll need to know how structures are setup in your LBI system since this will vary
  2. In this example we have an ACCOUNTING UNIT structure that is equal to a number value, ours is 4 digits.
  3. I will explain each column in order of your template file

    1. Action mode, A for Add, C for change, D for delete.
    2. Username
    3. Username
    4. Structure Name (ACOUNTING UNIT in our example)
    5. Structure Sub-name (ACCOUNTING UNIT under Group1 in our example)
    6. Condition (equal to, greater than etc.)
    7. Assigned value to structure
    8. Used to create a 2nd column after column G
    9. Represents element group (multiple would create sub groups within same structure)
    10. Represents multiple element fields within a structure group (see below example)
    11. Owner – typically Lawson or another admin user
    12. Start Date (how far back could the user access older reports)
    13. End Date (how far in the future could user access new reports)
  4. Now once you create your load file, go into LBI Reporting Services Administration and go to Import Rights
  5. Browse and select your CSV template file
  6. Click Validate Only to see any returned errors
  7. If contents are valid, add file again and this time click the Validate and Load button

Go to maintain rights and validate your user was loaded with proper data. Good luck!


Many organizations opt to engage Lawson consultant teams for managing their Lawson Business Intelligence (LBI) system. These consultant teams offer managed services at a fixed monthly rate and possess extensive knowledge and expertise in managing LBI. This service is particularly suitable for larger organizations, but smaller organizations that do not require a full-time Lawson employee on-site may also find it beneficial. Nogalis provides this service, and you can contact us via our contact page for further information.

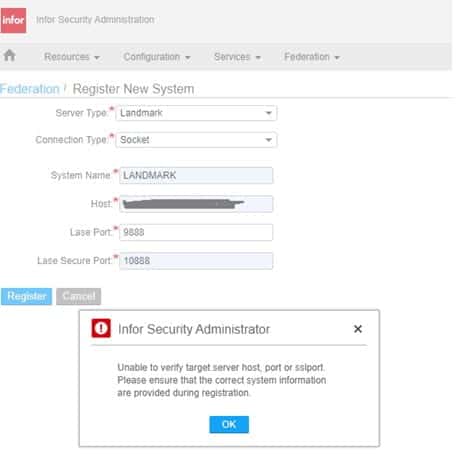
Here are steps to follow if you receive the error message “Registration failed with exception when trying to register a new federated system.

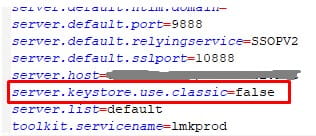
If you receive the below message when trying to register a federated system, open the lsservice.properties file on both servers.  Either add or update the line server.keystore.use.classic=false.

Tue Feb 21 19:26:45.573 EST 2023 – default-1240412896 – L(2) : Registration failed with exception.  Details: registerServer() received Lawson Security Error: Please check log files for details

Error happened on server.com;40000;40001;LSS.

Unable to reach the specified server [server.com;9888;10888;LANDMARK]. It will not be registered.

Stack Trace :

com.lawson.security.interfaces.GeneralLawsonSecurityException: Unable to reach the specified server [server.com;9888;10888;LANDMARK]. It will not be registered.

at com.lawson.security.server.events.ServerServerFederationEvent.processRegisterServer(ServerServerFederationEvent.java:994)

at com.lawson.security.server.events.ServerServerFederationEvent.process(ServerServerFederationEvent.java:115)

at com.lawson.lawsec.server.SecurityEventHandler.processEvent(SecurityEventHandler.java:634)

at com.lawson.lawsec.server.SecurityEventHandler.run(SecurityEventHandler.java:377)

If the IBM HTTP Server for my Web Server logs become too large to open and take up too much disk space, configure the Web Server to roll the logs by day and size.


Steps to perform:

IBM HTTP Server has many logs in the Folder “<Installation_Directory>/IBM/HTTPServer/logs”.  You can customize those log files such as the following logs in IBM HTTP Server:

  • Admin Log: admin_access.log
  • Admin Error Log: admin_error.log
  • Access Log: access_log
  • Error Log: error_log


  1. Go to the location of your IBM HTTPServer installation ($IHS_HOME or <Installation_DIR>/IBMHTTPServer).
  2. Change to the “conf” directory and open the httpd.conf file.
  3. Locate the line: CustomLog log/access_log common.
  4. Comment out that line, and after it add this line:


Change:

CustomLog “|/opt/IBM/HTTPServer/bin/rotatelog -l /opt/IBM/HTTPServer/log/access_log.%Y.%m.%d 5M” common


To:

#CustomLog log/access_log common

CustomLog “|/opt/IBM/HTTPServer/bin/rotatelog -l /opt/IBM/HTTPServer/log/access_log.%Y.%m.%d 5M” common


  1. Locate the Line: ErrorLog log/error_log.
  2. Comment out that line, and after it add this line:


Change:

ErrorLog “|/opt/IBM/HTTPServer/bin/rotatelog -l /opt/IBM/HTTPServer/log/error_log.%Y.%m.%d 5M”


To:

# ErrorLog log/error_log

ErrorLog “|/opt/IBM/HTTPServer/bin/rotatelog -l /opt/IBM/HTTPServer/log/error_log.%Y.%m.%d 5M”


  1. Then restart IBM HTTPServer.


Review the logs in the “<Installation_Directory>/IBM/HTTPServer/logs” directory to see the access log is logging by the Current date.