Adjust the JVM max memory size for ssoconfig in the GENDIR\java\command\ssoconfig.properties to 4096m
Before: ljx.vm.options=-Xmx512m
After: ljx.vm.options=-Xmx4096m
Next, save and close the file
This change is dynamic and does not require a restart, but you must exit ssoconfig for it to take effect.
After the change is completed and you’ve exited from the ssoconfig menu, you can now go back into ssoconfig -c to choose the rebuild the search index.
https://www.nogalis.com/wp-content/uploads/2023/08/ISS-Java-out-of-memory-error-when-rebuilding-the-search-index.jpg470470Angeli Mentahttps://www.nogalis.com/wp-content/uploads/2013/04/logo-with-slogan-good.pngAngeli Menta2023-08-15 09:41:412023-08-14 16:48:32ISS: Java out of memory error when rebuilding the search index
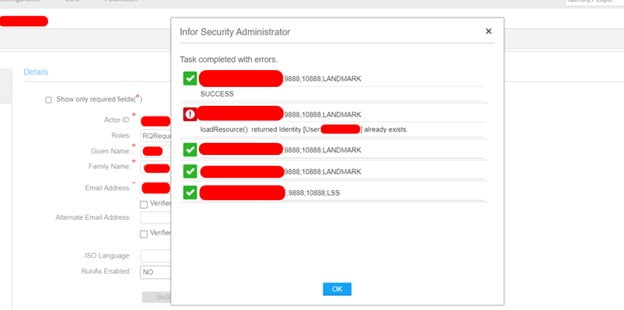
This article shows you a step by step guide on how to resolve the following Lawson error:
“loadResource(): returned identity [User:] already exists“
We need to run a list-based sync but first let’s explain what it is.
How list-based sync works:
Initially, an XML file containing all the records to be synchronized is required for executing the procedure. Later, the ssoconfig utility is employed to import the file. As a result of the sync command, all the relevant data related to actors/users, identities, and their associated roles (and services if required) is transferred from the “original system” (the one with updated data) to the “target system” (the one in need of an update).
Note: Please keep in mind that when synchronizing, if a service is present on the original system but not on the target system, it will be generated on the target system. It is important to note that syncing of services is a one-time process.
By default, during synchronization, Actor Roles are included with other user information and combined. For instance, if an Actor record in the LSF has one role “NormalUser,” and the same Actor is present in Landmark with two roles “NormalUser” and “BenefitsClerk,” then after synchronization, both systems would display “NormalUser” and “BenefitsClerk” for that actor. However, if you prefer to prevent the merging of Actor Role attributes, you can override the default setting in the input file. In this case, you will be asked to decide between Update Local or Update Remote action for each difference, similar to other attributes.
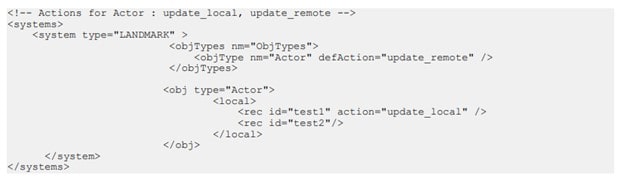
Create the XML input file (default behavior for Actor Roles)
Prepare an XML file in the suitable format for importing. The following example depicts the standard approach, where Actor Roles are combined during synchronization.
Example File:
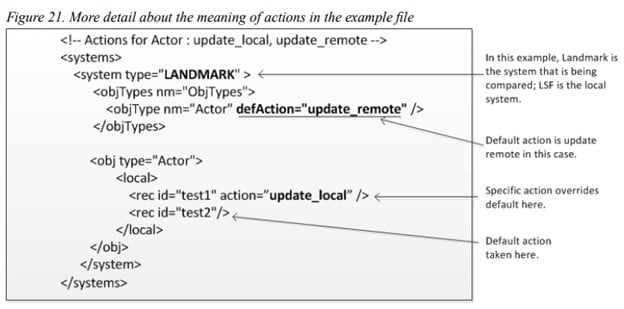
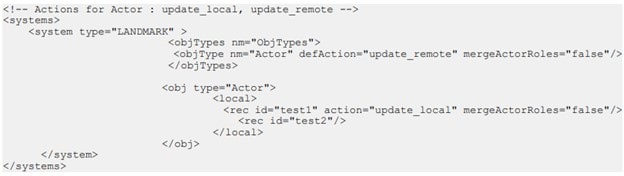
XML input file in which you specify behavior of Actor Roles
This instance contains the “mergeActorRoles” attribute, which is present in the file and set to “false.” Consequently, the roles will not be merged, and the specified action in the XML file will be followed instead.
NOTE: If you require the merging of roles for some Actor records, you should adjust the “mergeActorRoles” attribute to “true.”
Example file:
Run the import command using the ssoconfig utility
Execute the import command using the ssoconfig utility. Open a command window and enter the following command:
ssoconfig -S PWD <full_path_and>InputFileName
In this command, replace PWD with the security administrative password and <full_path_and>InputFileName with the name of the input file that you created in the previous step.
Once entered, a notification will confirm that the synchronization process has begun.
To monitor the synchronization progress, navigate to the Check Background Sync Status option within the Manage Federation sub-menu.
Introduction:
In today’s fast-paced business environment, companies often undergo digital transformations, migrating from legacy Enterprise Resource Planning (ERP) systems to modern solutions. However, legacy ERP applications often hold valuable historical data that must be preserved for regulatory compliance, historical analysis, and potential future use. Application archiving projects often fall under the responsibilities of IT Application managers at most companies. In this article, we will explore how to effectively archive data for long-term storage, the methods for storing archived data, and data retention strategies that align with the unique needs of large-scale enterprises.
How to Archive Data for Long-Term Storage:
Archiving data for long-term storage involves preserving valuable historical records while ensuring data integrity, security, and accessibility. IT Application Managers should consider the following best practices:
a. Data Segmentation: Identify the data that needs to be archived, separating it from the active dataset. ERP applications like Infor Lawson, Oracle, SAP, or PeopleSoft may contain vast amounts of historical data, and careful segmentation ensures the right data is archived.b. Data Validation: Before archiving, ensure data accuracy and completeness. Running data validation checks will help identify and rectify any inconsistencies.c. Compression and Encryption: Compressing and encrypting the archived data optimizes storage space and enhances security, protecting sensitive information from unauthorized access.
d. User access: Perhaps the most critical component of any viable data archive solution, is how accessible it is by users. The right solution should enable users to access archived records without the need to involve IT.
e. Role based security: Of course with ease of access comes responsibility. The right solution needs to enforce well defined security roles to ensure that users are accessing the data they have access to and nothing more.
Methods for Storing Archived Data:
IT Application Managers have various options for storing archived ERP data, including:
a. On-Premises Storage: Keeping archived data on local servers allows for complete control over the storage environment, ensuring immediate access to data when needed. Of course on-premises storage can be costly due to infrastructure investments and ongoing maintenance. Additionally, it may face limitations in disaster recovery options and data accessibility for remote employees, potentially hindering seamless operations in geographically dispersed organizations.
b. Cloud-Based Storage: Utilizing cloud computing platforms for data archiving offers scalability, cost-effectiveness, and high availability. Cloud providers like AWS, Azure, or Google Cloud offer secure and reliable solutions for long-term data retention. However storing structured data in the cloud without a structured presentation layer falls short of meeting all of the requirements we previously stated.
c. Cloud-Based Application: Combining the benefits of cloud computing with a well thought-out presentation layer is the ultimate way to address the challenges of ERP data retention. This option provides the freedom to decommission and eliminate on-premise servers while maintaining data integrity and providing users an easy way to continue accessing the data in the cloud.
Data Retention Strategies:
Data retention strategies aim to define the retention period for archived data, ensuring compliance with industry regulations and business needs. IT Application Managers should consider the following approaches:
a. Legal and Regulatory Requirements: Compliance with industry-specific regulations, such as HIPAA, GDPR, or SOX, requires setting appropriate data retention periods to avoid penalties and legal issues.
b. Business Needs: Align data retention policies with the company’s specific business requirements and operational workflows.
c. User Stories: Understanding the needs of your subject matter experts is key to archival success. The SMEs understand the real data needs of the business, audit requirements, and what information needs to be readily accessible.
Conclusion:
Archiving old ERP applications is a crucial responsibility for IT Application Managers in large-scale enterprises with extensive data centers and cloud computing operations. By understanding how to archive data effectively, selecting a suitable solution, and implementing data retention strategies, organizations can preserve valuable historical information securely and compliantly. As companies continue to evolve and modernize, the archiving process becomes a strategic investment in the long-term success of their operations. For IT Application Managers seeking a comprehensive and reliable archiving solution, APIX offers a user-friendly, cost-effective, and secure data archiving platform tailored to the unique needs of large enterprises. To learn more, visit https://www.nogalis.com/lawson-data-archive/
https://www.nogalis.com/wp-content/uploads/2023/08/Archiving-Old-ERP-Applications-A-Comprehensive-Guide-for-IT-Application-Managers.jpg470470Angeli Mentahttps://www.nogalis.com/wp-content/uploads/2013/04/logo-with-slogan-good.pngAngeli Menta2023-08-08 07:33:122023-08-08 13:41:36Archiving Old ERP Applications: A Comprehensive Guide for IT Application Managers
This article covers the steps for configuring Lawson to automatically generate all file types (XML, etc) for each batch job that is run.
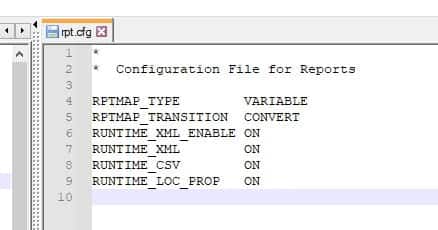
In LAWDIR/system, you will need to look for a rpt.cfg file. If the file doesn’t exist, then you must create it.
Next, to generate XML for all batch jobs, you must set RUNTIME_XML to ON. For CSV, the configuration type is RUNTIME_CSV.
See below for a sample file:
lawdir/system/rpt.cfg
There is no restart or downtime required for these changes to take effect. Simply restart the system and your new changes will be applied to your batch jobs moving forward.
https://www.nogalis.com/wp-content/uploads/2023/07/Generate-XML-Files-for-all-Batch-Jobs.jpg470470Angeli Mentahttps://www.nogalis.com/wp-content/uploads/2013/04/logo-with-slogan-good.pngAngeli Menta2023-08-04 08:49:412023-07-28 14:51:05Generate XML Files for all Batch Jobs
To adjust the maximum heap size of a node in Landmark Grid, you first need to be logged into the Grid Management Console. From there, follow these steps:
Click the Configuration Manager link (the gears icon located at top right corner).
Next, click “Applications”.
Select your Landmark deployed application.
Click “Edit Properties”.
Under Grid Defined Properties, click “Max Heap”.
Select the “All” Radio Button.
Find the node you wish to adjust, and click on value it is currently assigned.
In the popup window, enter a new value and click save.
In the top left corner of the screen, click save again to apply the changes.
Click the home link in top right corner.
Click the stop link (black box in top right corner of the node you adjusted)
The system will shutdown that JVM then, automatically restart it for your change to take affect.
And you’re done. Good luck!
https://www.nogalis.com/wp-content/uploads/2023/07/How-to-adjust-the-Maximum-Heap-Size-of-a-Node-in-Landmark-Grid.jpg470470Angeli Mentahttps://www.nogalis.com/wp-content/uploads/2013/04/logo-with-slogan-good.pngAngeli Menta2023-08-01 08:49:242023-07-27 15:36:08How to adjust the Maximum Heap Size of a Node in Landmark Grid
For whatever reason that you need a Lawson profile ID, below is a quick way to access it in LID.
Login into LID and go to a temp directory you’re okay with dumping a file to.
Run this command lsdump -f roledump.txt ROLE SuperAdminRole
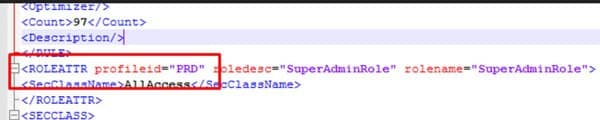
Go to the directory you dumped the file in and open roledump.txt in a text editor
Search for ProfileID until you find the one you’re looking for
Chances are, SuperAdminRole is created with an admin class assigned to it. You can also view this file using LASHOW command without having to dump the file.
Good luck!
Many organizations opt to engage Lawson consultant teams for managing their Lawson Security. These consultant teams offer managed services at a fixed monthly rate and possess extensive knowledge and expertise. This service is particularly suitable for larger organizations, but smaller organizations that do not require a full-time Lawson employee on-site may also find it beneficial. Nogalis provides this service, and you can contact us via our contact page for further information.
https://www.nogalis.com/wp-content/uploads/2020/10/How-to-get-a-Lawson-Profile-ID-in-LID-without-access-to-Lawson-Security-Administrator.jpg470470Angeli Mentahttps://www.nogalis.com/wp-content/uploads/2013/04/logo-with-slogan-good.pngAngeli Menta2023-07-28 08:19:182023-07-28 14:22:44How to get a Lawson Profile ID in LID without access to Lawson Security Administrator
Follow these steps to edit the domain name on the ADFS instance:
Update the Domain Name
Open the ADFS Management application from the ADFS server.
On the right, select “Edit Federation Service Properties”.
Change the Federation service name and identifier to reflect the new domain name.
Regenerate the Token Certificates
Open a PowerShell session on the ADFS Server
Run “Update-ADFSCertificate”, which will generate a new token-decrypting and token-signing certificate.
The old certificate will remain primary on the instance and cannot be deleted until a new primary is selected.
In PowerShell, run the command “set-ADFSProperties -AutoCertificateRollover $false”
Now you can right-click the secondary (new) certificates and set them as primary.
Delete the old certificates.
Reset the rollover option in PowerShell: “set-ADFSProperties -AutoCertificateRollover $true”
Deploy the new Server Certificate
Get the Thumbprint value on the new certificate for the new domain.
In PowerShell, run command “set-ADFSSslCertificate -thumbprint <value you saved in step 11>”
Bounce the ADFS service
Your ADFS domain/URL has been updated!
https://www.nogalis.com/wp-content/uploads/2023/07/How-to-change-the-ADFS-domain.jpg470470Angeli Mentahttps://www.nogalis.com/wp-content/uploads/2013/04/logo-with-slogan-good.pngAngeli Menta2023-07-25 08:16:542023-07-20 15:18:51How to change the ADFS domain