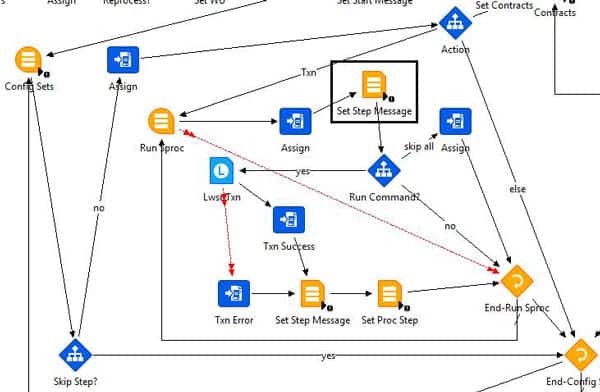
One way to control the “clutter” on your more complex IPA processes is to utilize the concept of “Dynamic Commands”.  Many times your flows will follow a pattern of reading some sort of data, validating/manipulating the data, then taking action on that data.  You can move much of this work into Stored Procedures and set up a configuration table to tell your flow which command to execute next.  This method also allows for more granular error handling and logging.

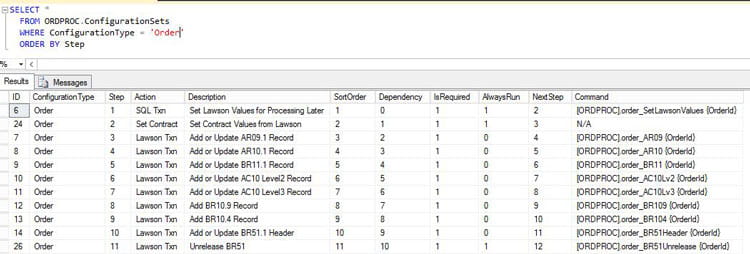
Here is a sample configuration table and flow.  The flow will read this in and follow each step in order, and use a SQL Query node to get the command text.  The Action field shows what type of action will be completed once the stored procedure brings back the command.

When changing level addresses on GL20 or AC10 make sure to specify all the level addresses, not just the ones that might have changed.

When you create the file for uploading, make sure to have the first level first, the second level next and so on until all levels are rebuilt.  If you try to change an address to one which has upper levels that did not exist in the old system, you will get errors.

Just like building the level addresses, you start with level 1, add a level 2 to an existing level 1 and so on.  Same thing when you rebuild the addresses – make sure to rebuild level by level.

After AD FS is implemented for your Landmark and LSF environments, Landmark will need to connect to the LSF server using the thick client URL and the user principal name of your admin account.  This means that all of your LSF connections will need to be updated in Rich Client, including the Infor Lawson Connection, File Activity Connection, System Command Connection, and Web Run Connection.  You will need to update the Web Root in each of these connections to the Thick Client URL, which is most likely your LSF server URL with port 1447 (i.e. https://lsf.company.com:1447).  Check with your installer to verify the port.  The User will need to be updated to the UPN value, for instance [email protected].

The Chart of accounts is recommended to be consistent for GL and Activities.  The Activity field, when populated, already differentiates the JE entry line from one to the same account without an activity specified.  This allows for easily determining how much was booked to a specific account and also split the bookings to a specific account into project related or not.

Account Categories in the AC module also allow you to have a separate chart of accounts, if desired, from your GL Chart of Accounts.

Since an account category is required when an activity is entered, it allows for a separation of the GL and AC charts if separation is desired.

Many users default in the Account Category so this value doesn’t have to be specified on each transaction that uses an activity throughout the system.  The defaulting could occur on GL20 instead of GL00 if the accounting unit used in the transaction would alter the way you would account for the project/activity posting.

To create an income statement for some accounting units, create an Accounting Unit list on MX10 that includes the companies and accounting units that you want to include in the report. Specify that list when running the GL293 and presto – an Income Statement with just those company-accounting unit combinations desired.

This can also be done by creating company groups if the “bursting” should be done by different companies.

A Level group can also be used which is great if one of your Accounting Unit levels signifies a reporting level.  As with the MX10 list, using RW70 level groups can also create a “bursting” effect to the GL293 Income Statement report.

Of course, creating different RW100 reports can also create the same effect and can be run together as a whole on RW100 by specifying a Report Group for example.  Use the same Format for all of the reports, and create different Row definitions that allow you to “burst” the income statement into different accounting groups.

If install-lpa.pl fails with exit code 2, make sure your OS account is configured. To configure the OS account, type command secadm provision os-C -o -a in a Landmark command window.  Then try restarting the Landmark update.


To customize the login instructions on your AD FS login screen, first you need to download the theme that will be updated. Then, you will update the onload.js script with your custom code, and then reset the theme to use the updated onload.js. Open PowerShell as administrator on the AD FS server, and follow these steps:

Download your theme:

export-adfswebtheme -name “<your theme name>” -DirectoryPath “<local directory>”

Modify the onload.js file located at <local directory>/script/onload.js:

Upload your modified onload.js file:

set-adfswebtheme -targetname <your theme name> -additionalfileresource @{Uri=’/adfs/portal/script/onload.js’;Path=”<local directory>/script/onload.js”}

The theme name that is delivered with the AD FS configuration is “default”, but you have the option of creating and customizing your own themes.

To update the left-hand illustration on your AD FS login screen, open PowerShell as administrator on the AD FS server, and type the command:

set-adfswebtheme -targetname <your theme name> -illustration @{path=”<path to the  image>”}

The theme name that is delivered with the AD FS configuration is “default”, but you have the option of creating and customizing your own themes.


The theme name that is delivered with the AD FS configuration is “default”, but you have the option of creating and customizing your own themes. To create a custom theme, open PowerShell as administrator on the AD FS server, and type the command:

new-adfswebtheme -name <your theme name> -sourcename <the theme to copy>

For your first theme, you will probably want to use “default” as the source.

To activate your theme, type command:

set-adfswebconfig -activatethemename <your theme name>


To update the company logo on your AD FS login screen, open PowerShell as administrator on the AD FS server, and type the command:

set-adfswebtheme -targetname <your theme name> -logo @{path=”<path to the  image”}

The theme name that is delivered with the AD FS configuration is “default”, but you have the option of creating and customizing your own themes.