
To Install a CTP on AS400, follow these guidelines:
Open a green screen and go to command line:
Enter the following commands:
call lawenv
qsh
cd $LAWDIR (or location of tar files)
The Versions file is EBCDIC instead of ASCII. You will use /QOpenSys/usr/bin/tar to unpack package.
Otherwise, you will get this error:
Error: Versions file is wrong CCSID.
If so, you will need to remove all untarred files from directory and start over with QOpenSys/usr/bin/tar
/QOpenSys/usr/bin/tar -xvf 9.0.1_patch_84930.tar
x 9.0.1_patch_84930.readme.html, 331911 bytes, 649 media blocks.
x Versions, 5816 bytes, 12 media blocks.
x Tasks, 3034 bytes, 6 media blocks.
x patch.tar.Z, 2483873 bytes, 4852 media blocks.
$
perl $GENDIR/bin/lawappinstall preview ProdLineName
perl $GENDIR/bin/lawappinstall update ProdLineName
perl $GENDIR/bin/lawappinstall activate ProdLineName
check for errors
ls $LAWDIR/ ProdLineName/rpg/*rpg/*SRC/*.err
Hit F3 to exit command line
Dspmsg to Display messages
If you find any failed job enter
Wrkjob # for failed job
When troubleshooting issues, you can look at the base UI of Infor applications temporarily without configurations by simply modifying the URL.
It is important to note that the URL addition must go on the Landmark URL (not Ming.le).
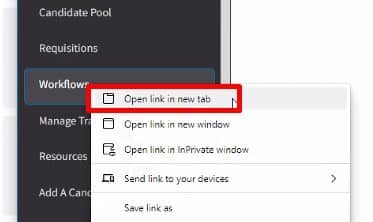
To open up the landmark URL, first right-click on any of the menu items on the side panel and select “Open link in new tab”.
Next, you will need to add the text &csk.disableuiconfigs=true to the URL. Keep in mind that this will only work for the HTML4 web UI.
That’s all there is to it. You’ve successfully disabled custom configurations in Infor web applications.

I’m often connecting to Lawson servers to grab reports, important files, etc. via Citrix through the browser and it’s frustrating when you can’t copy files via clipboard direct from the server, forcing me to use alternatives like wetransfer.com.
A workaround that seems to work for me is opening Citrix Workspace from your desktop tray icon
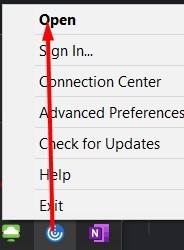
Then select Menu >> Accounts >> Add…

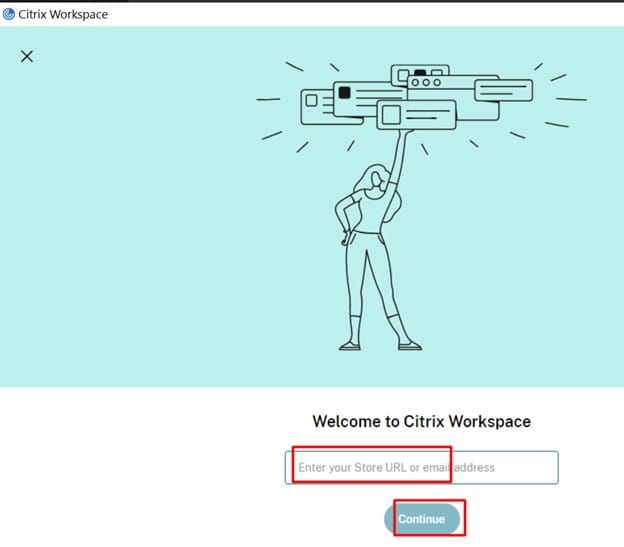
Add your store URL and continue
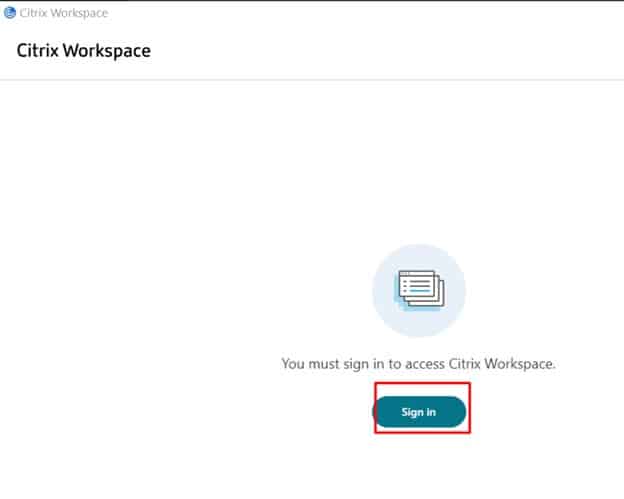
Once added, click Sign In
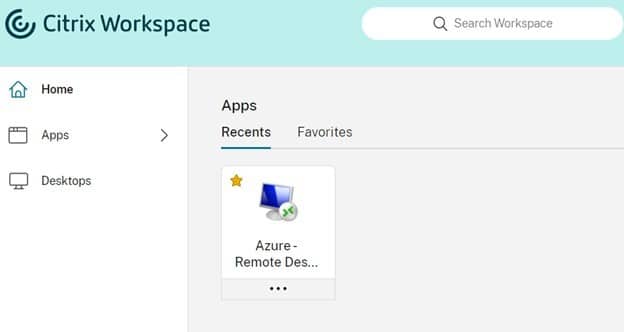
Enter your credentials and open the Remote Desktop app in your Citrix App Store.
Once remote desktop is open, click Show Option >> Local Resources and make sure Clipboard is checked
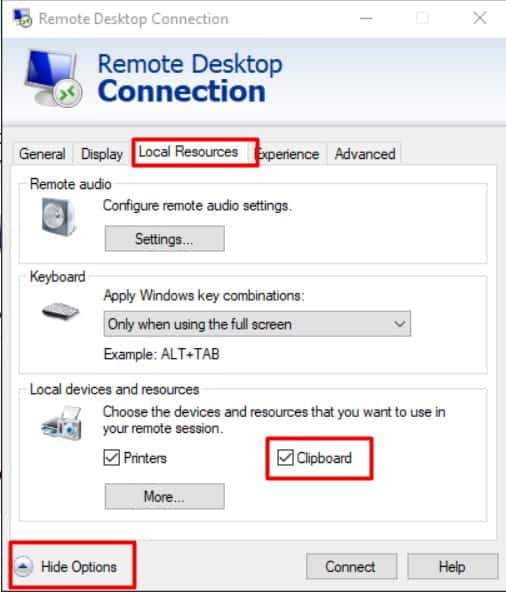
Clipboard should work properly now. If this ever doesn’t work, reboot your PC and try again.
secdump and secload AS400 error: “Command Not Found”
In order to have your command run successfully, you need to set up your Environment variables and library BEFORE you try to run any commands in Qshell.
Here are a couple of syntax examples for running the secdump and secload commands from Qshell to copy the security setup from test to production on AS400:
Dumping all security classes from a test Environment to a production Environment
CALL PGM(LAWENV) PARM(LAWTEST)
STRQSH
secdump lawapptest /home/secclasses.dmp
CALL PGM(LAWENV) PARM(LAWPROD)
STRQSH
secload -o /home/secclasses.dmp lawappprod
Dumping a single security class from a test Environment to a production Environment
CALL PGM(LAWENV) PARM(LAWTEST)
STRQSH
secdump lawapptest /home/hrclerks.dmp hrclerk
CALL PGM(LAWENV) PARM(LAWPROD)
STRQSH
secload -o /home/hrclerks.dmp lawappprod
Additional Information:
The two options outlined above are just two of the more common options used with secdump and secload; there are other options you can use. The complete syntax information for secdump and secload are provided below. See these syntax rules for information on other command options.


If your Landmark server is all of a sudden not communicating with your Lawson LSF server and you’re receiving the “Unable to connect to Grid Registry”, below are some steps you can take to resolve the issue.
Checks to validate grid connection issue in your bpm.properties file:
On the Landmark server:
1. Run this command on the Landmark command prompt.
Windows – packageLPSClientJars.bat
Unix – packageLPSClientJars.sh
This command grabs newly deployed jars and (re)creates the LPSClientJars.jar file in LASYSDIR\LPS directory
2. Copy the newly created LPSCLientJars.jar file to the LSF system (place it in GENDIR/bpm/jar)
On LSF Server
3. Stop the LSF Environment
4. From a command prompt, cd to GENDIR/bpm/jar
5. Extract the jar files out of the LPSClientJars.jar by running this command.
jar -xvf LPSClientJars.jar
6. Delete the LPSClientJars.jar file itself
UNIX – rm LPSClientJars.jar
Windows – del LPSClientJars.jar
The ONLY files that should exist in GENDIR/bpm/jar are
bpm-interfaces.jar
bpm-lpsforlsf.jar
gridbase.jar
grid-client.jar
lawutil_logging.jar
There should be no sub directories in GENDIR/bpm/jar
7. Restart your LSF Environment
NOTE: If your LSF environment runs on AIX, the LIBPATH in lawson.ev needs to include javahome/jre/lib/ppc64
This should resolve the issue and update the bpm.properties configuration.
If you’re not comfortable making these changes, we recommend organizations look into hiring a Lawson consultant team who offers managed services (typically at a fixed monthly rate). These Lawson teams have a wider range of expertise and knowledge and are ideal for larger organizations but also are great for smaller ones that don’t need a dedicated Lawson employee on-site 24/7.
To do a rngdbdump and then ftp to your PC, in LID do a form transfer and enter rngdbdump in the form ID field
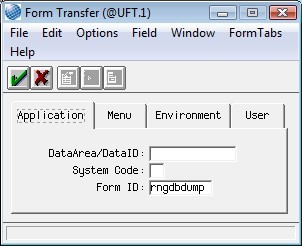
Enter the DataArea, FileName Range Option and Range Keys
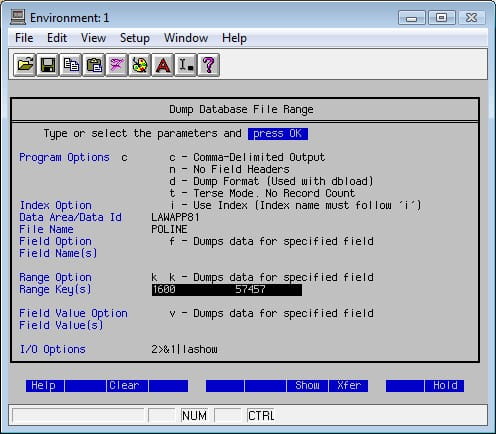
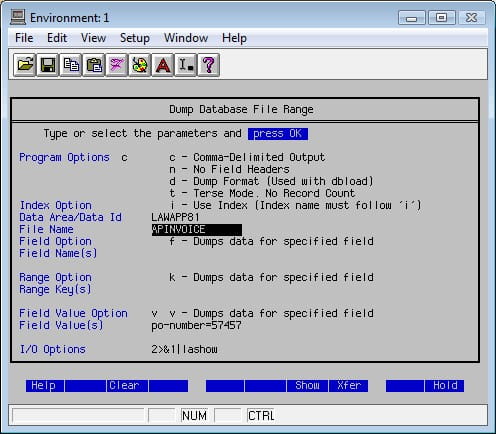
Hit return for output
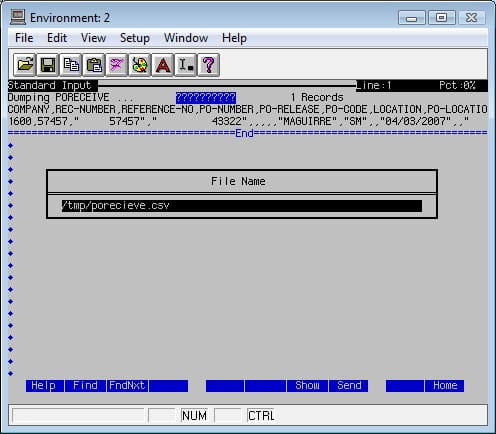
Shift F8 to save to a file
Log into Navigator and go to the filesystem you saved the file
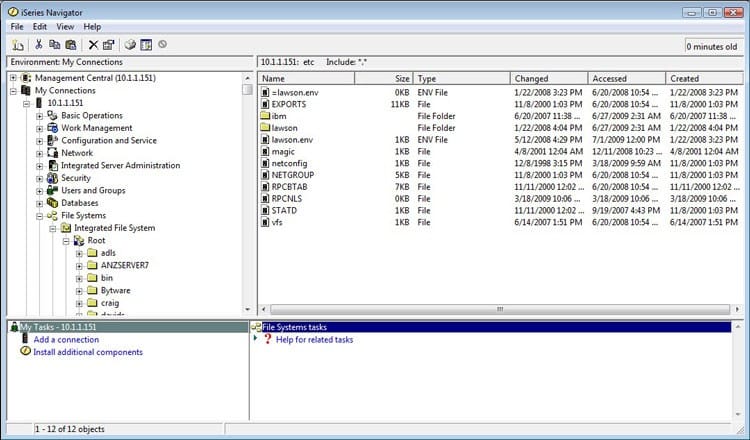
Drag and drop to your local directory