The jobinteg command identifies orphaned jobs and allows you to delete them to clean up your job server.
The parameters for jobinteg are
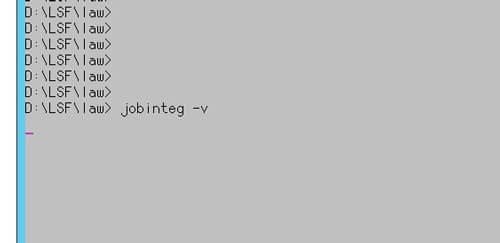
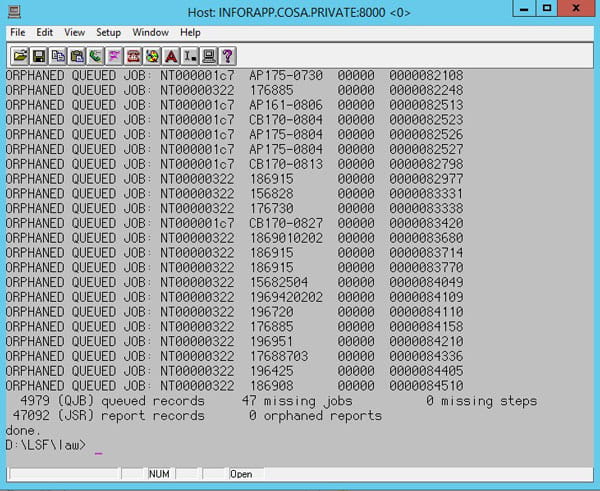
v (Verbose) – prints the bad records
t (Terse) – prints totals only
P – validate parameters
U – print usage/syntax
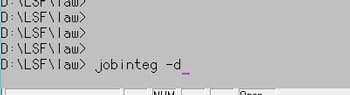
d – deletes bad records
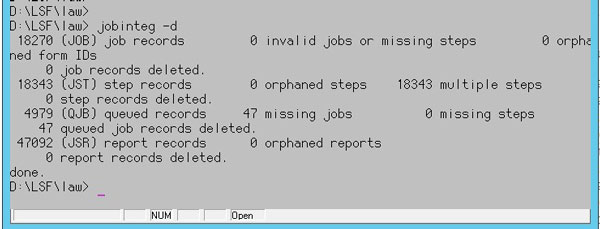
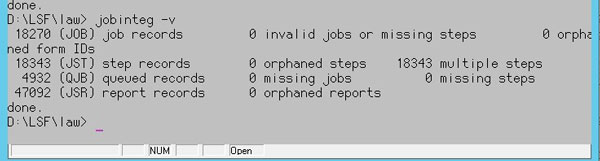
It is recommended that you run a jobinteg -v first to see how many (if any) jobs are orphaned or missing. Then, run a jobinteg -d to delete the orphaned jobs. Here is an example of the output:
https://www.nogalis.com/wp-content/uploads/2020/10/Using-Lawson-jobinteg-Command-to-Clean-up-Batch-Jobs.jpg470470Angeli Mentahttps://www.nogalis.com/wp-content/uploads/2013/04/logo-with-slogan-good.pngAngeli Menta2020-10-27 09:48:122021-01-06 17:47:32Using Lawson jobinteg Command to Clean up Batch Jobs
The Lawson Transaction Node can be used to add/edit/delete records in Lawson forms using AGS calls.
After you drag the node to your process, you can enter the AGS call manually, import it, or select “Build” in the properties to open a wizard. In the Wizard, select all your system values. When you are selecting the fields to update, also be sure to include all the key fields so that Lawson can find your record. The field values can be hard-coded, or you can use variables. Once you’re done building your call, click Finish, and the AGS call will be displayed in the properties window.
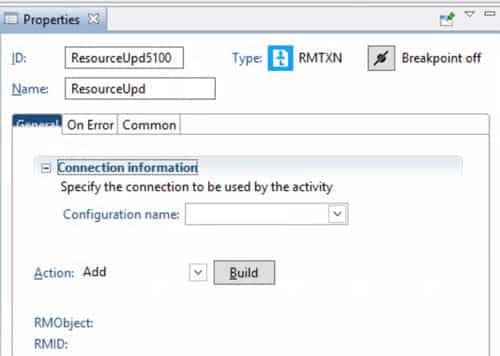
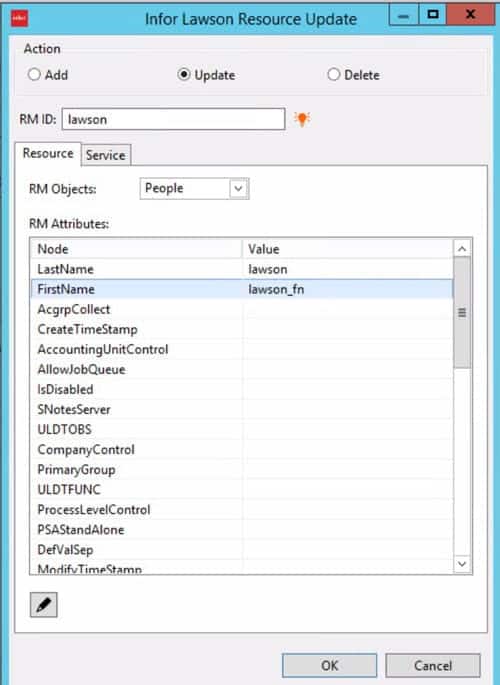
The Resource Update node is used to add/edit/delete resources in Lawson Security (Resource Manager). This node is extremely useful for automating onboarding and offboarding.
In the properties of the node, click “Build” to build your resource update action.
Select your action and the type of object you are updating (People or Thing). The selection criteria and the updated values can be IPA variables.
After you click “OK” on the build, you will be able to see what is being updated in the properties window.
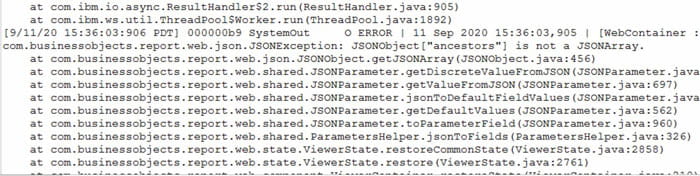
If your LBI instance is installed with Crystal Report Application Server 2011, you may see a recurring error in your LBI WebSphere logs, referencing “JSONOBject[“ancestors”] is not a JSONArray”.
This is a known defect in CRAS 2011, and will be resolved with an update to CRAS 2011 SP4. You can safely ignore this error, or you can configure the logger to ignore it. To configure the logger to ignore the error, add the following to the LBI_HOME\Reporting Services….\erswar-x.x.war\WEB-INF\classes\log4j.xml:
<!– Workaround to supress com.businessobjects.report.web.json.JSONException: JSONObject [“ancestors”] is not a JSONArray. error–>
<logger name=”com.businessobjects.report.web”>
<level value=”FATAL”/>
</logger>
Then, restart WebSphere and verify that the errors are no longer being logged.
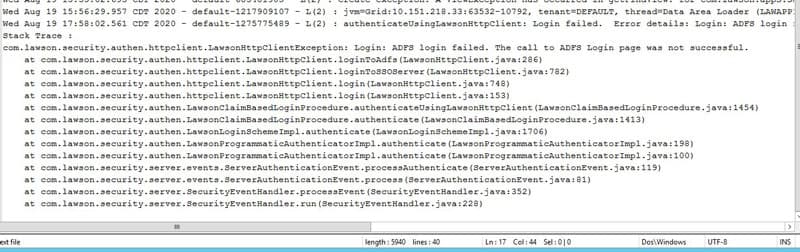
If you are logging into Rich Client and getting a “login failed error”, check the security_authen.log file located on the Landmark server at LASYSDIR/security_authen.log. If this file contains the error “ADFS login failed. The call to ADFS Login page was not successful”, you can configure your Rich Client installation to use an ADFS login.
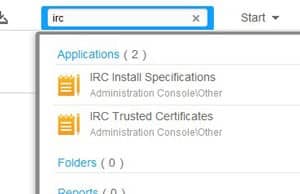
These steps can be performed in the LPA Web App, or you can get to Rich Client using the command line utility. To do this, log into the Landmark server as the Lawson user. Open a Landmark command window, and type the command “canvas64 gen”. This task is performed in the GEN data area.
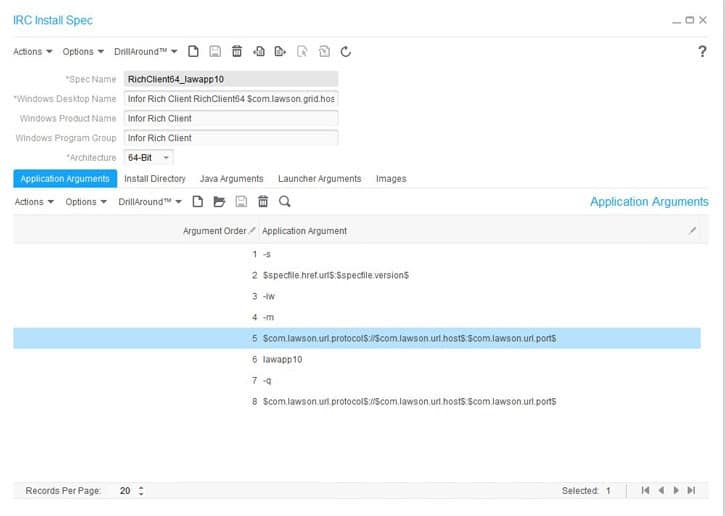
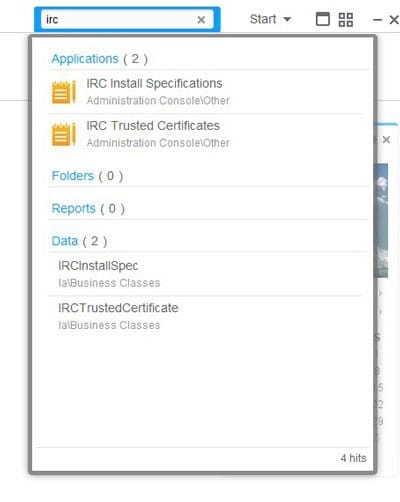
In the search window, type “IRC” and select “IRC Install Specifications.”
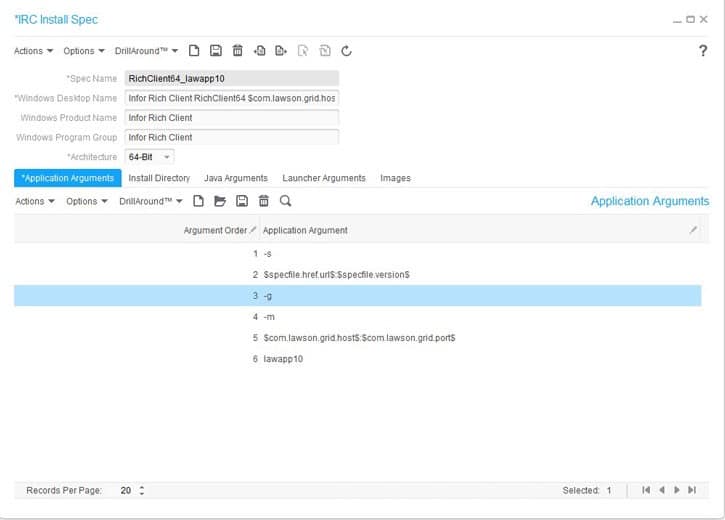
The default specifications for Rich Client 64 should look something like this:
You may be running Document Express with Lawson and Citrix Storefront and encountering this error. Before you jump to conclusions that this issue is related to Lawson or Citrix security, check these steps below.
The user is likely experiencing this error when trying to import invoices into Document express.
Make sure that all application related access is set in MHC.
Verify the user has Active Directory access to the import routine folder on the server where the invoices are loaded in from Lawson.
Lastly, verify the user has access to the import routine directly from Windows folder explorer. This path can be found in the import routine itself in document express.
Copy the import routine path, paste it into Windows folder explorer to verify access.
Conclusion: When the user imports the invoice in doc express, it downloads the file locally and opens it. Verify both channels are open for the user.
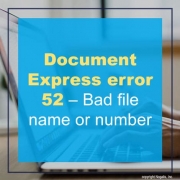
https://www.nogalis.com/wp-content/uploads/2020/10/Document-Express-error-52-Bad-file-name-or-number.jpg470470Angeli Mentahttps://www.nogalis.com/wp-content/uploads/2013/04/logo-with-slogan-good.pngAngeli Menta2020-10-06 08:09:092021-01-06 17:58:06Document Express error 52 – Bad file name or number
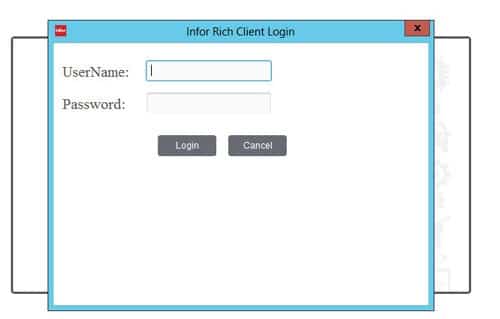
If you launch Rich Client and get a certificate error (particularly after a new Landmark install or update), here are the steps to update your IRC certificate.
Here is a sample error message that you might receive before you are even presented with a login screen:
You can resolve this issue either in the LPA web administration tool, or you can log into your IPA server as the lawson user, open a Landmark command window, and type the command “canvas64 gen”. These tasks are performed in the GEN data area.
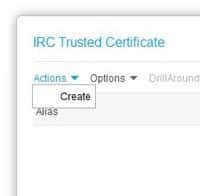
In the search box, type “IRC” and select “IRC Trusted Certificates”
Go to Actions > Create
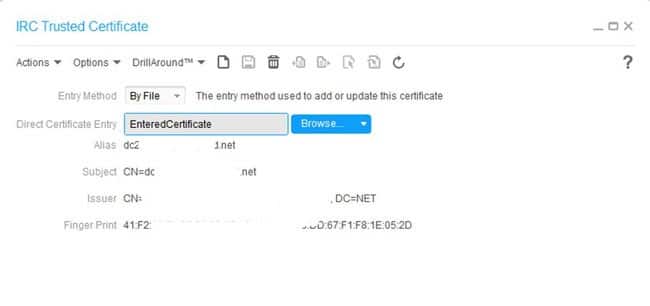
Add the certificate by file. Browse to a previously exported certificate (Base 64 cer format) and click the save button. The certificate details will be displayed if the certificate is valid.
https://www.nogalis.com/wp-content/uploads/2020/09/Certificate-Error-When-Loading-Rich-Client.jpg470470Angeli Mentahttps://www.nogalis.com/wp-content/uploads/2013/04/logo-with-slogan-good.pngAngeli Menta2020-10-01 08:32:572021-01-06 17:59:03Certificate Error When Loading Rich Client
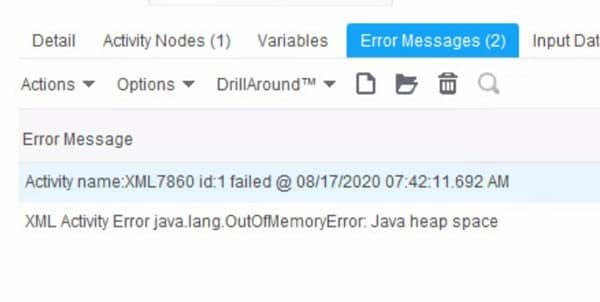
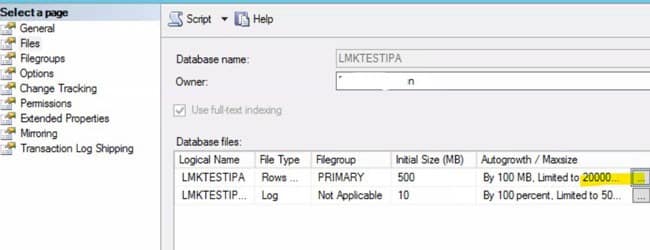
We recently noticed some strange behavior in IPA. All of our work units were stuck in “Ready” status, and the few Work Units that actually had errors indicated a java heap space issue. Some of the work units weren’t showing that a log was being created. We were also getting a generic error when uploading IPA processes.
It did seem like there was some kind of space or memory error. A reboot of the server didn’t address the issue. We were investigating and just happened to look at the command line window that opens up with IP Designer. That was the only place where saw a useful error message. It indicated that the database file had run out of space.
The resolution was to increase the “Maxsize” property on the IPA database file. In SQL Server, this is in the Database properties, Files tab.
https://www.nogalis.com/wp-content/uploads/2020/09/Database-File-Space-Issues-That-Manifest-in-IPA-Errors.jpg470470Angeli Mentahttps://www.nogalis.com/wp-content/uploads/2013/04/logo-with-slogan-good.pngAngeli Menta2020-09-28 08:33:232021-01-06 18:02:44Database File Space Issues That Manifest in IPA Errors
As of October 31, 2020, Infor is no longer going to support Internet Explorer as a browser for accessing Lawson applications. According to Microsoft, the end of life for IE will coincide with the end of life for Windows 10, so this is not a notice for the end of life for IE. This just means that any future Infor patches will not be developed to function with Internet Explorer.
Lawson has been stable in Chrome since the later releases of version 9. It is also supported on Microsoft Edge Chromium and Firefox. There are some things you will want to consider before moving to a different browser:
Impacted Applications
Infor Lawson System Foundation (LSF) 10.0.X.0 release
Infor Landmark Technology Runtime 10.1.1.X and 11 releases
Lawson for Infor Ming.le 10.0.X.0 and 10.1.X releases
Infor Lawson for Ming.le Content Lawson applications 10.0.X release
Infor Lawson Mobile Supply Chain Management (MSCM) 11.X release
Infor Lawson Point of Use (POU) 11.X release
Infor Lawson Business Intelligence (LBI) 10.X.0.0 release
Infor Business Intelligence for Lawson (IBI) 10.X.0.0 release
All Infor Human Capital Management (HCM) products, including Infor Global Human Resources (GHR) and Infor Talent Management 10.1, 10.2 and 11 releases.
Design Studio 10 (the application) is going to continue to be supported in Internet Explorer
Design Studio forms might need some updates to make them compatible with a different browser. Design Studio relies heavily on JavaScript, and some of the syntax is browser-dependent. Make sure you test all of your design studio forms before having users switch browsers.
MSCM
MSCM 10 is not compatible with Chrome. Infor will continue to support Internet Explorer with MSCM 10 installations until the end-of-life for MSCM 10.X.
MSCM 11.X (base, POU, and SIM) is compatible with Chrome, and it is recommended that you get to v11 as soon as possible! Contact us if you need help upgrading.
Recommendations
Switching browsers should be pretty seamless. Just have your users spend a week performing their daily tasks in your organization’s chosen browser, and log any issues that arise. If they hit a wall, they can always move to IE until a workaround is provided.
Upgrade MSCM! If you own licensing for MSCM, the update should already be available to you.
As always, check the Infor Lawson compatibility matrix to get the latest information in application compatibility.
https://www.nogalis.com/wp-content/uploads/2020/09/Infor-Support-Ending-for-Internet-Explorer.jpg470470Angeli Mentahttps://www.nogalis.com/wp-content/uploads/2013/04/logo-with-slogan-good.pngAngeli Menta2020-09-17 09:37:282021-01-06 18:05:06Infor Support Ending for Internet Explorer
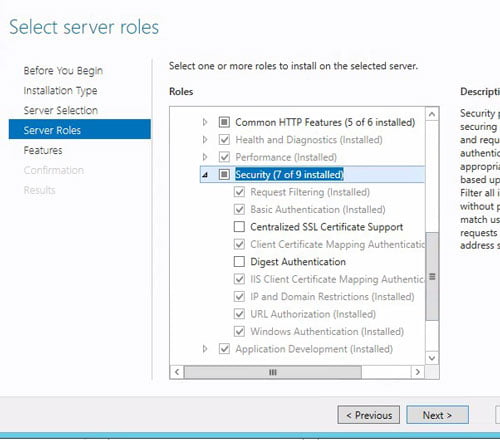
If your organization has custom websites that need to be secured quickly and easily, you can use the IIS internal authentication and authorization rules.
First make sure that your host server is set up to utilize Windows Authentication. In Roles and Features > Server Roles > Web Server (IIS) > Security, install “Windows Authentication”.
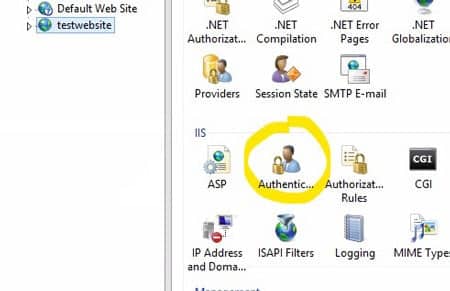
Once Windows Authentication is installed, select your site in IIS and select “Authentication”
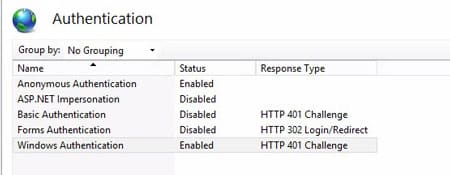
Set Windows Authentication to enabled
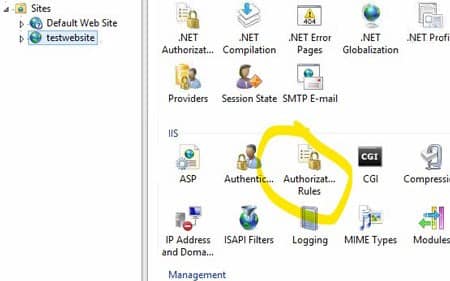
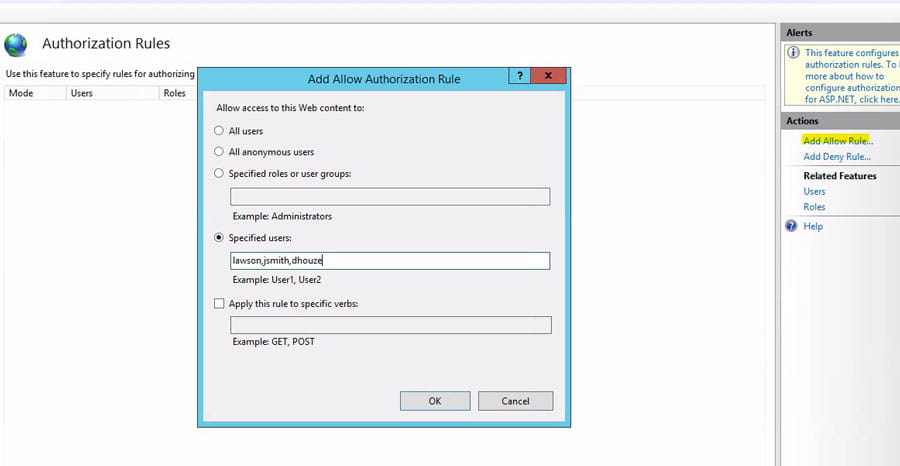
Go back to your website, and select “Authorization Rules”
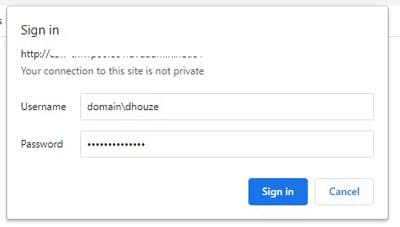
From here, you can give access to individual users or Active Directory groups. The users will be presented with a Microsoft credentials dialog, and they will log in with their Windows credentials.
https://www.nogalis.com/wp-content/uploads/2020/09/Securing-a-website-using-IIS.jpg470470Angeli Mentahttps://www.nogalis.com/wp-content/uploads/2013/04/logo-with-slogan-good.pngAngeli Menta2020-09-14 09:01:052021-01-14 15:39:42Securing a website using IIS