After making updates to your LDAPS-enabled Lawson environment, you may encounter errors when trying to start the Lawson service.  Check the lase server logs for a message similar to this:


20-12-03 14:07:57:455 1 default.SEVERE api.LawsonSecurity.initialize(): Failed to initialize Ldap

20-12-03 14:07:57:467 1 default.SEVERE api.LawsonSecurity.getConfig(): com.lawson.lawsec.authen.LSFSecurityAuthenException:Failed to initialize LDAP. Detailed Message is javax.naming.CommunicationException: simple bind failed: 111.111.111.111:636 [Root exception is javax.net.ssl.SSLHandshakeException: sun.security.validator.ValidatorException: PKIX path building failed: sun.security.provider.certpath.SunCertPathBuilderException: unable to find valid certification path to requested target]

Stack Trace : javax.naming.CommunicationException: simple bind failed: 111.111.111.111:636 [Root exception is javax.net.ssl.SSLHandshakeException: sun.security.validator.ValidatorException: PKIX path building failed: sun.security.provider.certpath.SunCertPathBuilderException: unable to find valid certification path to requested target]

                at com.sun.jndi.ldap.LdapClient.authenticate(LdapClient.java:219)

                at com.sun.jndi.ldap.LdapCtx.connect(LdapCtx.java:2895)


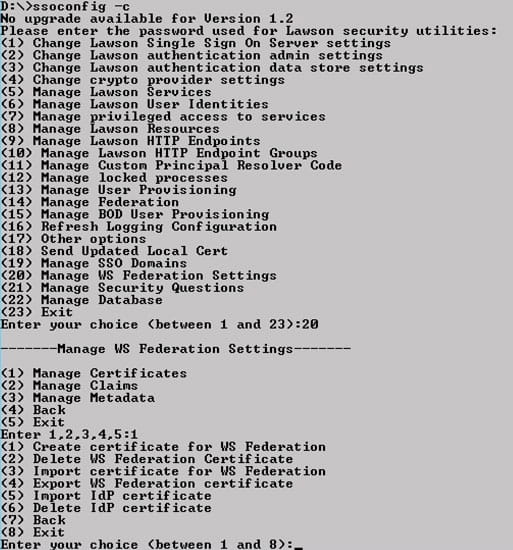
This message means that you need to add/update the ADLDS certificate for your OS Java.  Follow these steps to update the certs:


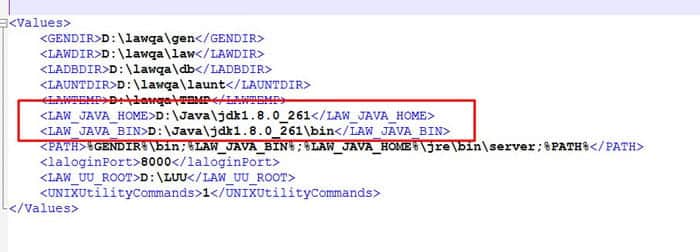
  1. Set environment variables (<APPINSTALLDIR>\enter)
  2. Run command “where java” to determine where LAW_JAVA_HOME is located
    1. NOTE: You may have multiple instances of Java, and you need to make sure you apply the cert to all of them!
  3. Back up file LAW_JAVA_HOME\jre\lib\security\cacerts
  4. Run the ikeyman utility at WAS_HOME/bin
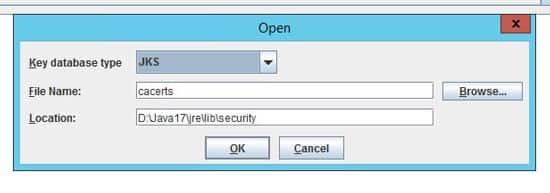
  5. Open the LAW_JAVA_HOME/jre/lib/cacerts file and select the Key database type of JKS
  6. Type password “changeit”
    1. This is the default password for the Java certs files
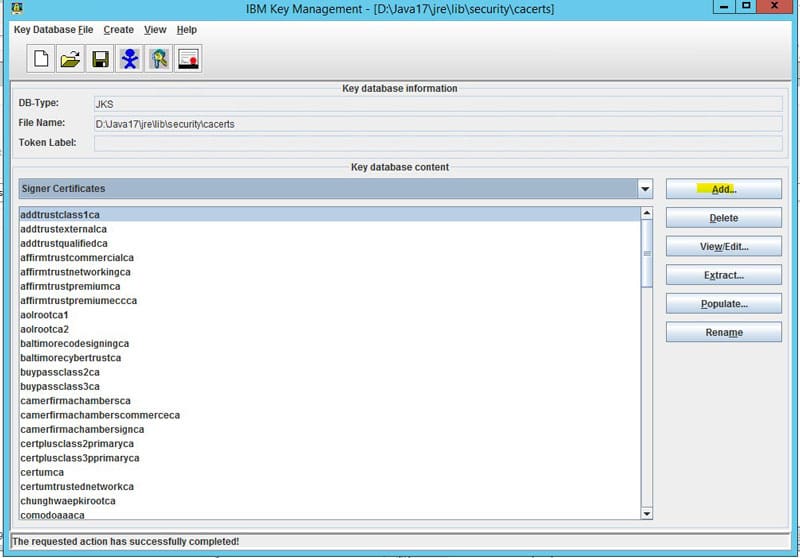
  7. Select “Signer Certificates” in the dropdown
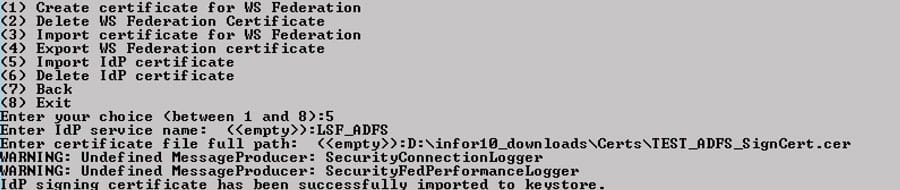
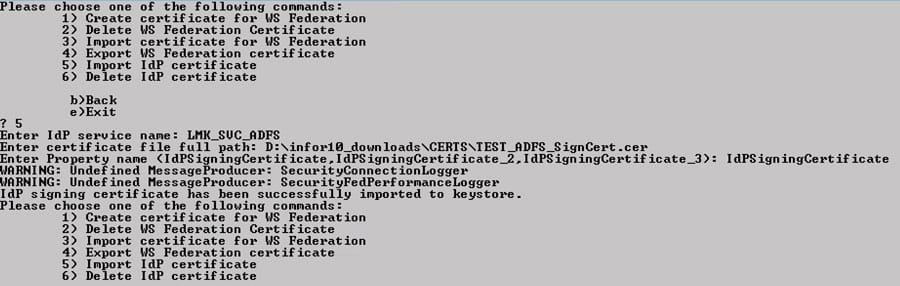
  8. Click “add” and navigate to the ldap certificate exported earlier
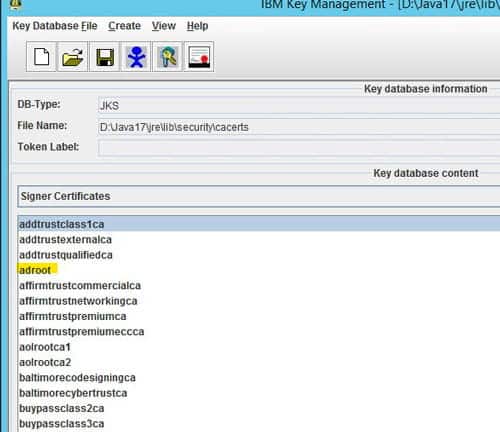
  9. Give it a meaningful name

Staten Island’s Richmond University Medical Center (RUMC) has selected Infor Cloverleaf™ to increase interoperability across its network of healthcare services and providers. The Infor Cloverleaf Integration Suite is an innovative foundation for clinical interoperability and supports many protocols for communication, which can transform messages between various industry-standard data formats. RUMC will deploy Infor Cloverleaf to contribute to improved care outcomes, and to lower healthcare costs for patients. By moving interoperability to the cloud, RUMC will be able to focus more time on care outcomes and business outcomes, less time managing servers and applications, begin leveraging FHIR and API-based data exchange, and benefit from being on the latest version of Cloverleaf with routine upgrades. Per the press release, Infor Cloverleaf will enable data interoperability and integration across clinical applications, both inside and outside of the organization, through support of proprietary and traditional data formats and protocols as well as newer web-based API standards such as FHIR.


For Full Article, Click Here

LDAPS requires multiple certificates, and all must be valid and current for authentication to work in Lawson.  If you are trying to log into Lawson after implementing LDAPS and Lawson is behaving like the user doesn’t exist or the password is invalid, check the LAWDIR/system/security_authen.log.  A certificate issue will be noted by verbiage such as:

Tue Nov 10 16:45:55.359 PST 2020 – default–844051996: Error encountered while getting users DN. Please see logs for details[858vk9nl1gd6d40vdn8r41qhl3]Could Not Bind With privileged identity. User [lawson]simple bind failed: dc.company.com:3269
Stack Trace :
javax.naming.CommunicationException: simple bind failed: 
dc.company.com:3269 [Root exception is javax.net.ssl.SSLHandshakeException: com.ibm.jsse2.util.h: PKIX path validation failed: java.security.cert.CertPathValidatorException: The certificate expired at Fri Nov 06 11:33:36 PST 2020; internal cause is:
java.security.cert.CertificateExpiredException: NotAfter: Fri Nov 06 11:33:36 PST 2020]
at com.sun.jndi.ldap.LdapClient.authenticate(LdapClient.java:231)
at com.sun.jndi.ldap.LdapCtx.connect(LdapCtx.java:2753)
at com.sun.jndi.ldap.LdapCtx.<init>(LdapCtx.java:329)

This message could indicate that your AD LDS certificate is expired, so you need to check that cert on the server, as well as in WebSphere.  However, it could also mean that the certificate on the domain controller is expired, so you’ll need to check that as well.

If you are using AD FS to authenticate against Lawson, and having trouble connecting to either Lawson or Landmark, one thing you need to verify is the IdP certificate.  This certificate should be the Token Signing Certificate that is exported from the AD FS manager.

To make sure the certificate is valid in Lawson, use an LDAP browser to connect to your Lawson AD LDS instance.  Navigate to lwsnSecData > svcprop > [your ADFS service name].  Open the properties of the IdPSigningCertificate and validate the lwsnSvcPropValueBinary value.  If it is blank, you need to delete and reinstall the IdPSigningCertificate.  If it is not blank, but you are still having trouble with connecting to Lawson, and you’ve tried everything else, it doesn’t hurt to delete and recreate the certificate.

To delete and reimport the certificate in Lawson, log into ssoconfig.  Select Manage WS Federation Settings > Manage Certificates.  Select “Delete IdP Certificate” and type in the service name for which you are deleting the cert.  Then select “Import IdP Certificate”.  Provide the service name and full file path.

To validate the Landmark certificate, in Rich Client GEN navigate to Service > [the service that is used with AD FS].  In Service Properties, check the IdPSigningCertificateThumbrint.  Make sure it matches the thumbprint on your Token Signing certificate that was exported from AD FS.  If it doesn’t match, then follow the steps to delete and reimport the certificate.

To delete the certificate, in a Landmark command window, type the command secadm -m.  Choose option 30 (Manage WS Federation Settings).  Choose option 1 (Manage WS Federation Certificate).  Select 6 to delete the certificate (provide the service name).  Then, select 5 to import the certificate (provide the service name and file path).

When Java is updated or moved on the Lawson server, the application will also need to updated to use the new location.

First, update the system environment variables JAVA_HOME and LAW_JAVA_HOME.  Also, update those entries in install.cfg so that location will be used for future updates.

You may also need to run the command to update the environment parameters.  Create an XML file with the following data (using your new location for java):

Then, navigate to GEN_DIR/bin and run the LaMgmtCmd.exe command with the -u option to update the environment parameters:

LaMgmtCmd.exe -u <environment> <update file>

To view your environment parameters, run the LaMgmtCmd command with the -r option

After a WebSphere fix pack, or an update of some kind, you might see a 500 server error that indicates a Bouncy Castle jar mismatch.

To verify that your issue is related to Bouncy Castle, you can check the ssoconfig/SSOCfgInfoServlet web page to see if the XML will render.  If you see a similar error below, check the ios.log.  The “NoSuchProviderException: No such provider: BC” indicates that the Bouncy Castle jar files need to be updated.

[10/15/20 9:06:31:448 CDT] 000000ef SystemErr     R com.lawson.lawsec.authen.LSFSecurityAuthenException:Message:java.security.NoSuchProviderException: No such provider: BC

Stack Trace : java.security.NoSuchProviderException: No such provider: BC

at javax.crypto.Cipher.getInstance(Unknown Source)

at com.lawson.lawsec.authen.AuthenDat.decryptData(AuthenDat.java:2619)

at com.lawson.lawsec.authen.AuthenDat.getRMPrivUserPass(AuthenDat.java:521)

at com.lawson.lawsec.authen.LawsonAuthentication.getJNDIProps(LawsonAuthentication.java:1087)

at com.lawson.lawsec.authen.LawsonAuthentication.getInitialDirContext(LawsonAuthentication.java:1045)

at com.lawson.lawsec.authen.LawsonAuthentication.getInitialDirContext(LawsonAuthentication.java:1033)

at com.lawson.lawrm.rmMetaMgr.RMContext.getDirContext(RMContext.java:464)

at com.lawson.lawrm.rmMetaMgr.RMContext.getRMMetaDataManager(RMContext.java:798)

at com.lawson.lawrm.rmMetaMgr.RMContext.InitContext(RMContext.java:282)

at com.lawson.lawrm.rmMetaMgr.RMContext.<init>(RMContext.java:162)

at com.lawson.lawrm.rmMetaMgr.RMContext.<init>(RMContext.java:126)

at com.lawson.lawrm.rmMetaMgr.RMContext.getInitialContext(RMContext.java:208)

at com.lawson.lawrm.rmMetaMgr.RMContext.borrowRMContext(RMContext.java:303)

at com.lawson.lawsec.authen.LawsonService.<init>(LawsonService.java:152)

at com.lawson.lawsec.authen.LawsonSecurityXRefImpl.getServiceForName(LawsonSecurityXRefImpl.java:365)

at com.lawson.lawsec.authen.LawsonSSODomainManagerImpl.getDefaultPrimaryService(LawsonSSODomainManagerImpl.java:320)

at com.lawson.security.vulmit.VulnerabilityMitigation.getDefaultPrimaryService(VulnerabilityMitigation.java:193)

at com.lawson.security.vulmit.VulnerabilityMitigation.getStringServiceProperty(VulnerabilityMitigation.java:203)

at com.lawson.security.vulmit.VulnerabilityMitigation.configureAntiCsrf(VulnerabilityMitigation.java:173)


To update the jar files, navigate to WAS_HOME/java/bin and run the command “java -jar %GENDIR%/java/thirdparty/bcinstall.jar”.  This will automatically check the validity of your Bouncy Castle jar file and update if needed.

D:\IBM\WebSphere\AppServer\java\bin>.\java -jar %GENDIR%\java\thirdParty\bcinstall.jar

Testing for provider … FAIL: No such provider: BC

Installing provider

Installing bcprov-jdk16-145.jar

transferring …….done

Adding java.security entry

Adding org.bouncycastle.jce.provider.BouncyCastleProvider to java.security file

backing up ………………………………………………..done

D:\IBM\WebSphere\AppServer\java\jre\lib\security\java.security backed up to D:\IBM\WebSphere\AppServer\java\jre\lib\security\java.se

curity1901856172194836655.bak

placing new properties ………………………………………….done

Testing for strong encryption policy … PASS.

..done

backup D:\IBM\WebSphere\AppServer\java\jre\lib\security\policy\unlimited\local_policy.jar to D:\IBM\WebSphere\AppServer\java\jre\lib

\security\policy\unlimited\local_policy.jar78069013951101779.bak

..done

copied D:\IBM\WebSphere\AppServer\java\jre\lib\security\policy\unlimited\US_export_policy.jar to D:\IBM\WebSphere\AppServer\java\jre

\lib\security\policy\unlimited\local_policy.jar

Verifying provider … PASS.

Verifying policy … PASS.

Summary :

Provider installed successfully

Policy installed successfully

Crypto policy set


  1. Download the bulletin.
    1. Log into your MyBSI account
    2. Navigate to Product Maintenance
    3. Select your product
    4. Regulatory Bulletins
    5. Select your bulletin
    6. Click the download button(s)

  2. On the Server where BSI is installed, open a command window as administrator
  3. Navigate to the install directory (i.e. D:\BSI\TF10ClientInstall)
  4. Change directory to the directory that matches your server configuration (win32 for a 32-bit server, or amd64 for a 64-bit server)
  5. Run the command tf10lic /ResetDSN
  6. Run the command set TF10_SCHEMA_NAME=<Your Schema/Databse Name>
  7. Run the command set TF10_DATASET=DEFAULT
  8. Run the command tfmaint “<full file path where you downloaded the bulletin>”

  9. Check the “upd” log file for any error messages
  10. Validate PRTF.1 in Lawson