
844-NOGALIS (844-664-2547)
Nogalis, Inc.
  • Link to Facebook
  • Link to X
  • Link to LinkedIn
  • Link to Mail
  • Company
    • News, Events and Articles
    • About Us
  • Products
    • Infor Lawson Data Archive
    • PeopleSoft Data Archive
    • Oracle Data Archive
  • Services
    • Infor Lawson Support
    • Infor Lawson / CloudSuite Consulting
  • Education & Training
  • Support
  • Contact Us
  • Click to open the search input field Click to open the search input field Search
  • Menu Menu

Archive for category: Frontpage Article

You are here: Home1 / News, Events and Articles2 / Frontpage Article

IP Designer Series – Landmark Transaction

Articles, Frontpage Article, News

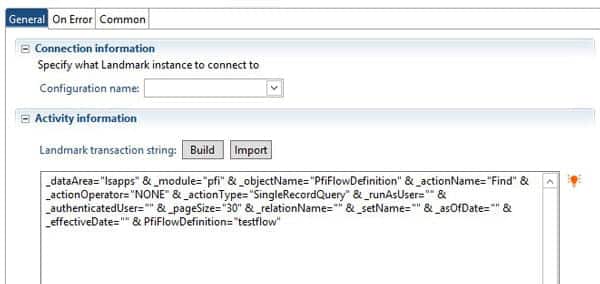
Use the Landmark Transaction node to query or update Landmark data.  In the properties window, select “Build” and you will be presented with a wizard to help you build your Landmark query.
Select the data area that you are querying/updating.  Select the Module and Object Name.  (HINT: these values can be found by using Ctrl+Shift+Click on the form in Rich Client or the Landmark Web UI).

Choose your action.  There are basic CRUD (create, read, update, delete) actions for each object, and there will be more actions specific to the object you selected.  Action Operator will likely be “NONE”.  Select your action type (SingleRecordQuery, MultipleRecordQuery, etc.), and finally select the criteria.  Click OK.
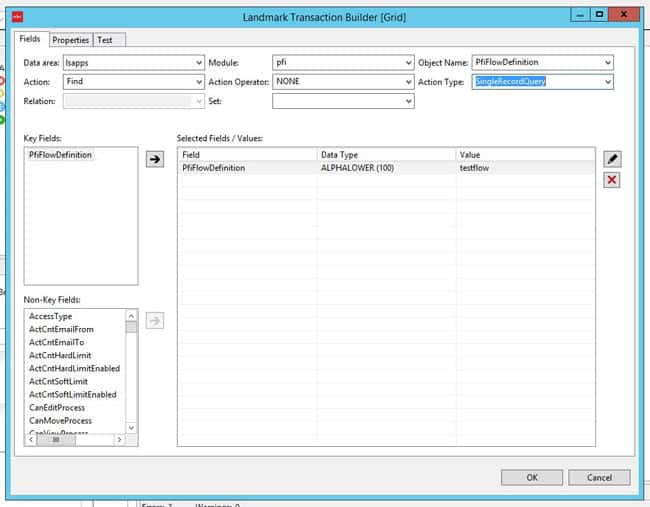
Decide whether to use the hardcoded values for your transaction field values.  You can supply variables here to make your flow more portable.
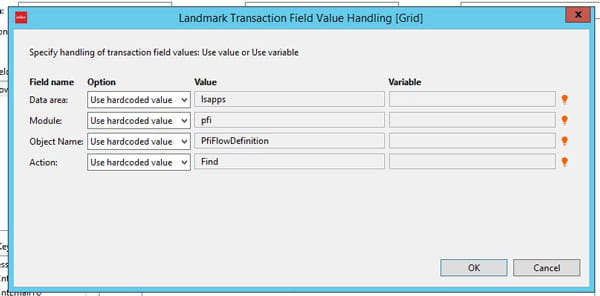


02/20/2020
https://www.nogalis.com/wp-content/uploads/2020/02/IP-Designer-Series-Landmark-Transaction.jpg 470 470 Angeli Menta https://www.nogalis.com/wp-content/uploads/2013/04/logo-with-slogan-good.png Angeli Menta2020-02-20 08:33:332020-02-19 11:01:43IP Designer Series – Landmark Transaction

Security violation for activity group on Activities batch jobs

Articles, Frontpage Article, News

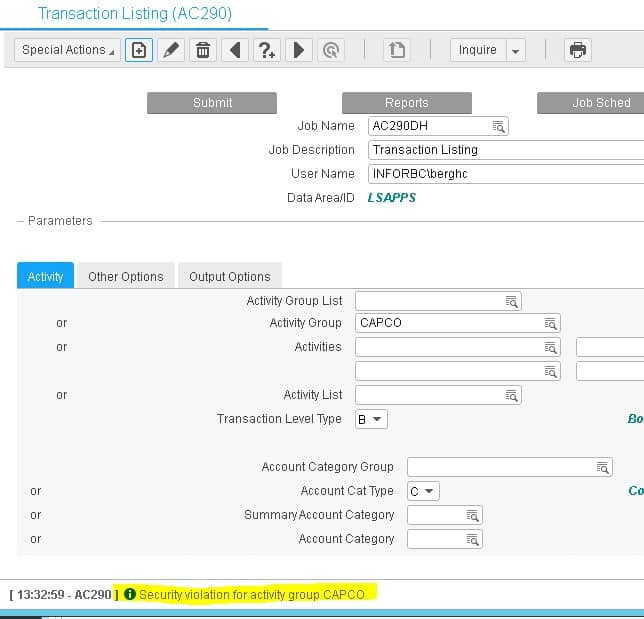
Security on activity groups is handled outside of LSA.  If users are getting a “security violation for activity group” when they try to add a batch job in the activities module, you will need to do a little extra security maintenance.
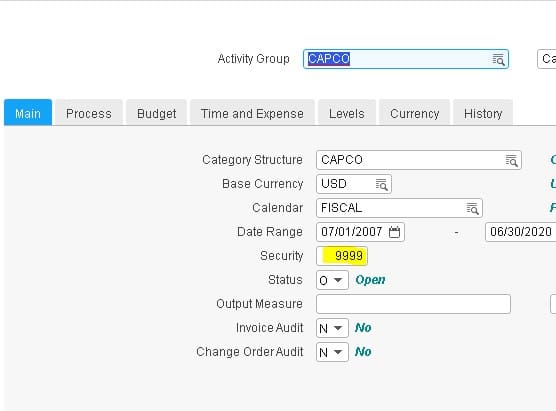
First, go to AC00 and make note of the value in the “Security” field.
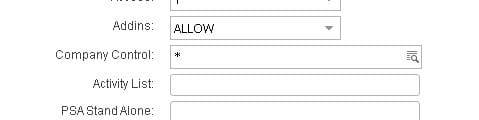
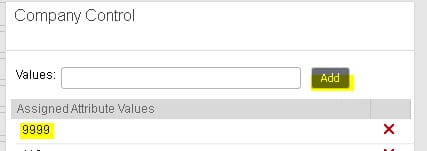
Next, open the user’s security record in ISS or LSA and navigate to the “Company Control” field.  Click on the search and make sure that “Security” value is in the user’s company list.  If not, add it.  Then clear out the security cach and perform an IOSCacheRefresh.

02/18/2020
https://www.nogalis.com/wp-content/uploads/2020/02/Security-violation-for-activity-group-on-Activities-batch-jobs.jpg 470 470 Angeli Menta https://www.nogalis.com/wp-content/uploads/2013/04/logo-with-slogan-good.png Angeli Menta2020-02-18 08:09:422020-02-14 13:10:04Security violation for activity group on Activities batch jobs

AP Invoices and Asset Management

Articles, Frontpage Article, News

AP Invoices only flow to Asset Management when there is an Asset Template associated with the AP invoice distribution line.

The invoices appear on AM15 and can be then added to AM or not depending on the actual need.

AP invoices do not automatically create assets, they need to be reviewed on AM15 and all aspects of the information that appears there is able to be adjusted before the invoice becomes an Asset.


02/14/2020
https://www.nogalis.com/wp-content/uploads/2020/02/AP-Invoices-and-Asset-Management.jpg 470 470 Angeli Menta https://www.nogalis.com/wp-content/uploads/2013/04/logo-with-slogan-good.png Angeli Menta2020-02-14 11:51:572020-02-14 12:56:48AP Invoices and Asset Management

SSO Error Due to Expired WebSphere Cert

Articles, Frontpage Article, News

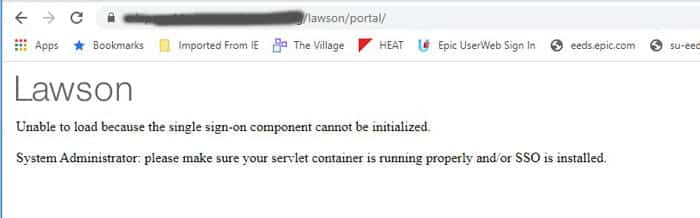
Recently we ran into the dreaded “Unable to load” error message in Portal, and could not find any indication of why Portal couldn’t load.  The most we could see through a Fiddler trace is that the sso.js file was getting a 500 error.  There was nothing logged anywhere.  Not on the WebSphere node, application server, nothing in ios, security, event viewer.  Nothing!  We figured WebSphere had to be the culprit, because sso.js is wrapped up in an ear file in WAS_HOME, and everything on the Portal side was working until it tried to hit that script.  So, we started digging into WebSphere and figured out that one of the certs was expired on the Node.  For some reason, a custom wildcard cert had been used for the WebSphere install on the node only.  We opted to switch it to use the default self-signed cert, which was not expired, and was the solution that worked best for us.  Another option would, of course, be to upload a new wildcard cert and switch the old one to the new one.

To switch a cert in WebSphere, go to Security > SSL certificate and key management > Key stores and certificates.  Select the NodeDefaultKeyStore of the node you want to change, and under additional properties on the right, select “Personal certificates”.  Click your “old” cert and select “Replace”.  Select the “new” certificate that is replacing the old one.  Check the “Delete old Certificate after replacement” box.

Bounce WebSphere services, or better yet, reboot.  And you should be good to go!


02/10/2020
https://www.nogalis.com/wp-content/uploads/2020/02/SSO-Error-Due-to-Expired-WebSphere-Cert.jpg 470 470 Angeli Menta https://www.nogalis.com/wp-content/uploads/2013/04/logo-with-slogan-good.png Angeli Menta2020-02-10 07:06:492020-02-07 22:15:10SSO Error Due to Expired WebSphere Cert

Know What’s in Your Array

Articles, Frontpage Article, News

The indexOf() method returns the first index of where a user given element is found in an array or it returns -1. This method has 1 required parameter and 1 optional parameter. The required parameter is the lookup value and the optional one is start index. The lookup value is the element you are trying to find. The start index is where you want to start looking for the lookup value.


Below shows some examples of how the indexOf() method works.


02/06/2020
https://www.nogalis.com/wp-content/uploads/2020/01/Know-whats-in-your-Array.jpg 470 470 Angeli Menta https://www.nogalis.com/wp-content/uploads/2013/04/logo-with-slogan-good.png Angeli Menta2020-02-06 07:54:002020-02-04 16:28:11Know What’s in Your Array

Chrome 80 Browser SameSite Workaround (Supporting Article)

Articles, Frontpage Article, News

With the Chrome 80 update, here is a simple workaround to disable SameSite cookies.


To get started open your Chrome Browser.

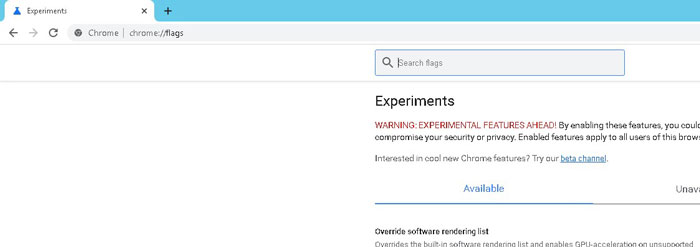
Type chrome://flags in the URL and press enter:

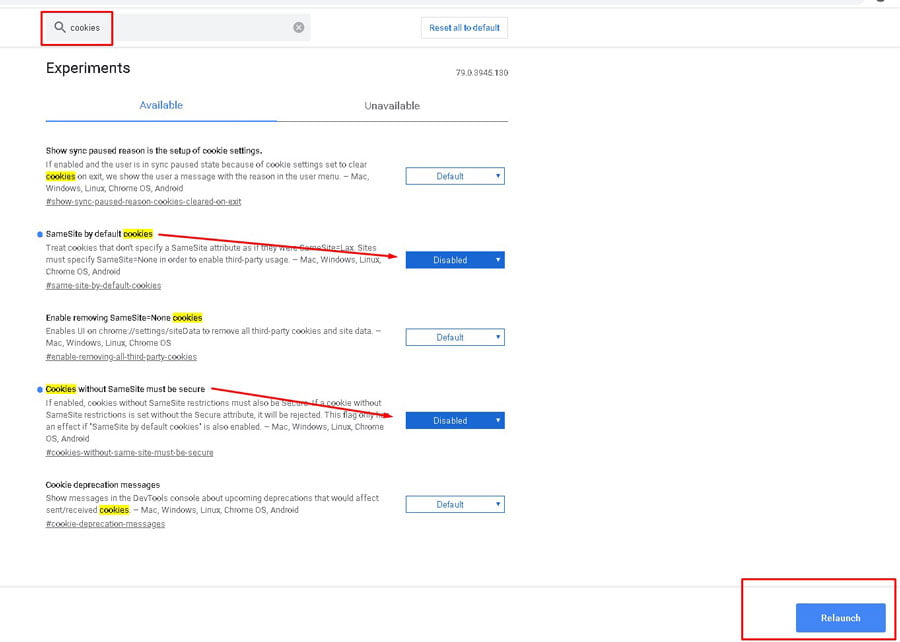
Search cookies and set SameSite by default cookies and Cookies without SameSite must be secure to disable, then relaunch the browser:

Confirm changes after relaunching and that it!


Watch the accompanying video below for a visual guide.

02/04/2020
https://www.nogalis.com/wp-content/uploads/2020/02/Chrome-80-Browser-SameSite-Workaround.jpg 470 470 Angeli Menta https://www.nogalis.com/wp-content/uploads/2013/04/logo-with-slogan-good.png Angeli Menta2020-02-04 16:08:572024-01-02 16:09:56Chrome 80 Browser SameSite Workaround (Supporting Article)

How to dump RQ02 approval strings out of a Lawson database

Articles, Frontpage Article, News

Lawson RQ02 approval strings work hand in hand with Landmark and are setup in different ways per organization. Some use general hierarchal titles and some use individual usernames. Regardless of how you implement it, you want to be able to create a report so you can update them as individuals join/leave/move around the organization

To generate a database dump of all approval strings and their levels using my method, you’ll need read access rights to the LSL database and must be using SQL.

  1. Login to your TEST or PROD database application.
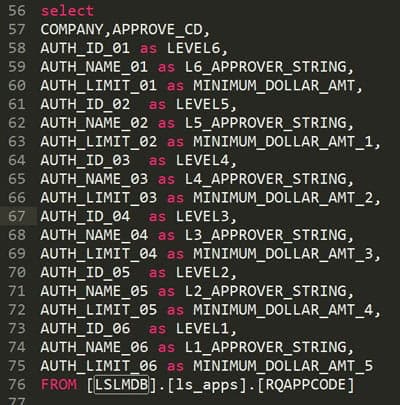
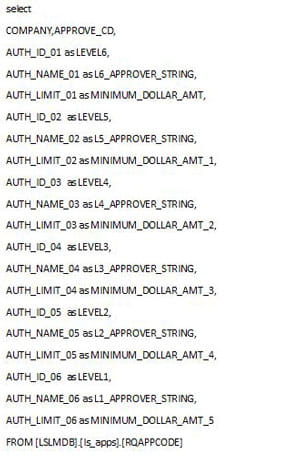
  2. Create a new query window and paste the below SQL code in, one is a screenshot to show syntax highlights and the other is the raw code for your convenience.

  3. Run the query, copy and paste with headers into Excel to filter down the data or edit the query.

I’ve renamed various column names to reflect the different levels and dollar amounts more clearly. Feel free to change the query to your liking. This is only the RQ02 strings, to get the filters for users’ setup in Landmark, check out my article titled: “Generating a simple approval level report from the Landmark database”.

01/31/2020
https://www.nogalis.com/wp-content/uploads/2020/01/How-to-dump-RQ02-approval-strings-out-of-a-Lawson-database.jpg 470 470 Angeli Menta https://www.nogalis.com/wp-content/uploads/2013/04/logo-with-slogan-good.png Angeli Menta2020-01-31 07:27:422020-01-23 13:44:07How to dump RQ02 approval strings out of a Lawson database

How to Restrict a Specific Form Table Field in Lawson Portal

Articles, Frontpage Article, News

For this tutorial, we will be restricting a table in CU01.1

  1. Login into Lawson Security Administrator
  2. Load up your default security profile typically titled PROD10 or TEST10
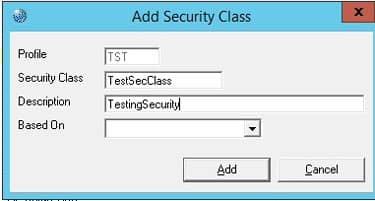
  3. Add a new security class

    Ours will be called TestSecClass
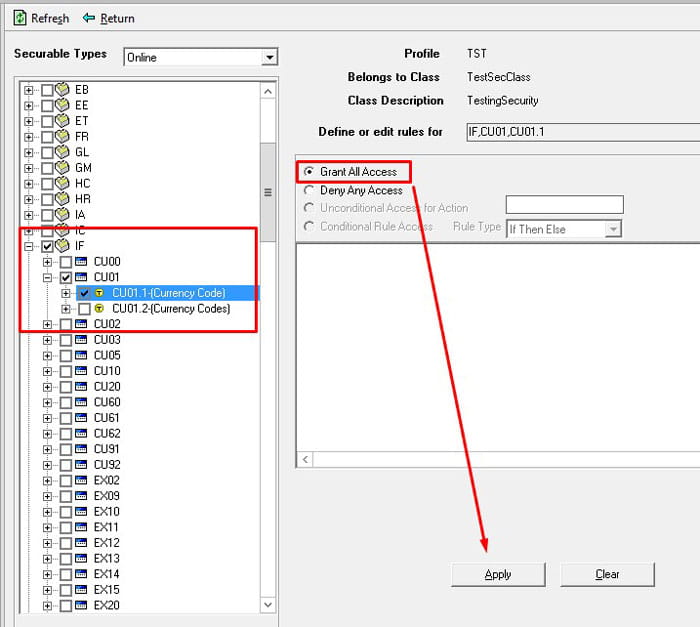
  4. Grant token access to CU01.1
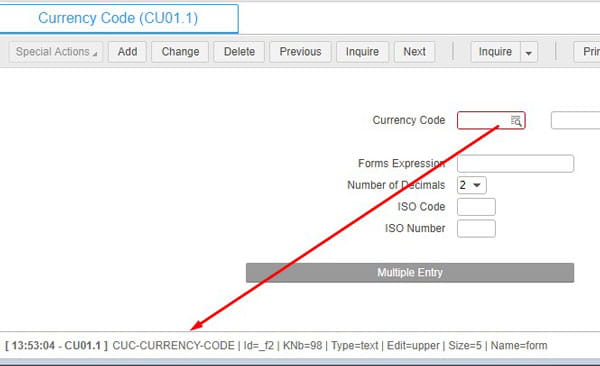
  5. Once this is added, we want to restrict a specific table on CU01.1 to find the table name, go to CU01.1 and press CTRL + SHIFT + O when selecting the field
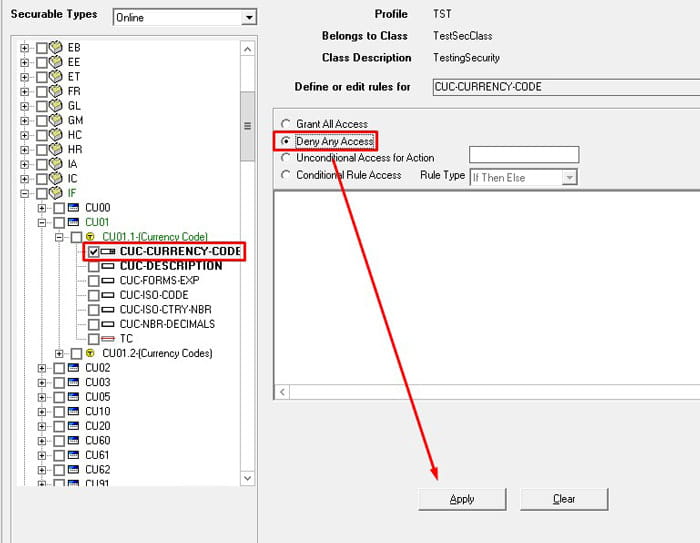
  6. Back in LSA, set CUC-CURRENCY-CODE to Deny Any Access
  7. Add this new class to a role of your choice. Add the role to a user and test CU01.1. To learn more about how Lawson security handles access, check out my other article titled: “Lawson Security – The Theory of Least Privilege Access Explained”
01/29/2020
https://www.nogalis.com/wp-content/uploads/2020/01/Form-Field-Lawson-Portal.jpg 400 400 Angeli Menta https://www.nogalis.com/wp-content/uploads/2013/04/logo-with-slogan-good.png Angeli Menta2020-01-29 09:34:392020-01-23 13:10:02How to Restrict a Specific Form Table Field in Lawson Portal

Creating an LBI Dashboard Series – Adding a Module (Part 2)

Articles, Frontpage Article

To start at the beginning, check out Part 1 of this series titled: “Creating an LBI Dashboard Series – Getting Started (Part 1)”


For this part in the series, we will be adding a simple module to our new LBI Dashboard.

  1. First login into LBI environment as an admin user.
  2. Go to your newly created dashboard
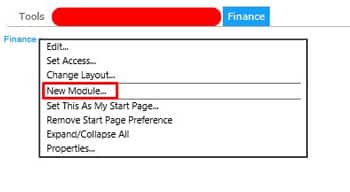
  3. Click the + icon on the top left and select “New Module”
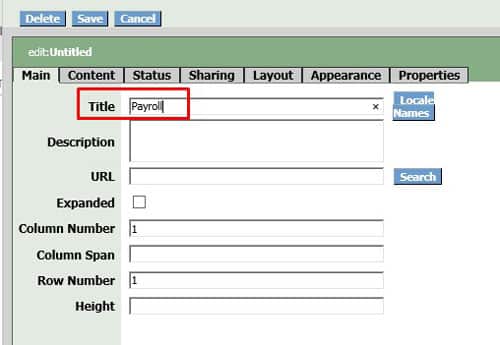
  4. On the Main tab, title your module, ours will be called “Payroll”
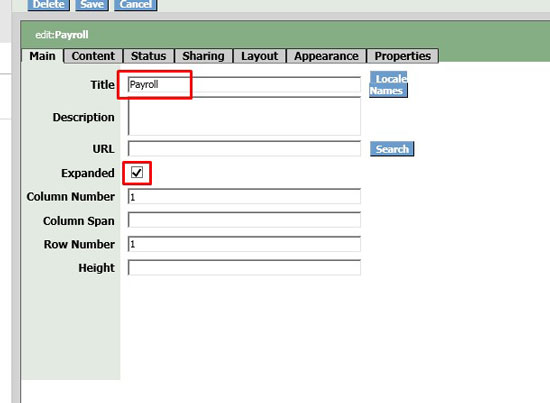
  5. By Default, the module will inherit access from the Dashboard itself, if you want to further restrict each module to separate users, you would do this again here. The expanded checkbox is great for convenience as the Module will be expanded by default:
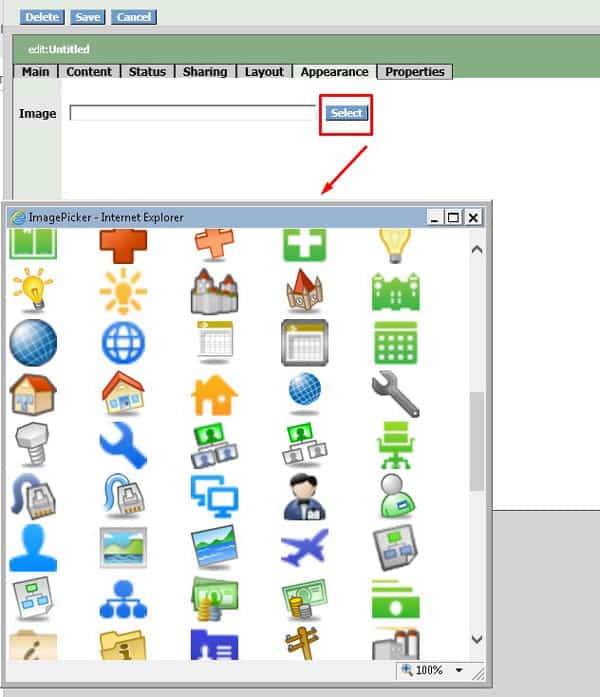
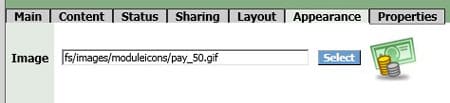
  6. Go to Appearance Tab and select a Icon for your module to help distinguish it from others, we will select the money icon for Payroll module:

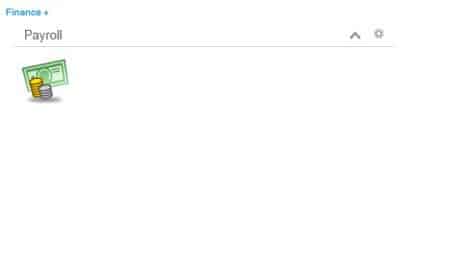
  7. When done select Save and you should see a blank Module in your dashboard:
  8. To add reports to this module, click the gear wheel icon in the top right of the module and select Add Items and then Search. You can also select a direct URL but this is much easier.
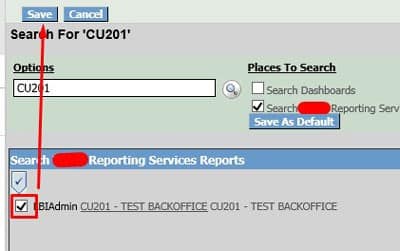
  9. A Searchbox should come up, this is to search all existing LBI reports. Type in the report name you want, check “Search Reporting Services Reports” and click the search icon to see the results.
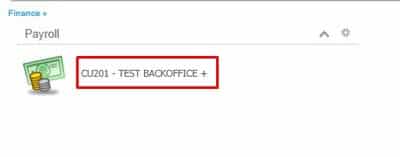
  10. Once you find your report, select it and click Save:

You’ve created a report module in your dashboard and added your first report!

That’s all for this article, keep an eye out for more in our LBI Dashboard series.


01/27/2020
https://www.nogalis.com/wp-content/uploads/2020/01/Creating-an-LBI-Dashboard-Series-Adding-a-Module-Part-2.jpg 470 470 Angeli Menta https://www.nogalis.com/wp-content/uploads/2013/04/logo-with-slogan-good.png Angeli Menta2020-01-27 07:17:302020-01-21 15:34:16Creating an LBI Dashboard Series – Adding a Module (Part 2)

Creating an LBI Dashboard Series – Getting Started (Part 1)

Articles, Frontpage Article, News

LBI dashboards are useful for delegating reports to specific access and is essentially a frontend for all your user reporting needs.

For this part in the series, we will be going over the very basics and how to create a dashboard tab for Finance users and setup access so those users can access the dashboard.

  1. First login into LBI environment as an admin user.
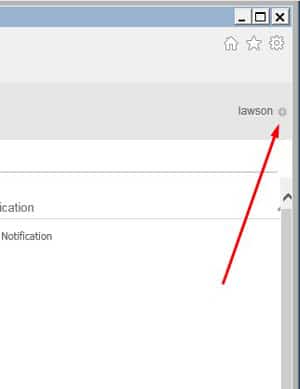
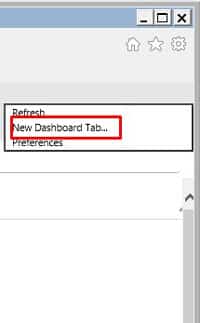
  2. In the top right next to your admins username, you’ll see a gear wheel, click that and select “New Dashboard Tab”
  3. Enter a dashboard title and click OK, ours will be named Finance
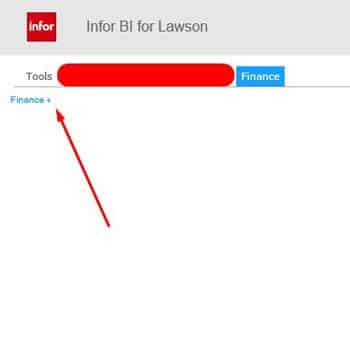
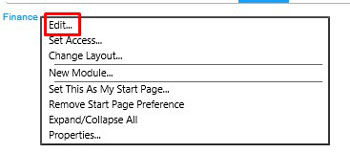
  4. You should be redirected to a blank Dasboard, on your new dashboard, click the + sign in the top left and select “EDIT” (note you can select ‘Set Access’ but it’s simpler to go to edit)

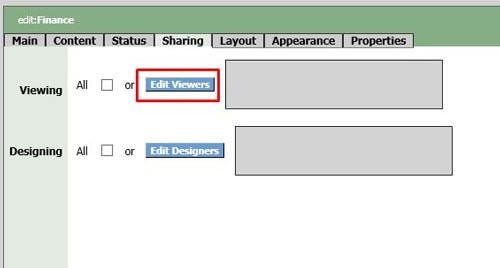
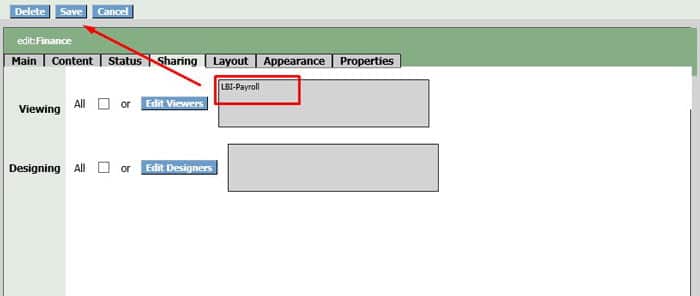
  5. A new menu should pop-up with multiple tabs. Go to Sharing and select Edit Viewers for specific access
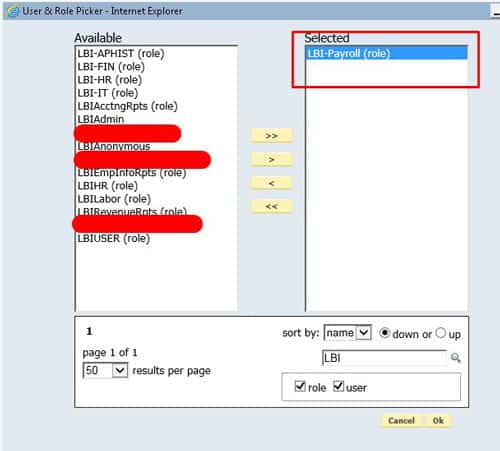
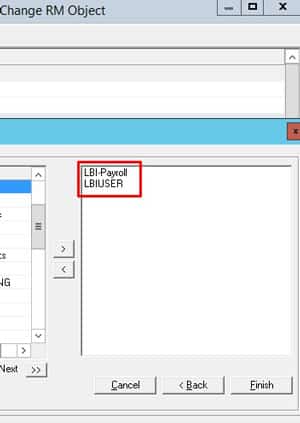
  6. In this screen you should see a set of users and groups (roles). In LSA, if users have specific groups assigned to their users, adding here will give them access to this dashboard. For our example we will be adding LBI-Payroll group from Lawson:
  7. All users with LBI-Payroll group will now have access to this dashboard. Press okay and Save:

This is the first step in setting up an LBI dashboard for specific users. Please note that LBI comes with a default role that all users must have which is typically called something like LBIUSER. Example below for this article:

01/24/2020
https://www.nogalis.com/wp-content/uploads/2020/01/Creating-an-LBI-Dashboard-Series-Getting-Started-Part-1.jpg 470 470 Angeli Menta https://www.nogalis.com/wp-content/uploads/2013/04/logo-with-slogan-good.png Angeli Menta2020-01-24 08:48:102020-01-21 15:17:21Creating an LBI Dashboard Series – Getting Started (Part 1)
Page 92 of 106«‹9091929394›»

LEGACY ERP DATA ARCHIVE SOLUTION


Discover how our clients are leveraging AWS services to archive their Legacy ERP data and provide ubiquitous access to users via a light-weight, secure, and read-only web interface. Secure, Fast, Reliable, and Cost Effective. That is the promise of APIX. Follow the link below to find out more and book a discovery call with our data archive specialist.

BOOK DEMO

© Copyright - Nogalis, Inc. 2024
  • Legal
  • Privacy
  • Contact Us
Scroll to top Scroll to top Scroll to top