File channels in Lawson Infor Process Automation (IPA) are very useful for picking up flat files and processing them.


In Infor’s older Rich Client tool, this can be easily found under the Start button drop down.

However, based on user permissions, this might not appear properly so I will tell you two ways to access the Channel Administrator.


First should be the obvious way which is Administrator >> Channel Administrator


However, based on your _ST roles, this might’ve not been granted properly. So, the second way to access it is in the top right search box. You can search Channel Administrator and access it there.

Description:
When running the AP160 the job did not create an AP160ACHTAPE to be sent to the bank, this file is empty.

Resolution:
AP160 runs the Lawson utility cnvtape to read the AP160ACHTAPE_SEQ file and to write out the AP160ACHTAPE file. To resolve this issue, you need to perform the following:

A. When using Lawson Security:

  1. Open Lawson Security Administrator
  2. Double Click on Profile Id “ENV”
  3. Double Click Security Class “DBAccess”
  4. Click “Add Rule” Button
  5. Select Securable Types “Executables”
  6. Expand Delivery Tokens
  7. Check box by cnvexp
  8. Click “Grant All Access” radio button
  9. Click Apply Button.
  10. Click on Profiles
  11. Double Click on Profile Id “ENV”
  12. Double Click Security Class “TranslTools”
  13. Double click on Rule Object “TRANSLATE”
  14. Right click Translation Tools and choose Select Next Level
  15. If cnvtape doesn’t exist under TRANSLATE then you must add it through Tokendef – Environment Form IDs – Category: TRANSLATE – Title: Convert Tape File
  16. Make sure radio button next to Grant All Access is checked
  17. Click Apply Button
  18. Double Click on Class Assignment>select the Role you want to assign the TranslTools Security Class to>Click Assign Security Classes Button>highlight TranslTools>click “>” Button>Click Close Button>Make sure that Role is assigned to user.

Once you have change users access, have the user run AP160 for Rerun Options – Recreate Tape=Y and the serial number of your tape to create the AP160ACHTAPE file which will be sent to the bank.

After a fresh install of Lawson, you may receive a “file not found” error in LID when adding a batch job.  Or, inquiring on certain forms might time out.  The batch job itself may show an error message alluding to the LUU utilities (such as invalid fstab option).  The issue is potentially an incorrect LAW_COBRTS_PATH.

To resolve, open a command line utility with the Lawson environment variables set.  Type command “laconfig”.  The configuration window pops open.

Select your environment.

On the environment tab, check the LAW_COBRTS_PATH.  If it is incorrect, fix it.


Reboot the server, or restart the services, and try your batch job again.


Join us for an in-depth session on best practices for planning, implementing, and testing Lawson year-end updates for Accounts Payable (AP) and Payroll (PR). Our experts will guide you through key steps to ensure a smooth and compliant year-end process — from preparation and configuration to validation and testing.

Gain valuable insights, practical tips, and actionable steps to help your organization close the year efficiently and confidently.


Get Started Today!

Don’t wait!  Contact us to get a quote on your server migration now!

An accompanying article for this webinar can be found here

Follow the steps below to learn how to find users that report directly under a manager in XM


First, in Mingle, go to Infor XM


Next, select Admin >> Users


Then locate the manager you want to search for users under:


Search fore your manager by name, then pick a result:

Now that we have the manager we want, click Find at the bottom and on the right hand side you’ll see all the users that are under this manager.

And that’s all there is to it! Just repeat the steps to view all users under different managers.

At Nogalis, security and trust have always been at the heart of everything we do. Today, we’re proud to announce that our APIX ERP Archive Solution is officially SOC 2 Type 2 compliant — a major milestone that reinforces our commitment to safeguarding your data.

After earning SOC 2 Type 1 compliance earlier this year — confirming the strength of our security design — we set our sights on the next milestone: SOC 2 Type 2. This certification demonstrates that our controls don’t just look strong on paper; they perform reliably in practice, ensuring your data remains protected with the highest standards of security and trust.

Developed by the AICPA, the SOC 2 framework is an independent standard for managing customer data based on five key trust principles: security, availability, processing integrity, confidentiality, and privacy. Meeting these standards confirms that our internal controls and processes align with the most rigorous data protection requirements.

Our SOC 2 Type 2 assessment was conducted by independent auditing firm Sensiba LLP, who worked closely with our team throughout the process. Their expertise, professionalism, and partnership were instrumental in helping us reach this milestone.

What this means for you:

  • Your archived ERP data is protected under industry-leading security practices.
  • Our systems are continuously monitored and improved for data integrity and availability.
  • We remain transparent and accountable in every step of our data handling.

We’re proud to share this achievement with our customers and partners, and we’ll continue to invest in security and compliance as part of our promise to deliver the safest, most reliable ERP archiving experience possible.

Thank you for trusting Nogalis and the APIX ERP Archive Solution with your data.

— The Nogalis Team

In today’s enterprise environment, seamless and secure access across applications is critical. Organizations increasingly rely on Single Sign-On (SSO) to simplify user authentication and improve security posture. If you’re already leveraging Infor’s suite of products, you might be surprised to learn that Infor LTR (Lawson Technology Runtime)—commonly seen as middleware—can act as a powerful SSO tool, much like Infor OS.

At Nogalis, we’ve helped numerous organizations harness Infor LTR as a Security Token Service (STS), enabling robust, federated SSO integrations across Azure AD, AD FS, Okta, and other SAML 2.0-compliant identity providers. This article outlines how Infor LTR can simplify your authentication landscape while ensuring scalability and security.

What Is Infor LTR?

Infor LTR is the core runtime wrapper for Infor web applications and will be supported until at least 2029. While often viewed as an infrastructure component, it also functions as a flexible STS, enabling secure federated identity across your enterprise apps.

Why Use Infor LTR as Your STS?

  • Federated SSO across multiple Identity Providers (IdPs)
    Infor STS supports Azure AD, MS Entra, AD FS, Okta, and any SAML 2.0-compliant provider.
  • Centralized SAML Authentication
    You can configure all your applications to use Infor STS as the single point of SSO integration.
  • Long-Term Viability
    With support guaranteed into 2029, LTR is a stable investment in your identity infrastructure.

How It Works – The Big Picture

  1. Establish Trust between your application and identity provider using STS.
  2. Exchange Federation Metadata between STS and your IdP.
  3. Configure your applications to delegate authentication to Infor STS.
  4. SAML-based handshake manages identity, assertions, and access.

Installation & Setup

Step 1: Migrate LTR to STS Mode

Using the LTR ISO, mount and run (in a command utility):

setup.exe –v”MIGRATETOSTS=true”

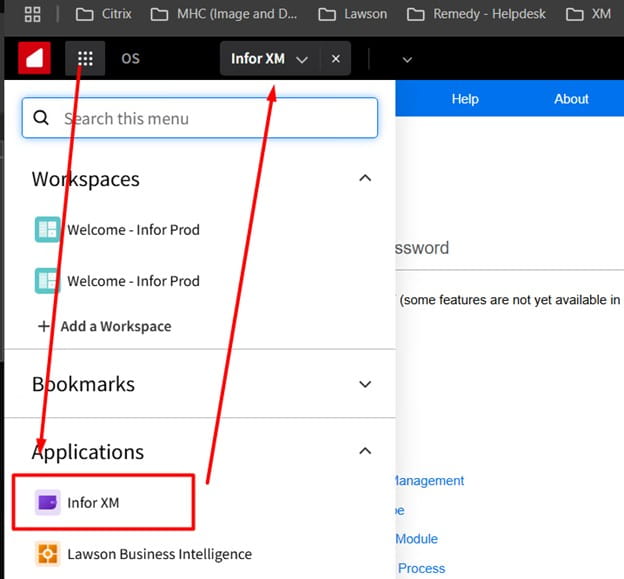
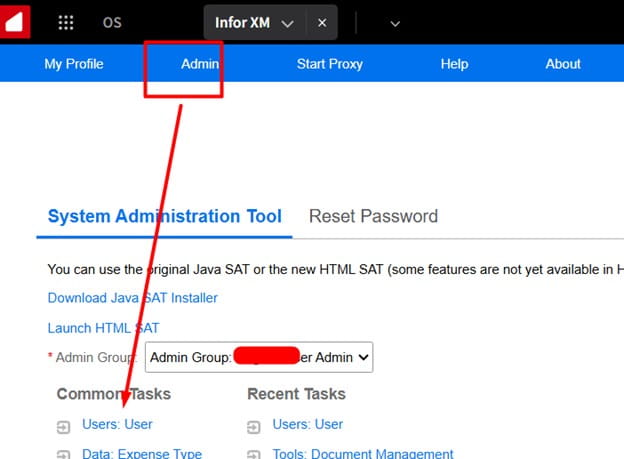
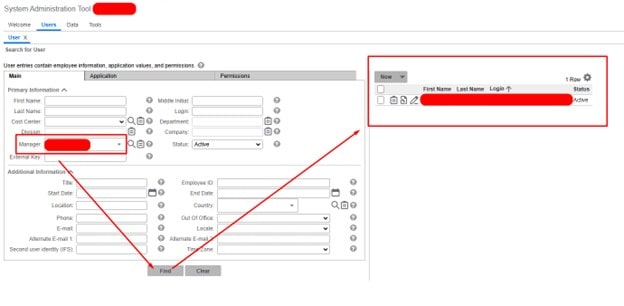
Step 2: Access STS Admin

This is your hub for managing Identity Providers (IdPs) and Service Providers (SPs). You’ll:

  • Add/Edit IdP connections
  • Add/Edit SP connections
  • Download metadata files and certificates

Identity Provider Configuration

🔹 Azure AD

  • Create a Non-Gallery App in Azure
  • Upload the Infor STS SP Metadata file
  • Export the Azure AD IdP Metadata and import it into STSAdmin

🔹 AD FS

  • Add a new Claims-Aware Relying Party Trust
  • Import the Infor STS SP Metadata XML
  • Download FederationMetadata.xml from AD FS and import it into STS

🔹 Okta

  • Create a SAML App Integration in Okta
  • Manually configure Entity ID and endpoints (Okta doesn’t accept SP metadata files)
  • Download and import Okta’s IdP Metadata XML into STS

Application Configuration

In your Infor or third-party app:

  1. Set SSO Service URL to:

https://your-ltr-server.com:9553/inforsts/infor/{GUID}/idp/samlSSO

  1. Configure SAML properties:
    • UsernameField
    • PasswordField
    • SLOUrl
  2. Upload STS signing certificate as the IdP certificate in your app
  3. Export app’s signing cert, then import it into STS Admin

Final Checklist – What You’ve Done

✅ Downloaded IdP federation metadata
✅ Downloaded STS SAML SP metadata
✅ Uploaded metadata files to STS and your IdP
✅ Configured your app to use Infor STS as the SSO provider
✅ Completed mutual trust between your application, STS, and identity provider

Ready to Get Started?

At Nogalis, we specialize in Lawson and CloudSuite implementations, migrations, and custom development. Whether you’re looking to modernize your identity strategy or get more from your Infor investment, we’re here to help.

📧 Contact us at:
Desi Houze – desi@nogalis.com
Tan Rezaei – tan@nogalis.com

🔗 Learn more about our Lawson Data Archive Solution


A. To export a service, for example, the SSOP without identities:

From the command prompt, type ssoconfig -c  and press Enter.
Enter your password for ssoconfig.
Type 5 for option (5) Manage Lawson Services.
Type 6 for option (6) Export service and identity info.
At the prompt “Do you want to export all services?” type 2 for (2) No.
At the prompt “Enter the services name separated by comma to be exported” type SSOP and press Enter.
At the prompt “Do you want to export the identities (“ALL” or “NONE”).” type NONE and press Enter.
Enter a filename for the export file, such as ssop.xml.
Type 12 or 13 to exit the menu
Locate the file in your current working directory.


B. To export ALL services without identities:

Type ssoconfig -c  and press Enter .
Enter your password for ssoconfig.
Type 5  for option (5) Manage Lawson Services.
Type 6  for option (6) Export service and identity info.
At the prompt “Do you want to export all services?” type 1  for (1) Yes.
At the prompt “Do you want to export the identities (“ALL” or “NONE”).” type NONE  and press Enter .
Enter a filename for the export file, such as AllServices.xml
Type 12 for option 12 (Exit).
Locate the file in your current working directory.


C. To export ALL services and ALL identities:

From the command prompt, type ssoconfig -c  and press Enter.
Enter your password for ssoconfig.
Type 5 for option (5) Manage Lawson Services.
Type 6 for option (6) Export service and identity info.
At the prompt “Do you want to export all services?” type 1 for (1) Yes.
At the prompt “Do you want to export the identities (“ALL” or “NONE”).” type ALL and press Enter.
Enter a filename for the export file, such as servicesIdent.xml.
The next message will be “Choose format that Lawson Software should export credential information as.”
(1) Encrypted
(2) Opaque
(3) Back
(4) Exit
Type for (Opaque).
Type 12 or 13 to exit the menu
Locate the file in your current working directory.


D. To export the SSOP service with identities:

From the command prompt, type ssoconfig -c  and press Enter.
Enter your password for ssoconfig.
Type 5 for option (5) Manage Lawson Services.
Type 6 for option (6) Export service and identity info.
At the prompt “Do you want to export all services?” type 2 for (2) No.
At the prompt “Enter the services name separated by comma to be exported” type SSOP and press Enter.
At the prompt “Do you want to export the identities (“ALL” or “NONE”).” type ALL and press Enter.
Enter a filename for the export file, such as ssopIdent.xml.
The next message will be “Choose format that Lawson Software should export credential information as.”
(1) Encrypted
(2) Opaque
(3) Back
(4) Exit
Type 2 for (Opaque).
Type 12 or 13 to exit the menu


E. To list service properties for SSOP:

From the command prompt, type ssoconfig -c   and press Enter.
Enter your password for ssoconfig.
Type 5 for option (5) Manage Lawson Services.
Type 10 for option (10) Manage Service Properties.
Type 3 for option (3) View/List Service Property.
At the prompt for “Enter the SERVICE NAME:” type SSOP and press Enter.
Attach a screenshot of the output.
Type for option 5 (Exit).