

The GEN job tables provide detailed information about job execution, allowing for tracking and troubleshooting. Each table serves a specific function in recording various aspects of the job lifecycle, from submission through execution to completion. This structure ensures clear mapping of relationships and dependencies among the tables, which is essential for monitoring and managing batch processes efficiently allowing admins to be able to trace job progress and diagnose issues at both macro and micro levels.
🔹 Job Table Relationships
JOBQUEUE (one row per submitted job)
|
|–< JOBSTEP (one or more steps per job)
| |
| |–< JOBSTEPLOG (messages for each step)
|
|–< JOBLOG (high-level messages/logs for the job)
|
|–< JOBPARM (parameters used when submitting job)
🔹 GEN tables related to jobs:
JOBQUEUE.JobQueue = primary key (ties everything together).
JOBSTEP.JobQueue → foreign key to JOBQUEUE.
JOBLOG.JobQueue → foreign key to JOBQUEUE.
JOBPARM.JobQueue → foreign key to JOBQUEUE.
Each job in the system is uniquely identified by the JobQueue value, which acts as the primary key and links related records across all main tables. By using foreign keys, the JOBSTEP, JOBLOG, and JOBPARM tables maintain referential integrity, allowing for efficient tracking and management of job execution details and associated parameters.
To retrieve comprehensive job execution data, a query can be constructed that joins the JOBQUEUE table with JOBSTEP, JOBLOG, and JOBPARM using the JobQueue field. This ensures all relevant information, such as job parameters, execution steps, and log messages, can be efficiently accessed and analyzed for each job instance.
Here is an example of a query to find who ran the GL199 with any messages found in the joblog. The results will show
SELECT JQ.JobName, JQ.Program, JQ.UserName, JQ.StartDate, JQ.StartTime, JQ.EndDate, JQ.EndTime, JQ.Status, JP.ParameterName, JP.ParameterValue, JL.Message
FROM GEN.dbo.JOBQUEUE JQ
LEFT JOIN GEN.dbo.JOBPARM JP ON JQ.JobQueue = JP.JobQueue
LEFT JOIN GEN.dbo.JOBLOG JL ON JQ.JobQueue = JL.JobQueue
WHERE JQ.Program = ‘GL199’
ORDER BY JQ.StartDate DESC, JQ.StartTime DESC;

When working with date and time values in MySQL, it’s common to store durations in days. However, sometimes you need to present those days as a more human-readable format—like years and months. For example, showing “2 years, 3 months” instead of “825 days.”
Here’s a simple way to achieve this using a MySQL formula.
Converting Days to Years and Months
Since MySQL doesn’t have a built-in function to directly convert days into years and months, we can use arithmetic with division (/) and modulo (%) operators.
SELECT
FLOOR(days / 365) AS years,
FLOOR((days % 365) / 30) AS months
FROM
your_table;
How It Works
Example
Suppose your table looks like this:
CREATE TABLE durations (days INT);
INSERT INTO durations (days) VALUES (400), (825), (1200);
Running the query:
SELECT
days,
FLOOR(days / 365) AS years,
FLOOR((days % 365) / 30) AS months
FROM durations;
Would produce:
| days | years | months |
| 400 | 1 | 1 |
| 825 | 2 | 3 |
| 1200 | 3 | 3 |
Notes and Limitations
Final Thoughts
Converting days to years and months in MySQL can be done easily with simple math functions. While the above approach works well for approximations, consider whether you need exact date-based calculations before choosing the method.
If you often store durations in days, this formula provides a quick way to present data in a more user-friendly format.


Most Lawson v10 systems has moved to Infor Security Service web portal to manage user provisioning etc.
However, Lawson Security Administration is still necessary for security reports, identity information, among other tasks.
When logging into Lawson Security Admin, you may receive this error and wonder why all of a sudden?
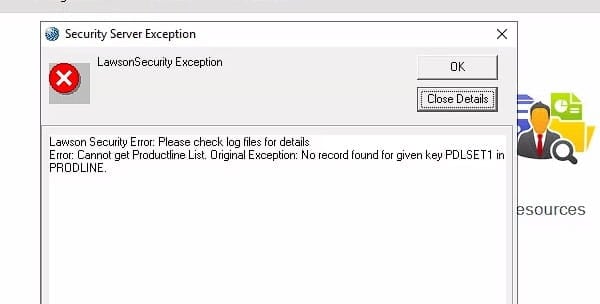
In order to resolve this, stop and start IBM and Lawson services in the proper order (your server names will differ from below but be similar under Windows Services.
Verify JAVA processes are down.

Follow this quick guide to re-label portal bookmarks in Lawson:
To change the Lawson v10 bookmark button label, locate and edit the file at %LAWDIR%\persistdata\lawson\portal\data\msgs\en-us\portal.xml, which controls how the label is displayed in the portal. Open the file in a text editor and search for “lbl_BOOKMARKS.”
Update the associated value to reflect your preferred naming convention, then save your changes. After updating, refresh the portal to confirm the new label appears correctly.
Keep in mind that this file may be overwritten during Portal or S3 Workspace patches and upgrades, so you will need to reapply your changes after each update to maintain the custom label.


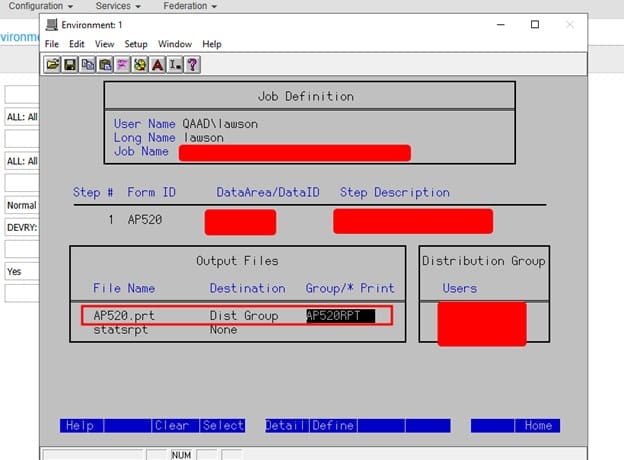
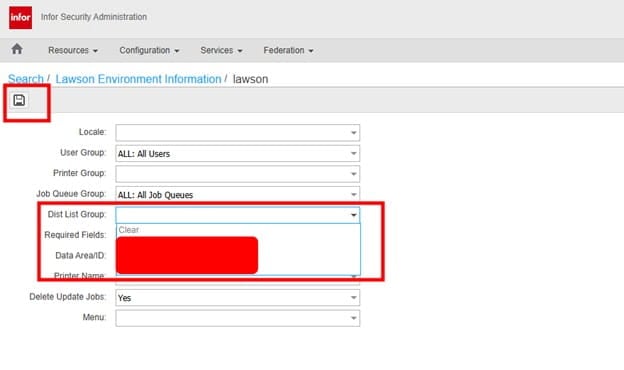
Summary: When setting up a Distribution group so other users can view the print manager of another user, typically a system user like lawson. You need to complete a very important step before being able to add it.

Follow the steps below to configure LSA logging for the passive client:
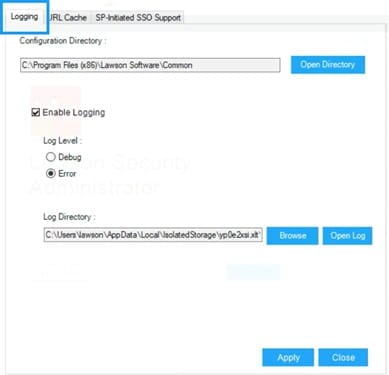
Specify where LawsonNlog.Config is located. LawsonNlog.Config is the configuration setting for LawsonHttpClient that takes care of logging.
Enable Logging- toggle logging.
Log level
Debug – Log the detailed trace
Error – Log the exception errors
Log Directory
Provide the location where the generated logs will be saved on the same computer where LSA is installed.