If you receive this message when working with Lawson Security Administrator:
“The version of this file is not compatible with the version of Windows you’re running. Check your computer’s system information to see whether you need an x86 (32-bit) or x64 (64-bit) version of the program.”
Corrective action
The LSA tool should be able to run on both 32-bit and 64-bit systems. Take these steps to check to see if this message is related to a different operating system issue.
Restart your Operating system.
Log in to computer as an Administrator> Run LSA installer as an Administrator > Proceed with LSA installation.
If the error message occurs again, the LSA download file might be corrupted. Download the latest version of the security administration tool and repeat step 2.
If you continue to get the same error, right-click the LSA installation program > Select Troubleshoot Compatibility > Click Try Recommended Setting > Click Start the Program > Proceed with the LSA installation.
If the installation is still not successful, contact Infor Support.
https://www.nogalis.com/wp-content/uploads/2026/03/Error-LSA-is-not-compatible-with-the-version-of-Windows.jpg470470Angeli Mentahttps://www.nogalis.com/wp-content/uploads/2013/04/logo-with-slogan-good.pngAngeli Menta2026-03-20 09:21:242026-03-12 13:23:34Error: LSA is not compatible with the version of Windows
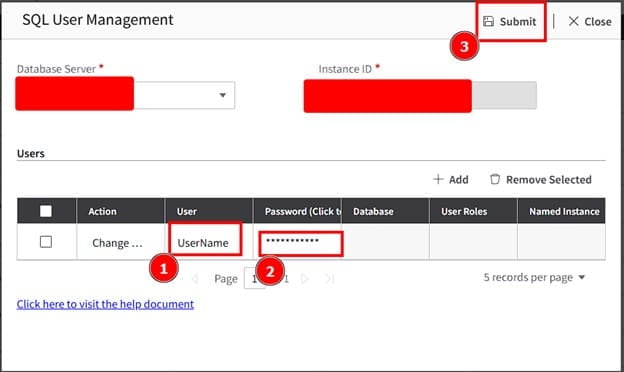
Follow these steps to update a user’s DB password via Infor Lawson Cloudsuite
Login to your concierge account and go to Cloudsuite app (this assumes you have access to this else open a ticket with Infor).
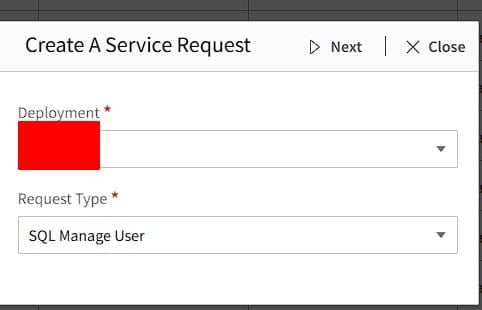
Create a Service Request
Select Deployment and Request Type: SQL Manage User
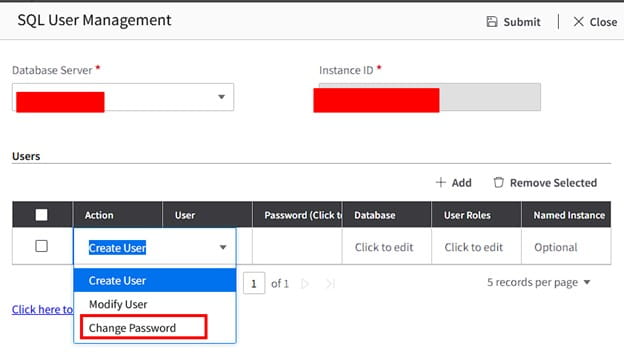
Select Database Server and in the drop down select Change Password
Enter username, the new password for the user, then click Submit
All done! Validate with the user. If this is something you’re need assistance managing, Nogalis offers a team of Lawson specialists within a single MSP services contract for customers. Let us know if we can assist you today.
https://www.nogalis.com/wp-content/uploads/2026/03/How-to-update-a-users-DB-password-via-Infor-Lawson-Cloudsuite.jpg470470Angeli Mentahttps://www.nogalis.com/wp-content/uploads/2013/04/logo-with-slogan-good.pngAngeli Menta2026-03-17 11:15:412026-03-12 13:20:53How to update a user’s DB password via Infor Lawson Cloudsuite
When working with MySQL, you might notice something surprising: a query that runs quickly on its own suddenly becomes slow when you try to save the results into a temporary table.
For example, let’s say you run a SELECT query that completes in about two minutes. But when you try to capture those results with:
CREATE TEMPORARY TABLE table_name
SELECT field1, field2, field3;
the process hangs, forcing you to kill it after five minutes. What’s going on here?
Why It Happens
When you run CREATE TEMPORARY TABLE … SELECT, MySQL is actually doing two jobs:
Running the SELECT – fetching rows from the source tables, applying filters, joins, and any transformations.
Creating and populating the temporary table – defining a new schema on the fly and writing the rows into it.
That second step adds overhead. Here are the most common reasons for the slowdown:
Data Volume: Copying millions of rows into a new table takes time, even if the query itself executes quickly.
Indexes: Your source query might benefit from indexes, but inserts into the temporary table don’t—MySQL has to write all rows one by one.
Storage Engine: By default, temporary tables may spill to disk if they exceed memory limits, which is much slower.
Server Resources: CPU, memory, and I/O pressure can cause inserts into the temp table to crawl.
Locking/Concurrency: Other queries on the same data can introduce waits and contention.
Creating a Temporary Table in Memory
If your dataset isn’t too large, you can speed things up by creating the temporary table in memory instead of on disk. MySQL supports this via the MEMORY storage engine:
CREATE TEMPORARY TABLE temp_in_memory (
id INT,
name VARCHAR(255)
) ENGINE=MEMORY;
Then, you can insert data directly into this in-memory structure:
INSERT INTO temp_in_memory
SELECT field1, field2
FROM source_table;
Because the table lives in RAM, inserts and reads are much faster—though the tradeoff is size limits (governed by the max_heap_table_size and tmp_table_size settings).
Best Practices
If you’re seeing big slowdowns when creating temporary tables, try:
Reviewing and optimizing your SELECT query with proper indexing.
Using ENGINE=MEMORY if your temp dataset fits in RAM.
Monitoring resource usage during the query (SHOW PROCESSLIST, or performance schema tables).
Splitting large inserts into smaller batches.
Making sure the temp table schema only includes the columns and datatypes you really need.
Takeaway
A SELECT query that runs fast doesn’t always translate to a fast CREATE TEMPORARY TABLE. The extra overhead of creating and writing the table can introduce new bottlenecks. If you only need the results for lightweight, session-specific work, an in-memory temporary table (ENGINE=MEMORY) can be a game-changer.
By understanding how MySQL handles temporary tables under the hood, you can choose the right approach and keep your queries moving fast.
https://www.nogalis.com/wp-content/uploads/2026/03/MySQL-Query-Latency-with-Temporary-Tables.jpg470470Angeli Mentahttps://www.nogalis.com/wp-content/uploads/2013/04/logo-with-slogan-good.pngAngeli Menta2026-03-13 08:53:532026-03-09 12:59:07MySQL Query Latency with Temporary Tables
User does not have access to LBI. See screenshot below.
Resolution:
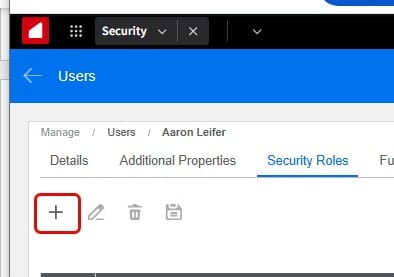
First, go to Mingle/InforOS, then go to manage users, and then search for the user.
Next, click on the arrow shown below which will take you to the user profile.
Click on the Roles tab:
Then click on the + to add roles:
Next, search for Mingle Role for LBI and click on the +Add & Close:
Finally, Click the Save icon. And you should be good!
https://www.nogalis.com/wp-content/uploads/2026/03/How-to-add-LBI-bookmark-to-users-Mingle-Menu.jpg470470Angeli Mentahttps://www.nogalis.com/wp-content/uploads/2013/04/logo-with-slogan-good.pngAngeli Menta2026-03-11 10:41:252026-03-10 11:00:10How to add LBI bookmark to users Mingle Menu
Lawson File Channels can be useful when importing files from a defined local Landmark directory or a remote one via FTP, SFTP etc. They are especially useful when a file from an outside organization is delayed. Unlike a IPA scheduler that only runs on a set schedule, a file channel will pick up a file that has been delayed for reasons outside of your organizations control.
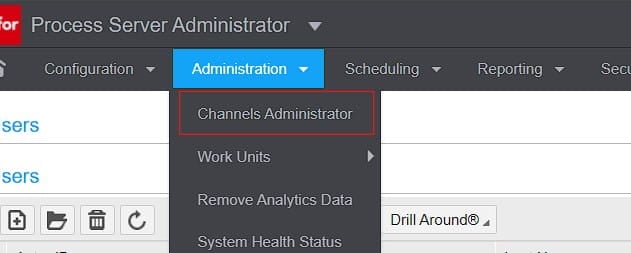
First in Process Server Administrator, you need to go to Administrator >> Channels Administrator (assuming you have permissions)
Then create a new File Channel:
Now that you know how to create one, File Channels essentially act as a source directory path that is scanned every X minutes to then search for a file specified by a File Channel Receiver.
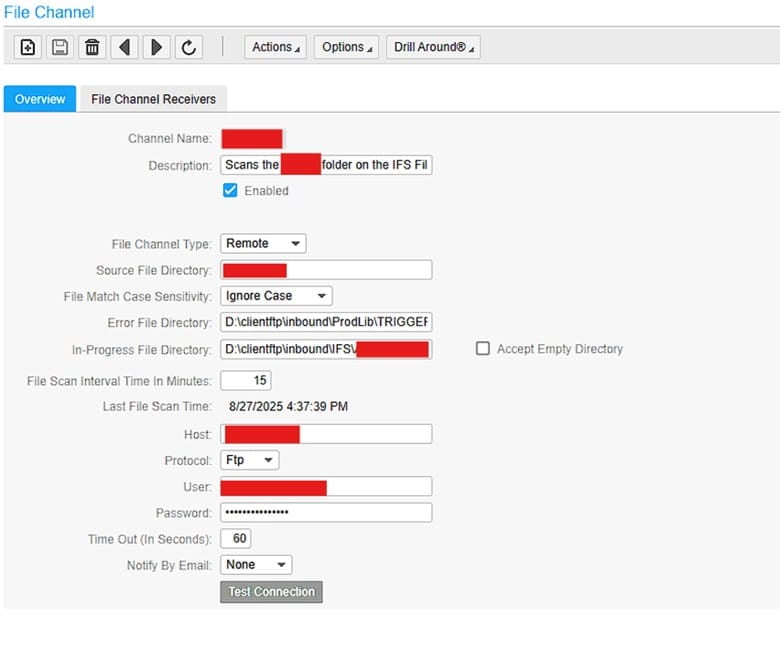
Below is an example of a File Channel searching a remote server via FTP:
Since the above is an FTP directory, it has a default directory upon connection. You then define the Source File Directory after that. If the FTP server connects and starts on ..\inbound directory, and your source directory is ..\inbound\APFinance, then Source File Directory is simple APFinance
Error file and In-Progress File Directory are always directories on the local Landmark server so make sure you establish those directories first.
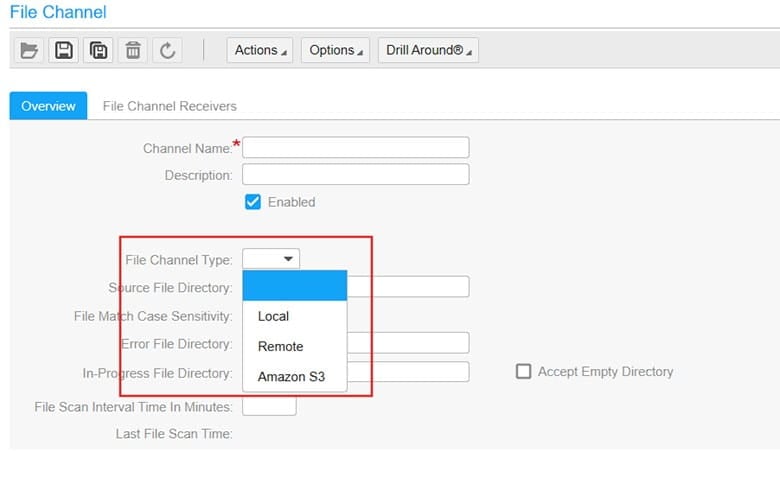
Additionally, you can change the File Channel Type. Local is Landmark, Amazon S3 is a specified Amazon server instance:
All other Parameters are self-explanatory so let’s move on to File Channel Receivers.
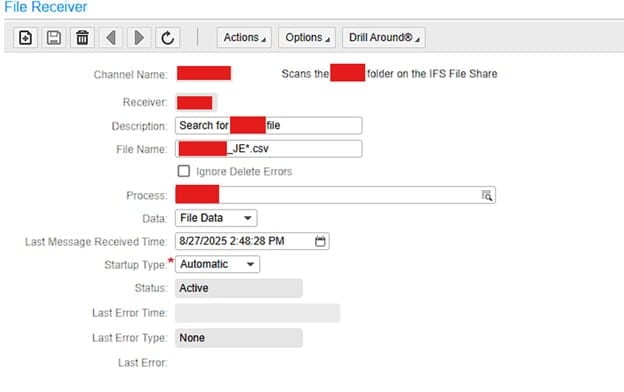
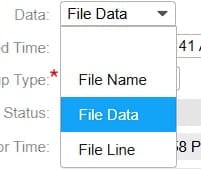
You can have multiple File Channel Receivers defining different file names for every File Channel. This way if you have one Source Directory, you can search different file names like ACH_*.txt, APC_*.xml etc.
The “Process” field is the IPA process that will be processing the file.
The Data field is also important. File Data is the ideal selection.
File Name: Triggers one workunit with just the file name.
File Data: Triggers one workunit with the file’s entire contents.
File Line: Triggers a separate workunit for each line of the file.
Once the file is picked up, it moves it to the in-progress directory while it gets processed regardless the the Data field setting. The in-progress directory acts like an archive folder in this way.
That’s it, File Channels are great when receiving a file from an outside organization that sends it on a schedule. That way if it happens to be delayed, the File Channel will still scan it when it finally gets to Lawson.
https://www.nogalis.com/wp-content/uploads/2026/03/How-do-Lawson-File-Channels-work.jpg470470Angeli Mentahttps://www.nogalis.com/wp-content/uploads/2013/04/logo-with-slogan-good.pngAngeli Menta2026-03-06 08:43:372026-03-02 12:47:30How do Lawson File Channels work?
When working with Aurora MySQL, it’s common to assume that running a TRUNCATE TABLE will completely clear out space and return your database to its pre-load size. Unfortunately, that’s not quite how it works — and it often surprises people during large migrations.
Here’s why truncating doesn’t always free space, and what you should do instead.
TRUNCATE vs. Space Reclamation
In MySQL (and Aurora MySQL), TRUNCATE TABLE is a fast operation that:
Deletes all rows from a table.
Resets the auto-increment counter.
Removes and recreates the underlying table definition internally.
However, with InnoDB tables, the physical storage file is not always shrunk automatically. Instead:
Pages inside the tablespace are marked as free.
The file size on disk (or Aurora’s volume usage) often stays the same.
That means your database volume won’t shrink even if the table is empty.
The Role of OPTIMIZE TABLE
To actually reclaim space after large deletes or truncations, you need to run:
OPTIMIZE TABLE your_table;
What this does:
Creates a new copy of the table with active rows.
Rebuilds indexes.
Frees up unused pages and defragments data.
Releases the unused space back to Aurora’s volume.
In practice, many users see 20–40% of their allocated storage reclaimed after running OPTIMIZE TABLE on heavily churned datasets.
Aurora-Specific Gotchas
Shared Storage Model
Aurora uses a distributed storage layer, so file-per-table semantics can be a bit confusing. Even with innodb_file_per_table=ON, the space isn’t automatically released at the cluster volume level until the table is rebuilt.
Performance Impact
OPTIMIZE TABLE is blocking for writes and can run for minutes to hours on very large tables.
Plan downtime or run during low-traffic windows.
Monitoring
Watch the VolumeBytesUsed CloudWatch metric before and after running OPTIMIZE. If you only truncate, the metric won’t move. After optimize, you’ll see a real decrease.
Best Practices
For staging or migrations: Always follow TRUNCATE with OPTIMIZE TABLE to reclaim disk space.
For production: Schedule optimizations for off-peak hours, and test on smaller tables first.
For ongoing operations: If your workload does lots of churn (bulk loads/deletes), regular optimization may be necessary.
Final Takeaway
In Aurora MySQL, TRUNCATE TABLE clears rows but doesn’t guarantee space reclamation. To actually shrink your database footprint, you need to rebuild the table with OPTIMIZE TABLE. Think of it as the “vacuum” step — without it, your cluster will keep carrying dead weight.
https://www.nogalis.com/wp-content/uploads/2026/03/Reclaiming-Space-for-Truncated-Aurora-MySQL-Tables.jpg470470Angeli Mentahttps://www.nogalis.com/wp-content/uploads/2013/04/logo-with-slogan-good.pngAngeli Menta2026-03-03 08:37:222026-03-02 12:40:47Reclaiming Space for Truncated Aurora MySQL Tables
This procedure explains how to subscribe to bookmarks.
You could also use the procedure to subscribe to bookmarks, if you have been given access to the bookmark by your system administrator. If the bookmark appears in your list, you have access to it. (See your system administrator if you need access to a bookmark that does not appear in your Bookmarks list.)
To subscribe to bookmarks
From the Portal home page, select Preferences (check marks icon)>Content.
Click on closed books to expand them, if necessary.
Bookmarks you are subscribed to have check marks in front of them.
If the check mark is removed and you want to add it, click on the box.
Unchecked bookmarks will not appear in your navigation pane or content window.
https://www.nogalis.com/wp-content/uploads/2026/02/Subscribing-to-Bookmarks.jpg470470Angeli Mentahttps://www.nogalis.com/wp-content/uploads/2013/04/logo-with-slogan-good.pngAngeli Menta2026-02-27 08:12:412026-02-20 13:15:25Subscribing to Bookmarks
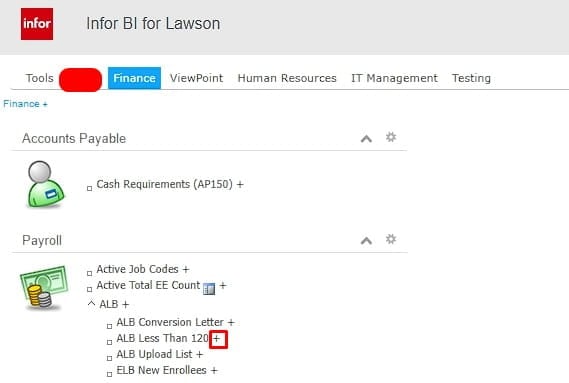
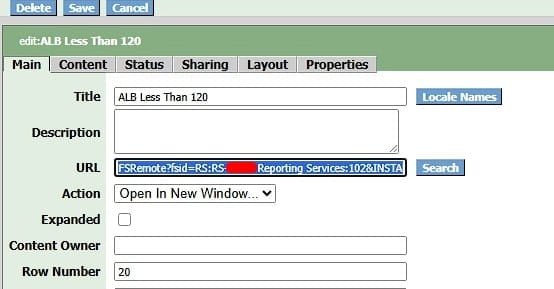
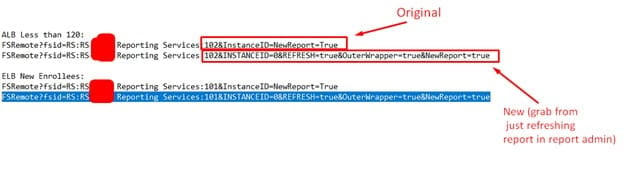
Follow these steps to learn how to fix certain Lawson LBI reports on dashboard prompting for ID and Password. This typically happens after a migration to a new version of LBI. You’ll need to update these report parameters.
First, edit the report on dashboard:
Next, copy the existing URL:
Run the report in Report Admin with data refresh and grab this part of the URL (see screenshot), append it to the end of the original URL above from the report you’re adding it from:
It should like this:
Now it should load properly without asking for credentials.
https://www.nogalis.com/wp-content/uploads/2026/02/How-to-fix-certain-Lawson-LBI-reports-on-dashboard-prompting-for-ID-and-Password.jpg470470Angeli Mentahttps://www.nogalis.com/wp-content/uploads/2013/04/logo-with-slogan-good.pngAngeli Menta2026-02-24 11:07:472026-02-20 13:12:09How to fix certain Lawson LBI reports on dashboard prompting for ID and Password