
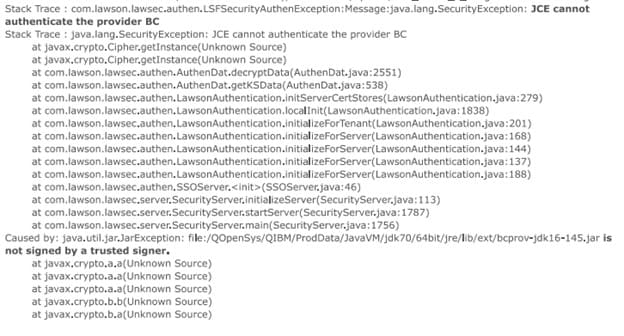
There is a known issue after some Java updates where lase won’t start, and attempting to run the bcinstall.jar throws the exception “JCE cannot authenticate the provider BC” in the lase_server logs. When the LASE fails to start after a Java update, this issue can only be resolved by installing a compatible Lawson CU.
When this happens, you will either need to revert to the previous version of Java, or update LSFCT to the minimally compatible CU (or later).
For Lawson version 10.0.9, the minimum CU is 4.
For Lawson version 10.0.10, the minimum CU is 5.
For Lawson version 10.0.11, the minimum CU is 6.

To debug online programs through command-line entry, follow these steps:
Note: If you need to include modules in the compile, use qcompile -Dm productline systemcode programcode .
Example (IBM i command line):
CALL TMCONTROL PARM(’-rp’ LAWAPP9 PR14)
Find the appropriate LATMProgramName job in the appropriate subsystem, and then select option 5 (Work with). Select option 1 to confirm that it is the correct job. If it is correct, return to the previous screen and note the job number, user name, and job name (which will be LATMProgramName).
Note: You can also use the WRKSBS command to find the appropriate subsystem and then LATMProgramName job.
ENDDBG
then
ENDSRVJOB


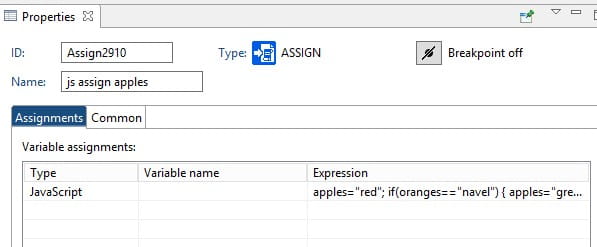
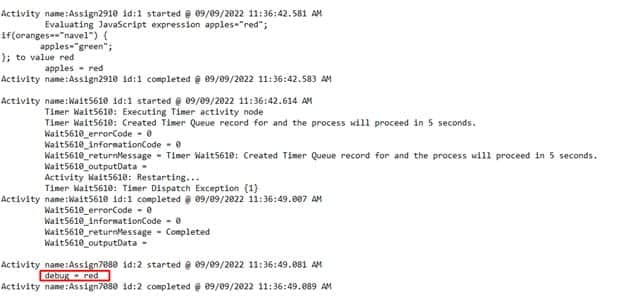
There exists a scenario in IPA where variable values are lost after a wait node, if the variable is set using javascript as opposed to the straight assignment feature. This article will describe the workaround for this scenario.

In this sample, the first assign node uses javascript to set the variable apples. The 2nd assign node (after the wait node) sets the debug string variable to the value of the apples variable.
This excerpt from the work unit log shows that the variable debug is set to a blank value. This is because the value of the variable apples is lost after the wait.

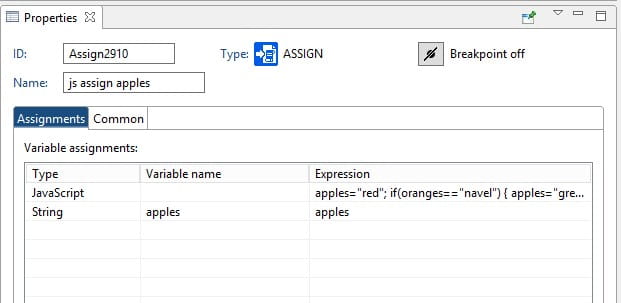
To ensure that the variable value is not lost after a wait node, simply set the value of the variable to itself using the traditional variable assignment. This can be done any time after the javascript setting, and before the wait node.
As you can see, the debug variable is now successfully set to the value of the apples variable.
You might be wondering if it is possible in LSF to a give a person access to 2 different data areas (productlines) with 2 different roles at the same time.
So let’s say if user1 is in data area 1 and has the security access associated with the role that has access to data area (1) and then again user1 also is in data area 2 they have the security access associated with the role that has access data area (2).
More discreet way of putting it:
User1 >> DataArea1 >> ReadOnlyRole access in DataArea1.
User1 >> DataArea2 >> ChangeAccessRole access in DataArea2.
The best way to set this up is to separate the two DataSources so they each have their own Productline and their own separate security profiles. That’s it!
User1 >> DataArea1 >> ReadOnlyRole is in SecurityProfile1 which is set to DataArea1.
User1 >> DataArea2 >> ChangeAccessRole is in SecurityProfile2 which is set to DataArea 2.
Good luck!


Procedure to Copy Lawson Portal Bookmarks from/to Different Servers or Environments
Bookmark data is stored in three places:
-Database tables in the LOGAN product line (listed below)
-LAWDIR/persistdata/lawson/portal/data/users/<user>.xml files
-LAWDIR/persistdata/lawson/portal/data/roles/<role>.xml files
Reminder that the <user>.xml files in LAWDIR/persistdata/lawson/portal/data/users contain references (bookmark subscriptions and/or locks) to the bookmark IDs in the original bookmark data. You must EITHER delete the “to” environment or copy from the “from” environment to the “to” environment, before you begin. Skipping this step will lead to orphaned references within the .xml files, errors in the Preferences > Content screen.
Also, the Portal role files in the “Manage Roles” screen under Portal Administration in Portal/Ming.le must EITHER have all bookmark locks removed in the “to” environment, or the files should be copied from the “from” environment to the “to” environment, because they contain references to the bookmark IDs in the original bookmark data.
PROCEDURES
Update the <user>.xml files in the “to” environment:
Copy the <user>.xml files from LAWDIR/persistdata/lawson/portal/data/users directory to the “to” environment. Or you can remove all of the <user>.xml files in the “to” environment; they will be recreated when the user logs in and receives or assigns content. DO NOT DELETE THE default.xml file in LAWDIR/persistdata/lawson/portal/data/users.
Update the <portalrole>.xml files in the “to” environment:
Copy the <portalrole>.xml files from LAWDIR/persistdata/lawson/portal/data/roles directory to the “to” environment. Or you can remove all of the bookmark locks in the “to” environment’s <portalrole>.xml files and reapply the locks later.
Backup and delete existing data in the “to” environment:
Perform the following tasks in the “to” environment, where the bookmark data will be copied to.
Back up and delete the LOBKMARK records (in the LOGAN product line/data area).
Back up and delete the LOGRPBKMRK records (in the LOGAN product line/data area).
Back up and delete the LOUSRBKOPT records (in the LOGAN product line/data area).
Back up and delete the LOUSRBKMRK records (in the LOGAN product line/data area).
Back up and delete the LOBKCONFIG records (in the LOGAN product line/data area).
Back up and delete the SISETUP records (in the LOGAN product line/data area).
Create dump files of the existing data in the “from” environment:
Perform the following tasks in the “from” environment, where the bookmark data will be copied from.
dbdump -d logan lobkmark > lobkmark.dmp
dbdump -d logan lobkconfig > lobkconfig.dmp
dbdump -d logan sisetup > sisetup.dmp
dbdump -d logan logrpbkmrk > logrpbkmrk.dmp
dbdump -d logan lousrbkmrk > lousrbkmrk.dmp
dbdump -d logan lousrbkopt > lousrbkopt.dmp
If the “from” and “to” environments are on separate servers, copy the .dmp files to the “to” server.
Load the data from the dump files in the “to” environment:
Perform the following tasks in the “to” environment, where the bookmark data will be copied to.
dbload logan lobkmark lobkmark.dmp
dbload logan lobkconfig lobkconfig.dmp
dbload logan sisetup sisetup.dmp
dbload logan logrpbkmrk logrpbkmrk.dmp
dbload logan lousrbkmrk lousrbkmrk.dmp
dbload logan lousrbkopt lousrbkopt.dmp
Update the <portalrole>.xml files in the “to” environment:
Reapply bookmark locks if you removed them previously. If you copied the files over, you can skip this step.
Refresh the IOS cache:
Run IOSCacheRefresh (“Refresh IOS Cache” admin task).
Verify bookmark data is not corrupt:
Log into Portal and go to Bookmark Manager (“Manage Bookmarks” admin task). Add a new Top-Level bookmark. Then verify that you can see it at the top of the list of bookmarks in the Bookmark Manager. This is confirmation that the bookmarks are loaded properly and the data is not corrupted. If you don’t see it at all or it was added under another bookmark, then your bookmark data is corrupt and Support should be engaged.
Test the data from a user perspective:
Log into Portal as a user (or have a user test) and verify that the bookmarks in the “to” environment look the same as the “from” environment. If you copied the <user>.xml files over, the user shouldn’t notice any differences.
If you are like me, you find it frustrating that you can only see the scheduled IPA processes that you created. As an administrator, this can make tracking down process triggers quite difficult. It is also difficult to determine which process is triggered by which schedule in the front-end Rich Client. I have created a query that can show all schedules, and which process is triggered by the schedule. Feel free to take this and make it useful to you!
ORACLE
SELECT NAME, SUBSTR(AAR.ACTIONPARAMETERS, INSTR(AAR.ACTIONPARAMETERS, ‘<field name=”FlowName” id=”FlowName”><![CDATA[‘)+46,
INSTR(AAR.ACTIONPARAMETERS, ‘]]>’, INSTR(AAR.ACTIONPARAMETERS, ‘<field name=”FlowName” id=”FlowName”><![CDATA[‘)) –
(INSTR(AAR.ACTIONPARAMETERS, ‘<field name=”FlowName” id=”FlowName”><![CDATA[‘)+46)) FLOW,
SCHEDULEWEEKDAY,SCHEDULEHOUR,SCHEDULEMINUTE,TIMETOEXEC
from LMK_LAWSON.ASYNCACTIONREQUEST ASYNCACTIONREQUEST INNER JOIN
LMK_LAWSON.S$AAR AAR ON AAR.ASYNCACTIONREQUEST = ASYNCACTIONREQUEST.ASYNCACTIONREQUEST
WHERE “GROUP” = ‘pfi’
ORDER BY NAME
SQL SERVER
SELECT NAME, RIGHT(LEFT(AAR.ACTIONPARAMETERS, CHARINDEX(‘]]>’, AAR.ACTIONPARAMETERS, CHARINDEX(‘<field name=”FlowName” id=”FlowName”><![CDATA[‘, AAR.ACTIONPARAMETERS)+46)-1),
CHARINDEX(‘]]>’, AAR.ACTIONPARAMETERS, CHARINDEX(‘<field name=”FlowName” id=”FlowName”><