The “Lawson RQC Requisition user not able to see Service Tab” issue can crop up from time to time for select users, but it is a simple fix (see below).
After verifying the user has adequate access for requisitions and the RQ04 record is created.
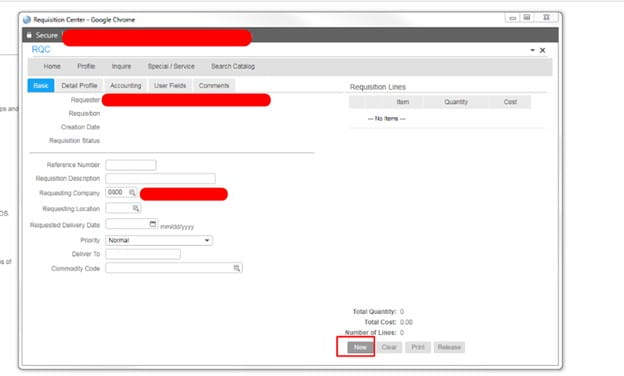
Have the user clear browser cache go to Requisition Center >> Shopping >> and Press NEW.
Have the user logout and back in, check to see if the Service Tab is now there.
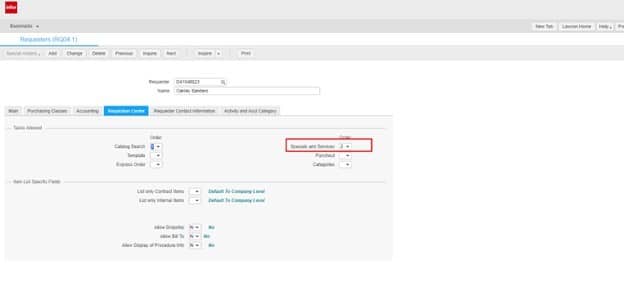
Also, in RQ04, you can set a value for Special/Service Items in one of the tab options to see if that resolves the issue as well.
Good luck!
Problem:
When I try to access or add a rule to a security class in the Lawson Security Administrator (LSA), I get the error message, “Data area has been suspended”. How do I resolve this issue?
Resolution:
This error usually occurs after running dbreorg without stopping your LSF WebSphere Application Server prior to the execution of dbreorg. This is a simple fix.
Basic steps to resolve this issue:

In Lawson, to restore a user’s print files, copy them to their original locations so that they will be visible in the print manager.
The standard locations for print files are:
Example (UNIX):
$LAWDIR/print/UserName/cu201b/1
Example (IBM i)
$LAWDIR/print/UserName/cu201b/1/xxxxxxx
Example (Windows):
%LAWDIR%\print\MYDOMAIN_UserName\cu201b\1
Once the files are copied to the correct directories, load them using loadrpts.
Running the command as follows will load all print files into the print manager for files existing in the standard print directories for all users where the file name in the directory ends with .prt:
loadrpts -s -p productline
To load reports for just one user from the standard print directory for files ending in .prt, use this syntax:
loadrpts -s -u username -p productline
Good luck!
You might be used to copying all Lawson jobs from one user to another when provisioning new users because jobdump and jobload flags can be very confusing in Lawson.
Something like this:
jobdump -d -o Job -v UserName joesmoe jobdump.txt
then
jobload -c -o Job -v UserName <copy userid1> <to userid2> jobdump.txt
What if you only needed specific jobs from a user to copy over?
Lets say we only need to transfer a MA126 job called MA126M:
jobdump -d -o Job -v JobName MA126M -v UserName joesmoe jobdump.txt
Here is a AP155 Job named AP155_P1:
jobdump -d -o Job -v JobName AP155_P1 -v UserName joesmoe jobdump.txt
Remember the dump file will be in the path you’re currently in LID. Good luck!

Problem:
When we try to connect to an SQL database with TLS1.2 on and TLS1.0 off, we get this error:
The test connection operation failed for data source x on server x at node <node> with the following exception:
java.sql.SQLException: The driver could not establish a secure connection to SQL Server by using Secure Sockets Layer (SSL) encryption.
Error: “SQL Server did not return a response. The connection has been closed.
ClientConnectionId:x”.
DSRA0010E: SQL State = 08S01, Error Code = 0. View JVM logs for further details.
Resolution:
TLS 1.2 and SQL Server require a fix from Microsoft to work.
To get the Content Store connection working:
– Ensure that the unrestricted jre policy files are added and in cognos configuration you add the SHA256 ciphersuites.
– Use the latest SQL Server jdbc driver (at least 7.0) for the java version that Cognos uses. You can find the latest SQL Server JDBC driver here: https://docs.microsoft.com/en-us/sql/connect/jdbc/download-microsoft-jdbc-driver-for-sql-server?view=sql-server-ver15
– Edit install_location\bin64\startwlp.bat (Windows) to add the following lines after the line set JVM_ARGS=-Xmx4096m -XX:MaxNewSize=2048m -XX:NewSize=1024m %DEBUG_OPTS%:
set JVM_ARGS=”-Dcom.ibm.jsse2.overrideDefaultTLS=true” %JVM_ARGS%
NOTE: The startwlp.bat file no longer exists in 11.1.5 and higher.
– Edit install_location\bin64\bootstrap_wlp_os_version.xml to add the following lines after the line <param condName=”${java_vendor}” condValue=”IBM”>-Xscmaxaot4m</param>:
<param>”-Dcom.ibm.jsse2.overrideDefaultTLS=true”</param>
– Edit install_location\bin64\cogconfig.bat (Windows) to add the following lines after the line set J_OPTS=%DD_OPTS% %J_OPTS%:
set J_OPTS=”-Dcom.ibm.jsse2.overrideDefaultTLS=true” %J_OPTS%
– If SQL Server has ‘Force Encryption’ set to ‘Yes’ (meaning that it is using an SSL certificate), you will need to import the SQL Server certificate into the Java cacerts keystore for your JRE. For example (using the Cognos JRE):
– Start Cognos Configuration using cogconfig.bat you modified in the previous step. Important: You must start IBM Cognos Configuration using cogconfig.bat
To get the SQL Server Native Client Connection:
Download a version of the Native Client that supports TLS 1.2 as per Microsoft’s KB Article: https://support.microsoft.com/en-ca/help/3135244/tls-1-2-support-for-microsoft-sql-server
To get the JDBC data source connection working:
– Go to Cognos Administration -> Configuration tab -> Dispatchers and Services
– Click on the dispatcher server to drill down to the services
– Beside the QueryService, click the Set Properties button
– Go to the Settings tab
– Add the following the Additional JVM Arguments for the QueryService setting
-Dcom.ibm.jsse2.overrideDefaultTLS=true
– Click OK
– Click on the Status tab
– Select System
– Click on the server to drill down to the services
– Beside QueryService, click the drop down arrow
– Select “Stop immediately”
– Wait 30 seconds for it to fully stop
– Click the drop down again and select “Start immediately”
You can also review the article from IBM:
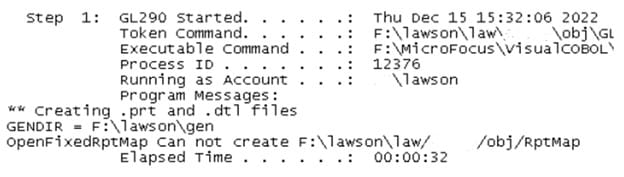
Sometimes when a batch job in GL goes into recovery, you may get the following exception or error on your screen: “OpenFixedRptMap Can not create LAWDIR/pdl/obj/RptMap”. Fear not, this is a quick and easy fix! To get past this screen, you will need to make sure that the batch user has full access to the LAWDIR/pdl/obj directory. This will dismiss the error for the batch recovery. After you confirm the batch user has full access, at this point you can then recover the batch job. You should not get the error again. You can look at the screenshot below for reference.